Posts may contain affiliate links (see Disclosure). Thank you so much for supporting Artsy-Fartsy Mama!
watercolor
Showing posts with label watercolor. Show all posts
Thursday, August 10, 2023

Watercolor Galaxy Bookmarks

Thursday, August 10, 2023

Watercolor Galaxy Bookmarks

Read more »

Paint a set of Watercolor Galaxy Bookmarks that are out of this world!


Watercolor Galaxy Bookmarks

I've been wanting to try some watercolor art, but have been feeling a bit intimidated to paint a larger project. Bookmarks are not only a great way to encourage reading, but they also happen to be a great size for painting! These Watercolor Galaxy Bookmarks are a lot of fun to make, and are such a simple watercolor project for beginners. Hand painted bookmarks would also be a creative gift to share with a fellow reader!
Tuesday, June 14, 2022

Resin Alcohol Ink Paint Water Dish

Tuesday, June 14, 2022

Resin Alcohol Ink Paint Water Dish

Read more »
Create a gorgeous paint water dish using resin and colorful drops of alcohol ink!

Resin Alcohol Ink Paint Water Dish

My daughter and I love watercoloring together to help relieve stress and to get out some creative energy. To save our drinking cups and collection of paper cups, I decided to make an awesome little paint water dish using resin and colorful alcohol inks. The mold I used for this dish is actually an ashtray, but it works great for a water dish to use for painting, or could also be used as a trinket dish. Either way, this is a fun project for any level of resin crafter!

New to resin? Be sure to check out Resin 101: Getting Started with Resin!
Wednesday, March 13, 2019

DIY Watercolor Journal

Wednesday, March 13, 2019

DIY Watercolor Journal

Read more »
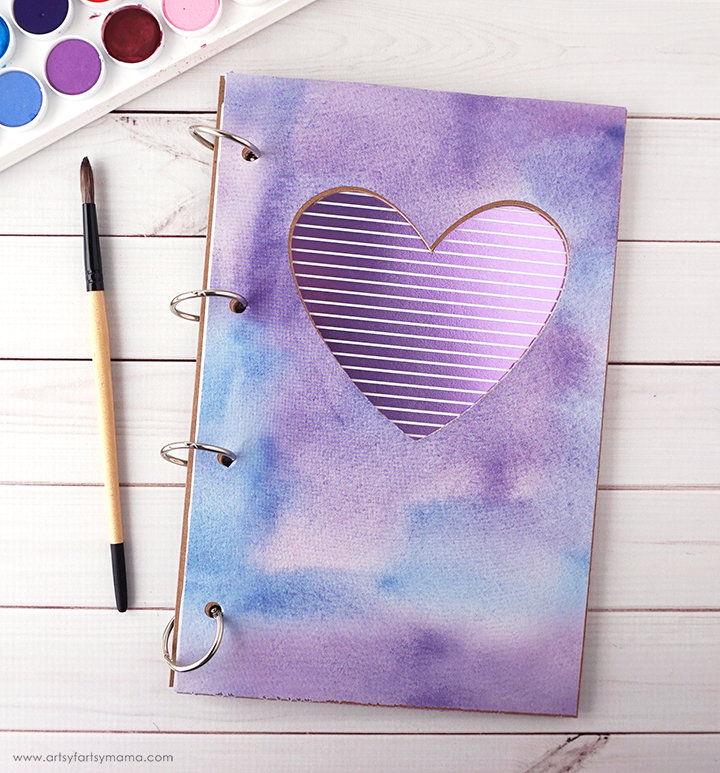
Do a bit of sketching or painting every day with this DIY Watercolor Journal made with the Cricut!

DIY Watercolor Journal

I have always been an "artsy-fartsy" person. Doodling, sketching, and painting with watercolors were one of my favorite things to do, and I kind of pushed it aside as I got older. I recently took a watercoloring class, and I kind of fell in love with painting again. To keep all of my new artwork in one place, I decided to make my own DIY Watercolor Journal using my Cricut.
Sunday, June 4, 2017

Easily Blend Colored Pencils with Baby Oil

Sunday, June 4, 2017

Easily Blend Colored Pencils with Baby Oil

Read more »
I have been compensated by Johnson's® Baby for this post; however, I am sharing my own thoughts. All opinions are my own.

Easily Blend Colored Pencils with Baby Oil to take your coloring to the next level! #JohnsonsBeautyHack

I have always enjoyed coloring and creating with colored pencils. It wasn't until recently that I discovered a new technique of using baby oil to take my coloring to a whole new level! In fact, I am kind of obsessing over it and have been SO excited to share this awesome hack with all of you. So without further ado, here is how you can easily blend colored pencils with baby oil!

Easily Blend Colored Pencils with Baby Oil to take your coloring to the next level! #JohnsonsBeautyHack

Besides your image to color, you will also need a few other supplies. First, you will need some colored pencils. My favorite brand is Prismacolor because of the quality and vibrant colors. However, you can use any brand of colored pencils with this trick.

You'll also need some baby oil. I grabbed some Johnson's® Baby Oil at Walmart in the baby products aisle right next to the baby wash and body lotion.

Last, but not least, you'll need some precision tip cotton swabs. They are perfect for blending your colored pencil projects because the pointed end is shaped just like your pencils. You can also find these at Walmart in the beauty aisle or near the regular cotton swabs.

Easily Blend Colored Pencils with Baby Oil to take your coloring to the next level! #JohnsonsBeautyHack

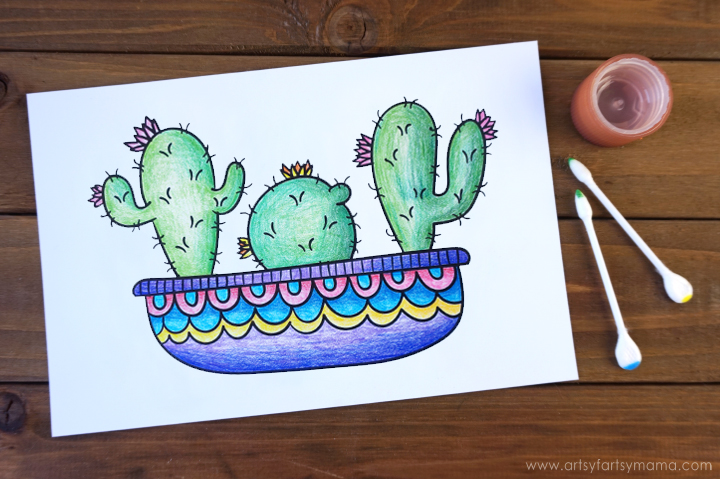
Download and print the cactus printable at the end of the post. You will need to print on a laser printer for the baby oil hack to work. Using a print from an inkjet printer or water soluble ink will bleed and ruin your project. You will also need a high quality cardstock for best results. Paper texture will also make a difference. A smooth paper will result in smooth color, while a rougher surface will show lots of texture.

Now that your image is printed, you can use any technique you want to color your picture: color lightly or press harder for a more saturated color, stipple (dotting), crosshatch, or just scribble to your heart's content. Like any skill, the more you practice with colored pencils, the better you'll get.

Coloring lighter to darker and layering colors will also give the illusion of shadows and depth. I used 3-4 shades of green on each cactus, but in different orders and areas to get a slightly different look on each one.

Easily Blend Colored Pencils with Baby Oil to take your coloring to the next level! #JohnsonsBeautyHack

Once the picture is colored, it's time to get blending! Grab some cotton swabs and pour a small amount of baby oil into the cap or a small container. You may also want to keep a paper towel on hand.

Easily Blend Colored Pencils with Baby Oil to take your coloring to the next level! #JohnsonsBeautyHack

Dip the tip of the cotton swab into the baby oil. Start with the tiniest amount, because a little goes a long way. Blot on the paper towel if you pick up too much. The trick is to use just a little bit of oil, otherwise it can leak through the paper and cause it to rip.

Hold the cotton swab like a pencil, and rub it on the colored area with the same amount of pressure that you use to color. The colored pencil strokes will immediately begin to smooth out and blend together like magic!

My best tip is to work slowly and start small with the oil. You can always add more. You can re-dip the colored cotton swab into the oil if you need to "reload". You'll notice you need more oil when the colored pencil isn't blending as easily.

Easily Blend Colored Pencils with Baby Oil to take your coloring to the next level! #JohnsonsBeautyHack

To show you the difference the oil makes, I only blended half of this cactus. The left side is smooth and vibrant, with an almost watercolor-like look. The right side is the unblended colored pencil with 3-4 different colors.

Use a different cotton swab for each color so you don't accidentally blend them together. By using a small amount of oil, I didn't have any problem with oil leaking through the paper. If you happen to over-do it on the oil, don't panic. You can sandwich your image with paper towel and a heavy book on top overnight and it should absorb some of the extra oil from your paper.

The image dries almost immediately, and you can frame it that day! Pour the extra baby oil back into the container to use again next time.

Easily Blend Colored Pencils with Baby Oil to take your coloring to the next level! #JohnsonsBeautyHack

I think I may have a new obsession with this colored pencil and baby oil technique! I just love the way it looks, and it's so unbelievably simple!!

You can print out this image, along with one other cactus image to color and frame in your own home. I have also included both images on one sheet in smaller sizes for you to practice on if you'd like to.

Some things you should know before downloading:
*Artsy-Fartsy Mama printables are for PERSONAL USE ONLY.
*You may NOT modify, re-sell, redistribute, or claim the design as your own.
*Please do not remove the credits/watermarks.
*If you'd like to share this project, credit must be given to Artsy-Fartsy Mama & linked back to this post.

Go grab some Johnson's® Baby Oil and try it out. You're going to love it! While you're at it, check out these other Johnson's® Baby Hacks for more creative ideas!

If someone is reporting an adverse event or a product quality complaint, please tell them to call the Johnson & Johnson (J&J) North America Consumer Care Center at 800-361-8068 during normal business hours of operation: Monday through Friday, 8 a.m. to 8 p.m. ET. After normal business hours, they can report adverse events or product quality complaints through www.jnj.com Contact Us page.

Tuesday, June 16, 2015

Foil Watercolor Gift Tags

Tuesday, June 16, 2015

Foil Watercolor Gift Tags

Read more »
I received product in exchange for this post. All opinions shared are 100% my own.


Free Printable Foil Watercolor Gift Tags at artsyfartsymama.com

I've always loved watercoloring, and pairing that look with foils is simply gorgeous. With the Minc machine, some free printables and watercolors, you can create some uniquely stunning foil watercolor gift tags and artwork in just minutes!!

Free Printable Foil Watercolor Gift Tags at artsyfartsymama.com

Start by printing out the "You Are My Sunshine" gift tags on heavy cardstock or watercolor paper with at little texture as possible. Cut the gift tags out and grab some watercolors. Any kind of watercolors will do!! You'll also need a paint brush and a small cup of water.

Free Printable Foil Watercolor Gift Tags at artsyfartsymama.com

For best results painting on cardstock, wet the watercolors, then paint on the dry paper. Get creative! Paint in any colors, make messy or clean paint strokes, and paint a section of the tag, or the entire thing!

**Very important: let the paper dry completely before adding foil in the next step! When the tags have dried, take a damp cloth or paper towel and wipe the front of the tags. This will help remove some of the paint off the printed text.

Foil Gift Tags in a snap at artsyfartsymama.com #HSMinc #foilallthethings

There are tons of ways to foil projects, but none are as easy and quick as using the Minc, especially for this project!! The Minc is an incredible crafting tool that turns laser printed items (both pre-made or your own custom designs) into a beautifully foiled creation in just seconds. You can see more in my previous post introducing the Minc and showing what it can do!

Turn on the Minc machine and set the heat setting to 3. The Minc foils come in a variety of colors, so it's fun to be able to coordinate them with the watercolor colors I used on the tags. Cut the foils with sharp scissors to cover the wording on the gift tags.

Open the carrier sheet and place the painted gift tags face up. Carefully lay the foil pieces over the tags (color side up) and lightly press down and make sure none of the text is uncovered. Carefully lay the top of the carrier sheet down over your project and smooth it out with your hand.

Tip: Sometimes static on the carrier sheet can cause the foil to shift, so just work slowly and try to keep everything in place as best you can.

Free Printable Foil Watercolor Gift Tags at artsyfartsymama.com

Run the carrier sheet through the Minc, then remove the tags and foil. Peel up the foil, and voila! Foiled, watercolored tags in just minutes!!

**The reason you need to find a watercolor paper with little to no texture is because the foil won't stick properly on textured paper. The smoother the paper, the better.

Free Printable Foil Watercolor Gift Tags at artsyfartsymama.com

To finish turning the tags into usable tags, simply use a standard hole punch to punch a hole in the center of the beveled side of the tag.

Free Printable Foil Watercolor Gift Tags at artsyfartsymama.com

Use some baker's twine, ribbon, or jute and thread it through the hole in the tag so you can easily attach it to any gift or package.

Free Printable Foil Watercolor Gift Tags at artsyfartsymama.com

I love the unique look these tags give to any gift, and will really "brighten" someone's day! Even though I don't have a lot of gifts to give out right now, I just can't stop making these tags because it's so easy and fun!!


Make your own Foil Watercolor "You Are My Sunshine" Print at artsyfartsymama.com

I've also made the "You Are My Sunshine" into a printable 8x10 for you to frame and put on display! Print it out on cardstock or untextured watercolor paper, then paint to your heart's content. Let it dry, then run it through the Minc the same way as the gift tags.

Make your own Foil Watercolor "You Are My Sunshine" Print at artsyfartsymama.com

Peel the foil, and place your print in a frame or hang on a clipboard. It really adds some color and shine to your space and it's fun to create custom decor for your home!


If you want to make your own foil creations, the Minc starter kit and accessories are available at Hobby Lobby and Jo-Ann, as well as local stores and online shops.