Store your favorite school supplies in a handmade No-Sew Felt Taco Pouch!
There are so many creative things you can make using felt, and it's always a lot of fun! Using my latest pattern, kids of all ages can make their very own Felt Taco Pouch! While this is a simple no-sew project, it can also be assembled using embroidery floss if you'd like. This adorable pouch is a fantastic pen or pencil pouch to take to school, or to keep your money safe when used as a wallet.
Get inspired to create with felt using OVER 100+ Creative Felt Craft ideas!
I love creating projects using felt! It's such a fun and colorful material that can be used for so many different kinds of projects. To help get you inspired to get creative, I've compiled a fantastic list of OVER 100 creative felt crafts including handmade plushies, kids crafts, home decor, Christmas ornaments, and more! There is definitely something for everyone in this list, and I'd love to hear what your favorite ones are.
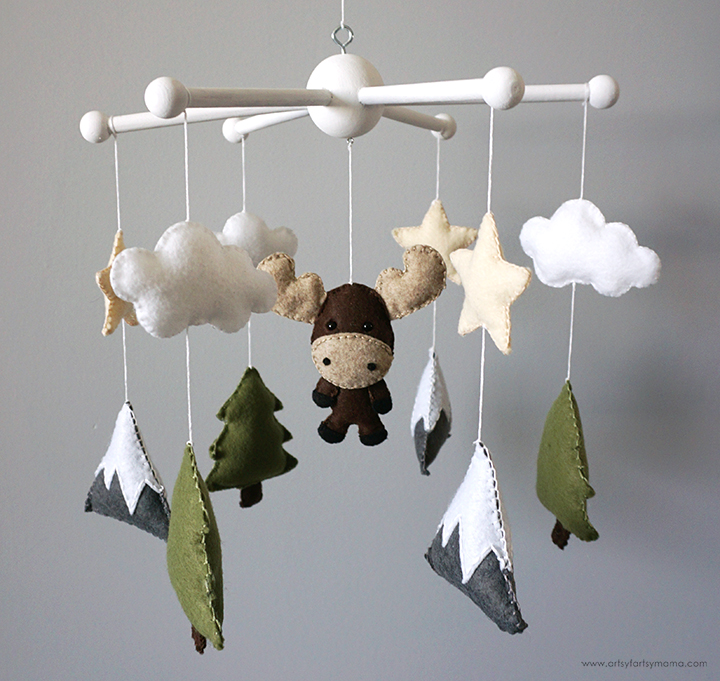
Use felt to make an adorable Woodland Baby Mobile to hang in your nursery!
Making things for a new baby is so much fun! This Woodland Baby Mobile was made using felt for my baby nephew, and I am so excited about how it turned out. I'm new to making mobiles, so this was a new challenge for me. Even though it was actually very simple to make, it did take a bit of time to stitch everything together. If you've got a new baby in your life or have one on the way, I would definitely recommend giving this project a try!
Have a barnyard of fun with a handmade set of felt Farm Finger Puppets!
I am so excited to have a new little nephew, and I couldn't wait to make him a little gift. I've made a lot of projects using felt, but this set of Farm Finger Puppets was a new one for me! I had a lot of fun putting this set together, and it turns out that it was a lot easier than I thought it would be. Kids of all ages are going to love these little puppets, and I'm sure they are going to have hours of fun playing with them.
Make your holiday gifts extra special by packaging them in a handmade Felt Santa Claus (or elf) Gift Bag!
I'm always looking for creative ways to package holiday gifts, and this one couldn't be easier! Made of felt, these Santa Claus and Elf Gift Bags are a fun way to add a handmade touch to gifts for neighbors and co-workers. These bags are a simple no-sew project, but can also be assembled using embroidery floss - lucky for you, I'm going to show you how to do BOTH! No matter how you make one, I just hope you get inspired to try making one for yourself.
Decorate your Christmas tree with adorable handmade Felt Gingerbread Star Cookie Ornaments!
Have you put up your Christmas tree yet? Mine is going up soon, and I can't wait! Creating handmade felt ornaments is such a great holiday project that crafters of any skill level can do with confidence. These Felt Gingerbread Star Cookie Ornaments are not only adorable, but they are such a fun and easy craft to add some "sweet" holiday spirit to your home. To help you get started, I'm sharing a FREE pattern for you to make your own set of Felt Gingerbread Star Cookie Ornaments!
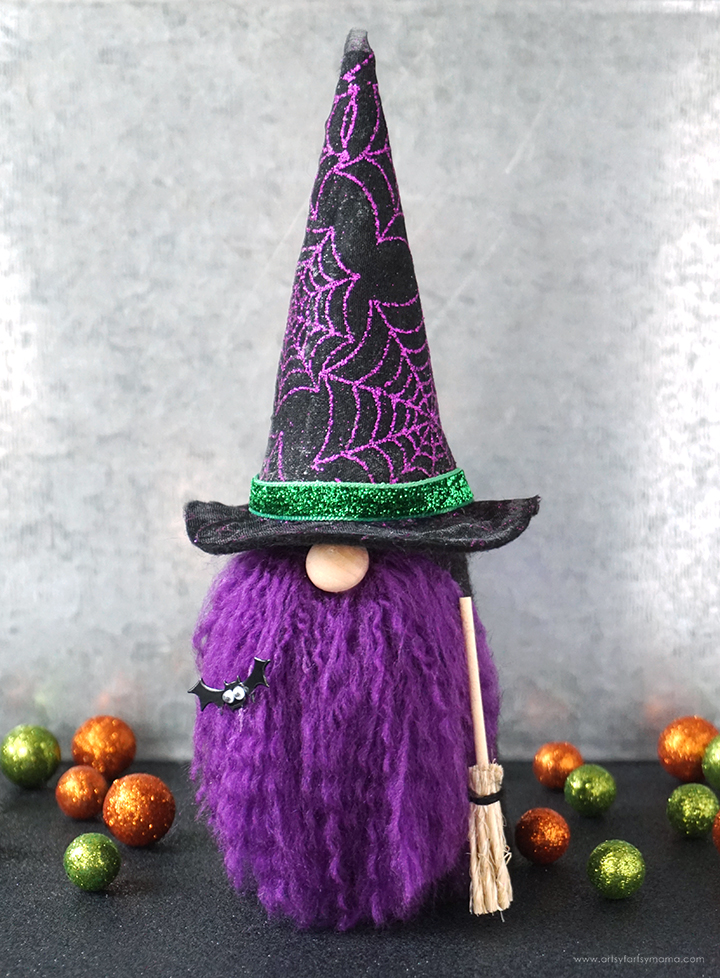
Create an adorably wicked Witch-themed Gnome to adorn your home for Halloween!
Spooky season is upon us, and I could NOT be more thrilled about it. Halloween is one of my favorite holidays, and I especially love crafting for it! I'm adoring the gnome craze right now, and wanted to make a spooky version to add to my Halloween decor. If you're looking for something to make for a "ghouls" crafternoon, this DIY Witch Gnome is so fun and easy to make!! I just love how it turned out, and hope you are inspired to give it a try for yourself!
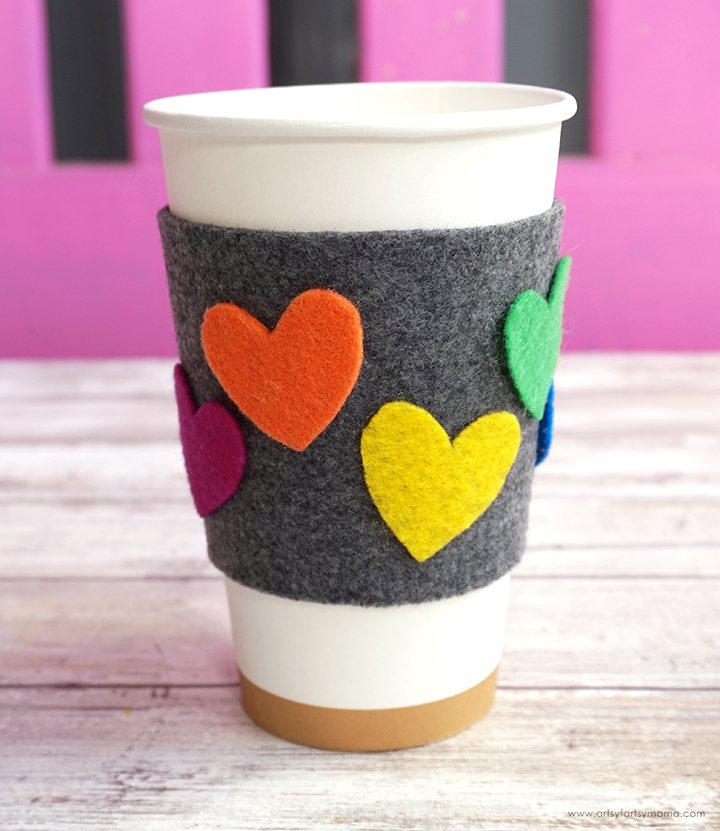
Dress up your favorite drink with a handmade No-Sew Felt Cup Cozy!
I love a good no-sew project, and this No-Sew Felt Cup Cozy couldn't be easier! All you need is my FREE cup cozy pattern and some colorful felt to dress up your favorite hot (or cold) drinks to keep your hands at a lovely room temperature. Having your own colorful cozy a fun way to start the day, but don't you think it would be awesome to make one as a sweet handmade gift to share with someone else to make their day a little brighter?
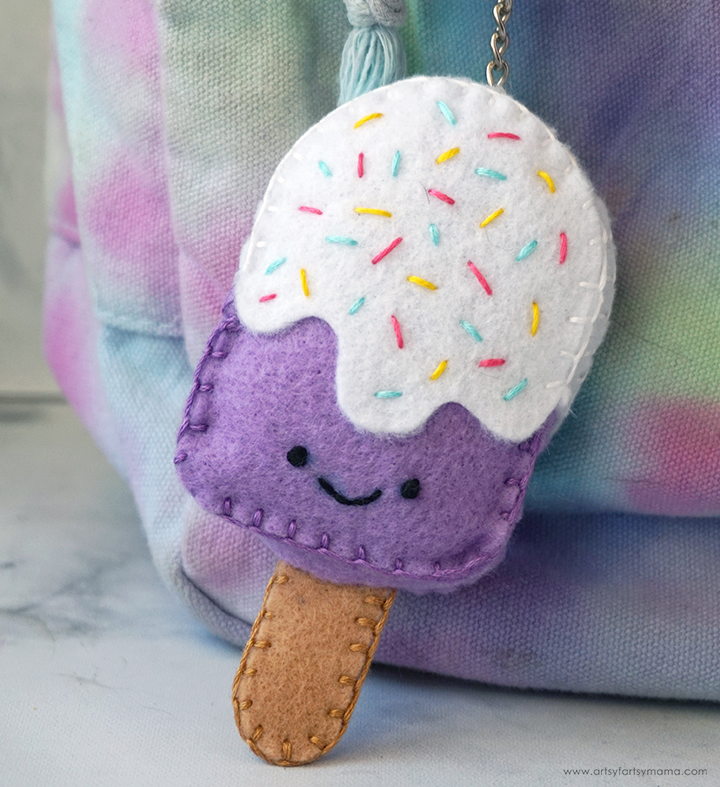
Use felt to make your own squishable Popsicle Keychain!
What better way to cool off this summer than with a popsicle... a felt popsicle, that is! This Felt Popsicle Keychain is such a fun summer craft that is easy for anyone to make in any color of felt you want! I kind of want a collection of plush popsicles in ALL the colors, personally.... Anyway, in just 30 minutes or so, you can create your own felt plush popsicle keychain using my free printable pattern. I hope you have a great time making this project!
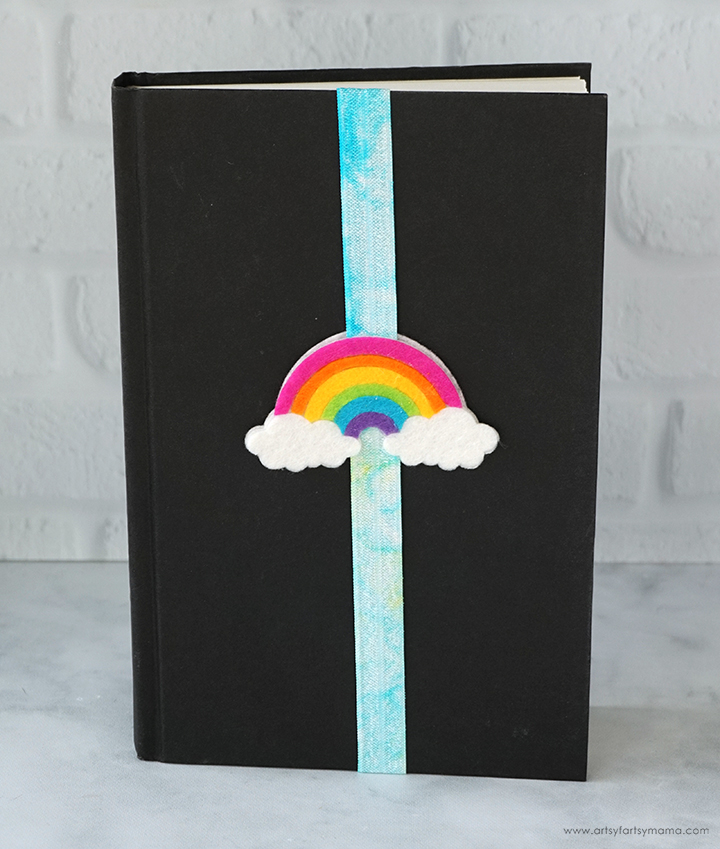
Add a pop of color to your favorite books with a handmade Felt Rainbow Bookmark (and Free Cut File)!
My daughter is the biggest bookworm I know, and I love coming up with different bookmarks for her to use. She's been traveling with her books a lot lately, so I wanted to make something that was a little more sturdy than traditional paper bookmarks, and less likely to get lost. This no-sew felt rainbow bookmark is not only colorful, but it's an easy project for both kids AND teens make on their own! The addition of the elastic to the bookmark will keep it easy to save your place, and won't fall out when books are moved around.
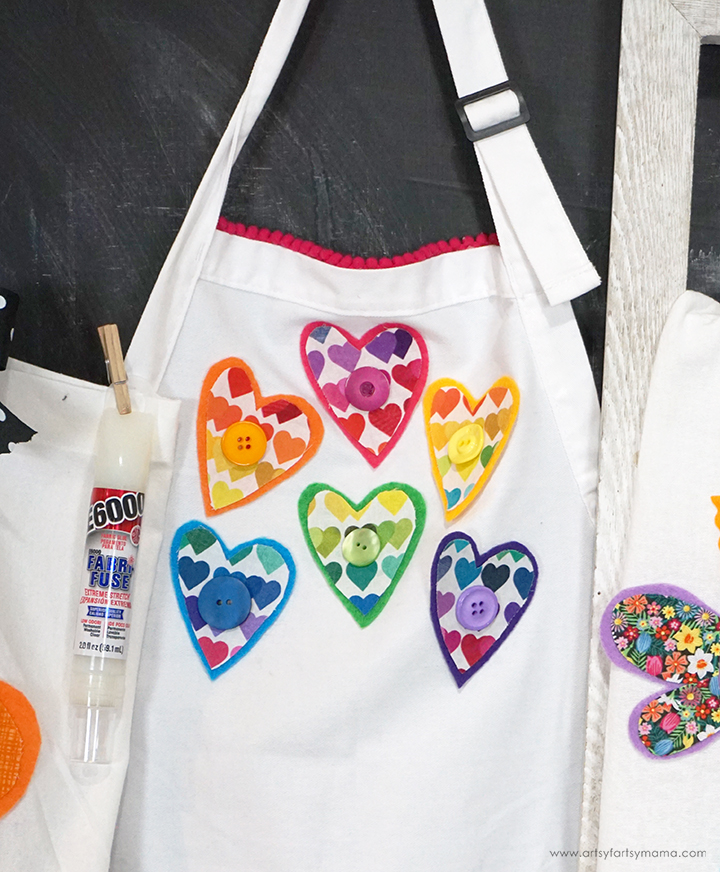
Customize a plain apron with a no-sew set of rainbow hearts!
Don't you just love no-sew projects? I sure do! Using glue, a simple apron base, colorful fabric and felt, you can create a no-sew piece of fashion to wear in the craft room or in the kitchen. It really is that simple, and I'm even sharing a FREE template for you to use to make it even easier. So what are you waiting for? This is such a quick and easy project for crafters of all ages and skill levels!
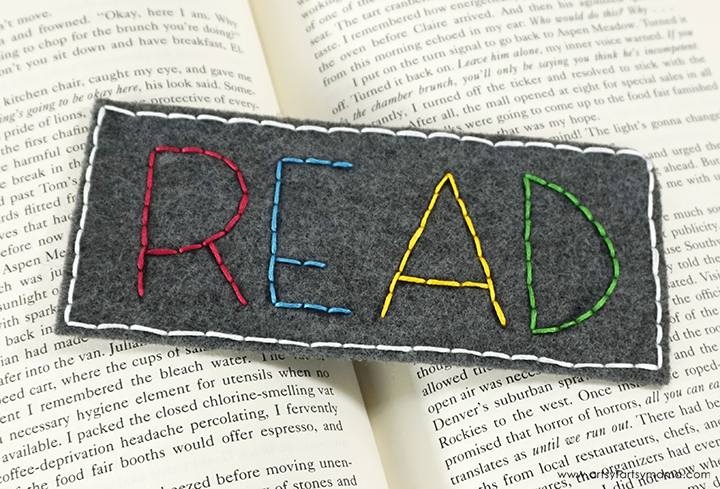
Save a spot in your favorite book with a Hand-Embroidered Felt Bookmark!
For me, there's no such thing as too many bookmarks. I love having a collection of them on-hand whenever I'm reading, and love finding new ones to share with my book loving daughter. As a fun fabric-scrap project, I decided to give an old piece of felt new life with a bit of embroidery floss. This is a good project for teens and embroidery beginners to try, because you can practice so many types of stitches on it. It's the perfect size to save a spot in your favorite book, and would be a thoughtful handmade gift for your reader friends.
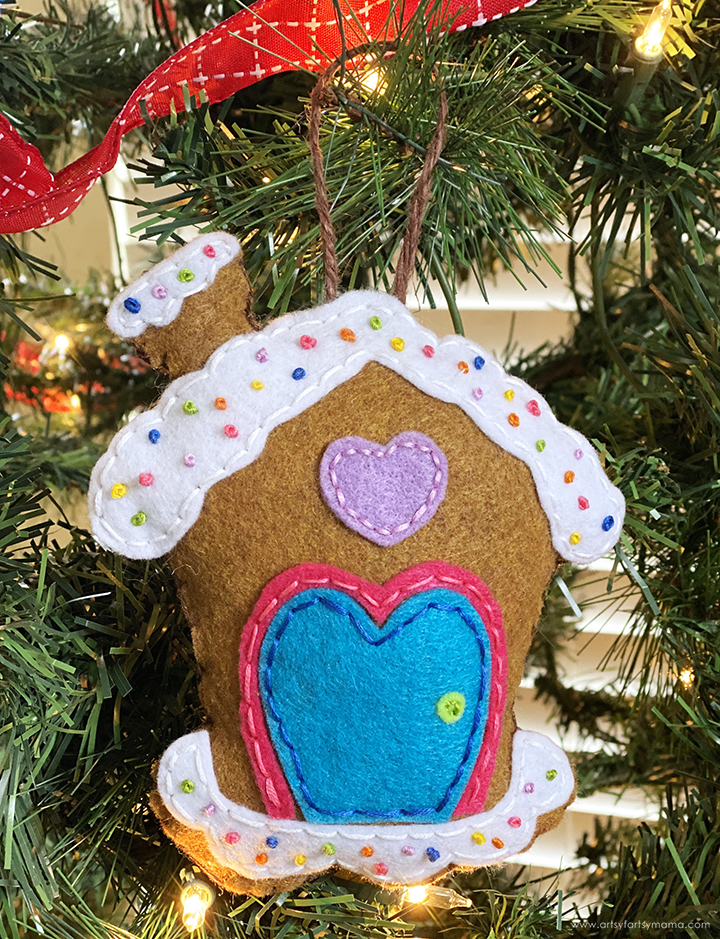
Create an adorably sweet Felt Gingerbread House Ornament for the holidays!
I'm so excited to share a festive handmade Gingerbread House Ornament I made using Anchor Spooled Embroidery Floss! It is such a fun holiday craft that even beginners would love trying. To make your life a little easier, I'm even sharing a free printable and SVG pattern for you to use to make your own set of Felt Gingerbread House Ornaments!
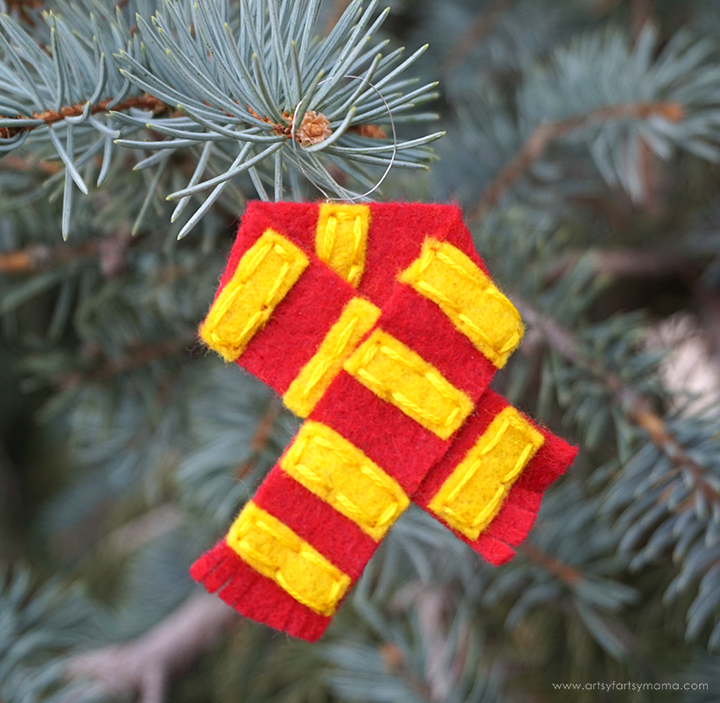
Create handmade Hogwarts House Scarf Ornaments to hang on your Christmas tree!
I'm currently giving my Christmas tree a magical makeover to a Harry Potter theme, and I couldn't be more excited about it! I was recently in Florida visiting the Wizarding World of Harry Potter, and was so inspired that we decided to do some crafting in the hotel room. These Hogwarts House Scarf Ornaments are such a simple craft and are a fun way to add some House pride to your decor.
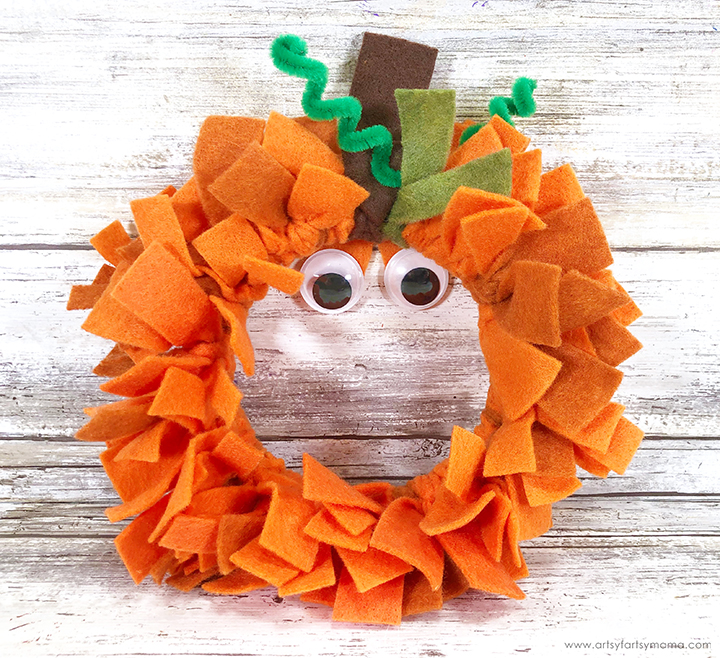
Tie leftover scraps of felt onto an embroidery hoop for a fun and fringy wreath that is perfect for Halloween!
Halloween crafts are so much fun, and even more-so if they are simple! This adorable Jack-O-Lantern Wreath is made using scraps of felt, and comes together so quickly. This wreath works as festive home decor, and would also be a cute to pair with a treat to share as a Halloween gift for neighbors, friends, or teachers!
I'm so excited to show you guys the shirt I just finished for my daughter to wear on Thanksgiving!
I've never done an applique {gasp!} and it was much easier than I expected. So, if you're a beginner and have wanted to try it, DO IT! It's so fun. For those of you who are pros at this and are laughing at my excitement over something so simple, try not to judge too much!
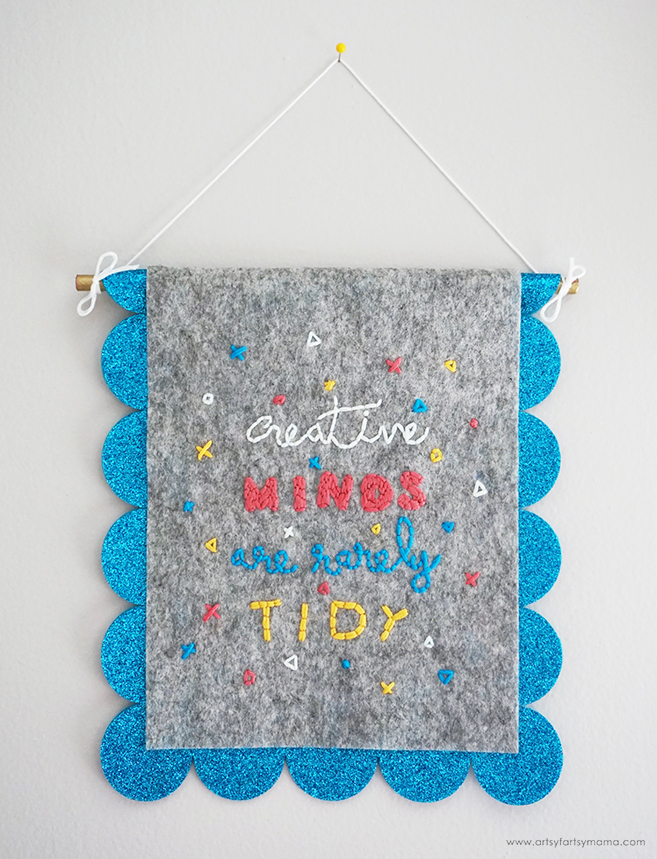
Make a DIY Embroidery Wall Hanging for your workspace using the Cricut!
I am slowly getting my craft room under control, and I wanted to create some decor to hang on the wall. This DIY Embroidery Wall Hanging is such a fun project, made easier using the Cricut Maker machine! This is something anyone can make to add a splash of color and personality to their workspace or craft room.
This post is sponsored in partnership with Paramount Pictures. As always, all opinions are my own.
When my daughter first got interested in acting, she learned all about the Shakespeare classics. One of her favorite plays was Romeo and Juliet and loves the movie Gnomeo & Juliet. It is now one of our favorite movies that we watch together as a family. A sequel to Gnomeo & Juliet has been announced, and we can't wait! Sherlock Gnomes is sure to be another family favorite, and it's in theaters March 23rd.
To celebrate our excitement for the movie, I wanted to make some handmade wooden peg dolls inspired by the Sherlock Gnomes characters. While it can take some time and effort, peg dolls are one of my favorite things to make. When I see how my daughter loves playing with every set I've made over the years, it makes every moment of work worth it.
After a string of garden gnome disappearances in London, Gnomeo & Juliet look to legendary detective Sherlock Gnomes to solve the case of their missing friends and family. This action-packed sequel to Gnomeo & Juliet features the voices of returning cast James McAvoy, Emily Blunt, Michael Caine, Maggie Smith, Stephen Merchant and Ozzy Osbourne, plus Johnny Depp as Sherlock Gnomes, Chiwetel Ejiofor as Watson, and Mary J. Blige as Irene.
To make your own set of Sherlock Gnomes Peg Dolls, you'll need to start with these supplies:
• Wooden peg dolls: 4 large, 3 medium, 3 small
• Wooden box with hinges - mine measures about 6x4x2
Have some images of the characters you want to make on hand to refer to. Since the dolls are so small, I simplify the characters by taking out the smaller details (nose, mouth, etc), but keep the main details (clothing, hair color, etc). Use a sharp pencil (I prefer a mechanical pencil) and lightly draw the simplified characters on the wooden peg dolls.
After everything has been drawn onto the peg dolls, the next step is to paint them. When it comes to paint, I recommend using Americana acrylic paints. Good quality acrylic paints like these will have brighter colors, and you'll only need 1 or 2 coats, which matters when you're working on a project like this. You'll also need a few small paint brushes in different sizes and styles to paint details on the peg dolls.
Getting started is the hardest part of making peg dolls. To make it a little easier, I choose one color and paint all of the parts on different dolls. This will also save you on time since you won't need to wash your brushes in between and get the paint out again later!
A few tips:
* If the color seems a little dull or you can see the wood grain through it, add another coat. Just make sure that the first coat of paint is dry before you add another.
* For the eyes, dip the non-brush end of a small brush into some paint and dab once or twice on a piece of scrap paper. Then carefully dab the brush on the eye pencil marks on the peg doll.
* You can use a thin Sharpie marker to add on thin details that a brush wouldn't be able to do (glasses, eyebrows, clothing details).
* After you're done painting, use an eraser over the peg dolls to remove any pencil left behind.
After all of the dolls have been painted, spray a coat of clear spray paint over the peg dolls to give them a glossy finish and to protect the paint. I painted a few coats - but make sure each coat is completely dry before adding another.
While going through my stash, I found some small wooden knobs. I painted the tops red and blue, the bottoms white and added spots to make them look like mushrooms. Gnomes and mushrooms are perfect together! Be sure to paint a coat or two of glossy spray paint over the mushrooms as well.
In the movie, Watson wears a bowler hat. I painted a small wooden cap to match his hat brim and suit. I finished it off with spray paint, then glued it to the top of his head with a strong craft glue.
The hats for the gnomes are a little more complex, so I decided to mold them by hand with clay. These were both a success and a fail, and I'll tell you why...
I used a polymer clay that was the perfect red color to match the gnomes. After warming a small ball of clay in my hands, I was able to mold the clay to the shape I wanted and they fit the gnomes perfectly. This is the success!!
A thing to know about polymer clay is that it has to be baked to permanently set the shape. I thought that since the peg dolls had a glossy finish, that the clay would come right off. Not so much. I carefully used a fingernail to loosen the hats around the heads and I completely ruined one of them. I remade the hat and put the peg dolls in the freezer for about 30 minutes. This stiffened the clay and made it a little easier to work with, but they put up a fight. I was finally able to remove the hats after using a fingernail and slowly working them off. I baked them according to package directions, and everything turned out okay in the end.
What I would have done different is tried an air dry clay instead. That way, I could have made the hats and let the clay set on the peg dolls. Then you can just paint them and be done! I'll try it next time and keep you updated.
After being baked, I let the clay hats cool completely. I added a drop of strong craft glue to the inside of the hats and attached them to each of the peg dolls. I repeated the same process for the characters with blue hats.
After the glue dried, I sprayed one last coat of clear spray paint to the hats to give them a glossy finish. The final step is to line up all the peg dolls and admire your work. They make me smile every time I look at them!
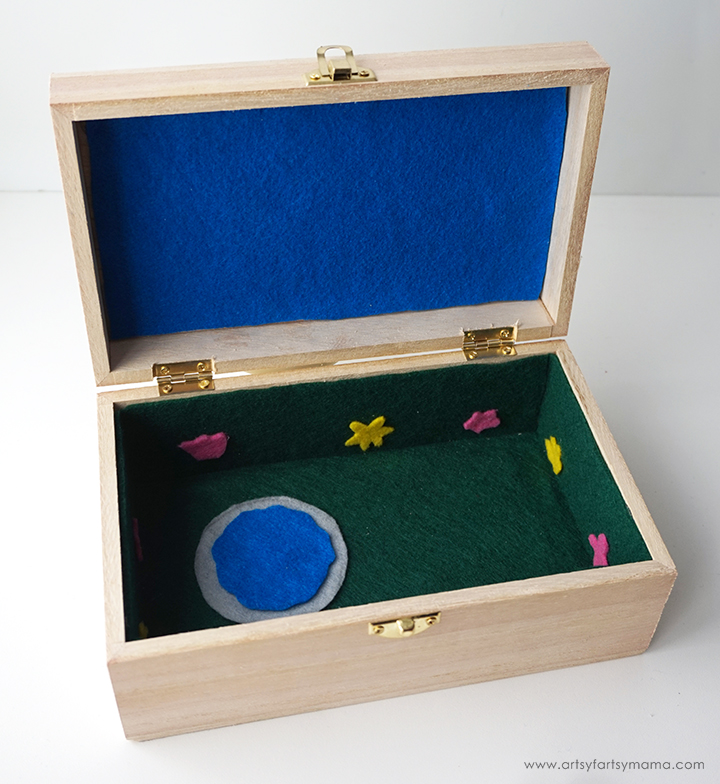
The wooden box will serve a few purposes - it's a great way to keep your peg dolls in one place and stay in great condition. It's also going to be a fun play space for the peg dolls!
Measure the inside of the box and cut a piece of green felt to fit. Use a glue gun to attach the felt to the bottom. Cut more green pieces of felt to cover the other four sides of the box and attach them with glue.
I wanted to make the box look like the gnome garden, so I cut out some little flowers and a cute pond out of felt. I also cut a rectangle of blue felt to add to the top of the box for the sky. Get creative and add as much or as little as you want!
You can also paint the outside of the box to look however you want. My daughter wanted to keep the wood look, so we just painted a thin coat of sealant on the outside to keep it looking nice.
Now that the box is complete, it's time to play! Take the gnomes in and out of the box to re-enact scenes from the movie - like this one from the trailer where one of the goons gets stepped on in the garden!
After the kids are done playing, lay all of the peg dolls inside the box. The felt will keep them from getting scratched up, and you can easily find all of the dolls again the next time you want to play.
This project has made us even more excited to see Sherlock Gnomes on March 23rd. Until then, we are going to be having a ton of adventures of our own, and probably re-enacting some of the scenes from Gnomeo & Juliet!
For all of the Sherlock Gnomes news and fun, visit the Official Website, Like on Facebook, and follow on Twitter and Instagram. You can also share and follow along with #SherlockGnomes!
Transform into the cutest pet in town with these easy-to-make DIY Dog Costume Accessories!
My daughter has been taking an acting class, and they put together a play to perform for the parents to show what they've been learning. As most kids do, she let me know a few days before the big night that she needed a dog costume to wear in the play! After a moment of panic, we put our heads together to come up with a simple costume that she could wear. Whether you're just playing dress-up or need to complete a costume, these DIY Dog Costume Accessories are easy and fun to make!
The 4th of July is on its way, which means lots of bright red, white, and blue decor, fireworks, and a full day of celebrating our country. To get my daughter all ready for the big day, I've teamed up with Fizzy Pops to create some unique accessories to wear in celebration of our country's birthday.
Here at Artsy-Fartsy Mama, you'll find a little bit of everything: crafts (even ones for the kids), FREE printables and SVG cut files, easy recipes, educational ideas, travel tips, sewing tutorials, and so much more to add creativity to your life!
Join Our Newsletter!
Let's be friends! Get the latest DIY ideas, recipes and freebies delivered straight to your inbox!