Posts may contain affiliate links (see Disclosure). Thank you so much for supporting Artsy-Fartsy Mama!
costume
Showing posts with label costume. Show all posts
Friday, October 15, 2021

DIY Bat Costume Accessories

Friday, October 15, 2021

DIY Bat Costume Accessories

Read more »
These easy DIY Bat Costume Accessories can be made in minutes for a simple, last-minute Halloween costume idea!

DIY Bat Costume Accessories

There's always a need for a last-minute costumes, especially around Halloween. To help you in your time of panic, I've put together a little set of Bat Costume Accessories that can be cut by hand or with your Cricut! The matching bat bow and mask are so simple to make using Oly*Fun, but will look like you spent all day making them. Talk about trick AND treat!!
Tuesday, August 10, 2021

DIY Dragon Hoodie Costume

Tuesday, August 10, 2021

DIY Dragon Hoodie Costume

Read more »
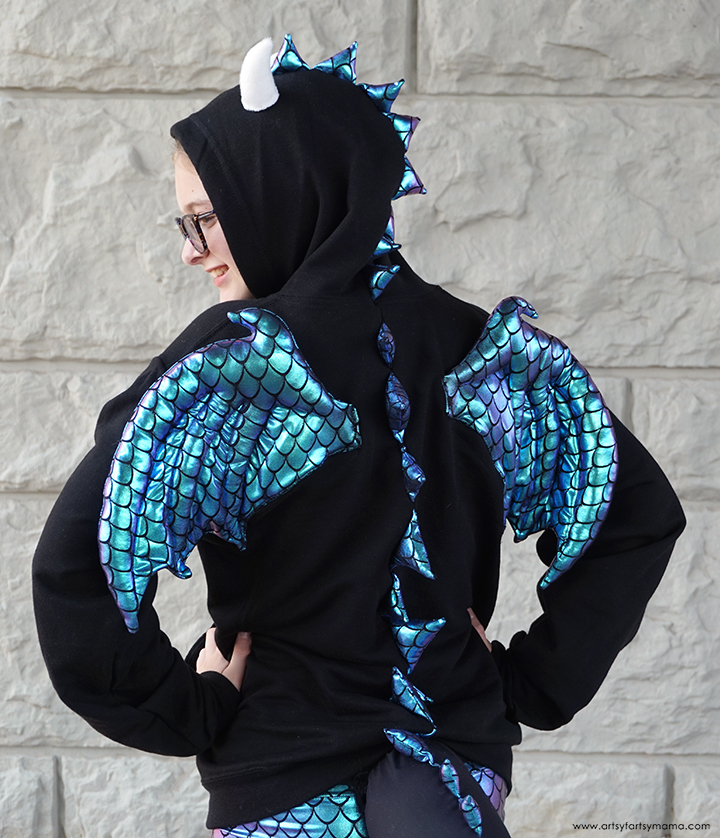
Have an adventure this Halloween with your own Dragon Hoodie Costume!

DIY Dragon Hoodie Costume

One of my favorite things about Halloween season is deciding what kind of Halloween costume to make for my daughter every year. I've been making her costumes since she was a baby, and I'm so excited to share what we've decided on for this year. With a little help from Fairfield World, we were able to put this Dragon Hoodie Costume together, and I couldn't be more thrilled with it. Not only is it an eye-catching costume, but it's also comfortable (which is important) and the main outfit can be worn again after Halloween!
Saturday, October 10, 2020

DIY Star Butterfly Costume

Saturday, October 10, 2020

DIY Star Butterfly Costume

Read more »
Make your own Star Butterfly Costume (inspired by Star vs. the Forces of Evil) to wear for Halloween or cosplay!

DIY Star Butterfly Costume

For Halloween this year, my daughter asked me to help her put a Star Butterfly costume together inspired by Disney XD's Star vs. the Forces of Evil. We both love the show, and I always have a great time making her costumes, so of course I was up for the challenge! I was able to DIY everything for this costume, and have been so excited to share it with you. If you're a fellow Star fan, this costume is perfect for Halloween and cosplay! 
Friday, October 9, 2020

DIY Star Butterfly Boots

Friday, October 9, 2020

DIY Star Butterfly Boots

Read more »
Create your own pair of Star Butterfly Boots to complete a Star vs. the Forces of Evil costume!

DIY Star Butterfly Boots

Have you ever watched Star vs. the Forces of Evil? My daughter absolutely loves it, and plans on dressing up like the main character, Star Butterfly, for Halloween this year. Before I show you the complete Star Butterfly costume, I wanted to share how to make some of the parts of the ensemble so that the costume post isn't too long. I'm so excited with how our Star Butterfly boots turned out and to share how you can make your own if you want to dress up like her, too!
Monday, October 5, 2020

DIY Star Butterfly Wand

Monday, October 5, 2020

DIY Star Butterfly Wand

Read more »

Every Star vs. The Forces of Evil superfan needs a DIY Star Butterfly Wand!


DIY Star Butterfly Wand

One of my daughter's favorite shows is Disney XD's Star vs. the Forces of Evil. She's constantly quoting the show, and even plans to dress up like the main character, Star Butterly, for Halloween! Star's magic wand is her most popular accessory, so we put our 3D printer to the test to make one for ourselves. Honestly, it's not hard at all to make, but it does take a little time and patience. Once finished, it's just what any Star Butterfly superfan needs for hours of pretend play, cosplay use, or to put on display!
Monday, October 14, 2019

DIY Luna Lovegood Costume

Monday, October 14, 2019

DIY Luna Lovegood Costume

Read more »
Accio costume! Whether you're a wizard or a muggle, this Luna Lovegood costume is perfect for Halloween or cosplay!

DIY Luna Lovegood Costume

For Halloween this year, my daughter asked me to help her put a costume together to look like Luna Lovegood, a friend of Harry Potter. We are both obsessed with Harry Potter, so this was a fun challenge! Instead of going store-bought, we were able to DIY/thrift everything we needed for this costume which saved us a lot of money and allowed us to get creative. If you also admire this unique character, this costume is perfect for Halloween and cosplay!

*Check out all of our Harry Potter projects!
Monday, October 15, 2018

50+ DIY Disney Costumes

Monday, October 15, 2018

50+ DIY Disney Costumes

Read more »
Dress up like your favorite Disney character with OVER 50 *magical* DIY Halloween costume ideas!

50+ DIY Disney Costume Ideas for Halloween or Cosplay

Halloween is all about being whoever you want to be, and who wouldn't want to be a part of the magical world of Disney? I've found OVER 50 of the best Disney-inspired costume ideas for kids, adults, and groups that you can DIY to wear on Halloween, or even to the Magic Kingdom itself!

Tuesday, October 9, 2018

DIY Vanellope (Wreck-It Ralph) Medal Bag

Tuesday, October 9, 2018

DIY Vanellope (Wreck-It Ralph) Medal Bag

Read more »
Make a DIY Vanellope (Wreck-It Ralph) Medal Bag (with FREE cut file) to take trick or treating this Halloween!

DIY Vanellope (Wreck-It Ralph) Cookie Medal Trick or Treat Bag with FREE Cut File
Monday, October 8, 2018

DIY Vanellope von Schweetz Costume

Monday, October 8, 2018

DIY Vanellope von Schweetz Costume

Read more »
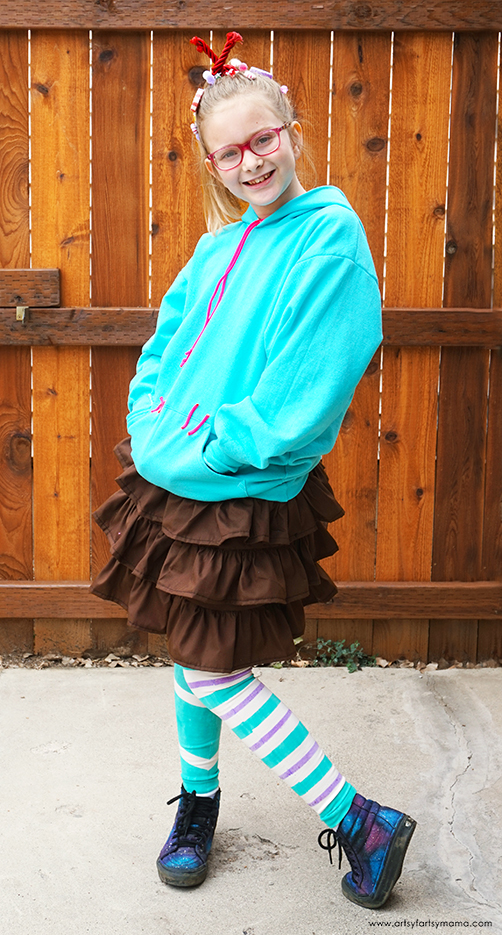
Bring Vanellope from Wreck-It Ralph to life this Halloween with this DIY Vanellope von Schweetz Costume!

DIY Vanellope von Schweetz Costume

We love Wreck-It Ralph and are looking forward to Wreck-It Ralph 2 later this year! One of my daughter's favorite characters is Vanellope von Schweetz and relates to her a lot, actually. She has ADHD and sometimes thinks of herself as a "glitch" because she thinks differently than others do. Just like Vanellope does, my daughter uses her "gift" to stand out from the crowd and accomplishes her goals in her own special way!

I really enjoy making my daughter's Halloween costumes, and this year she is thrilled to go trick-or-treating as Vanellope von Schweetz from Wreck-It Ralph!
Sunday, January 28, 2018

DIY Dog Costume Accessories

Sunday, January 28, 2018

DIY Dog Costume Accessories

Read more »
Transform into the cutest pet in town with these easy-to-make DIY Dog Costume Accessories!

Transform into the cutest pet in town with these easy-to-make DIY Dog Costume Accessories!

My daughter has been taking an acting class, and they put together a play to perform for the parents to show what they've been learning. As most kids do, she let me know a few days before the big night that she needed a dog costume to wear in the play! After a moment of panic, we put our heads together to come up with a simple costume that she could wear. Whether you're just playing dress-up or need to complete a costume, these DIY Dog Costume Accessories are easy and fun to make!
Sunday, October 1, 2017

DIY Nightmare Before Christmas Sally Costume

Sunday, October 1, 2017

DIY Nightmare Before Christmas Sally Costume

Read more »
Thanks to Therm O Web for sponsoring this post. As always, all of the opinions and text are my own. This post also contains affiliate links.

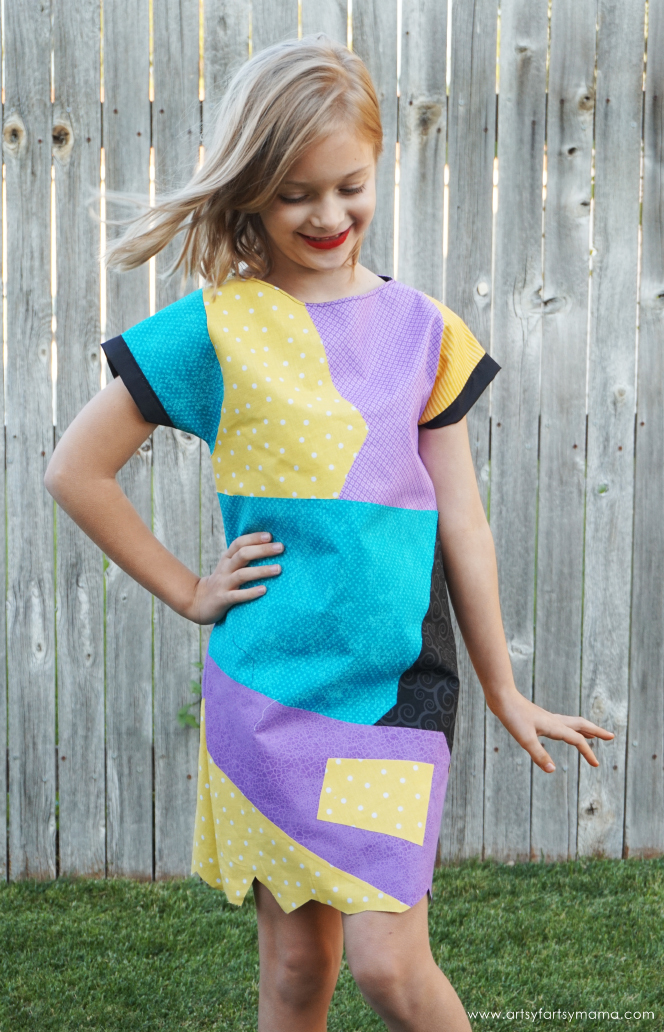
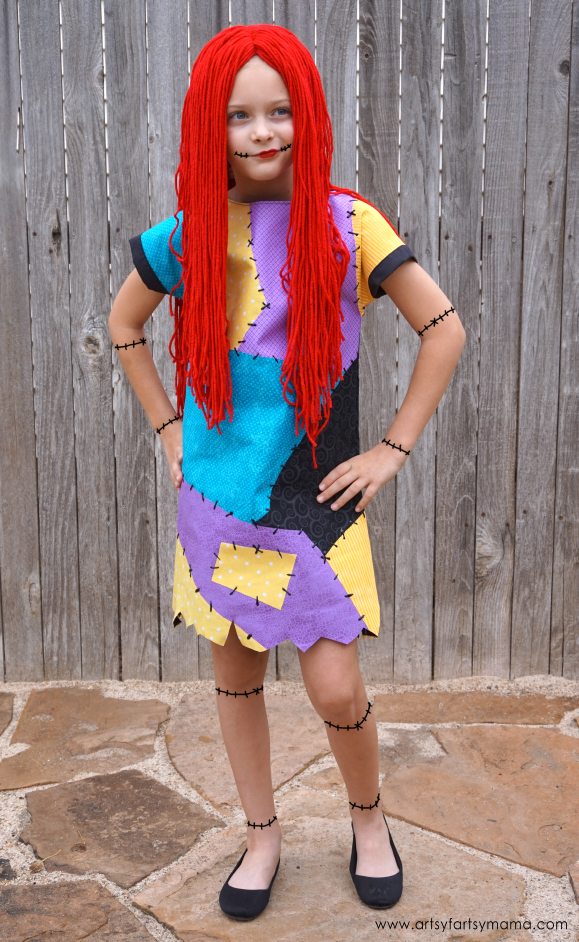
Bring Sally from The Nightmare Before Christmas to life this Halloween with this DIY Sally Costume Tutorial!

DIY Nightmare Before Christmas Sally Costume - Dress and Wig Tutorial

The Nightmare Before Christmas is one of our all-time favorite movies. We watch it all year long, but especially around Halloween and Christmas. I really enjoy making my daughter's Halloween costumes, and this year she is thrilled to go trick-or-treating as Sally from The Nightmare Before Christmas

DIY Nightmare Before Christmas Sally Costume Dress and Wig Tutorial

For Sally's dress, I used an easy-to-follow and FREE pattern from Scattered Thoughts of a Crafty Mom. It's a simple A-line pullover dress that fits sizes 4-10.  You can use any basic dress pattern you want, but I think this pattern worked fantastically! The pattern is designed to be sewn with a knit fabric, so I would recommend sizing up for this costume since you won't be using knits.

I started by cutting out the dress pattern pieces in my daughter's size out of a plain black cotton fabric. Print out an image of Sally to use as a reference to choose the other fabrics you will need for the dress. Besides the plain black fabric for the base of the dress, I chose 6 other cotton fabrics: mustard yellow with stripes, yellow polka dot, teal, purple checked-ish, purple textured, and a black fabric with The Nightmare Before Christmas-looking swirls.

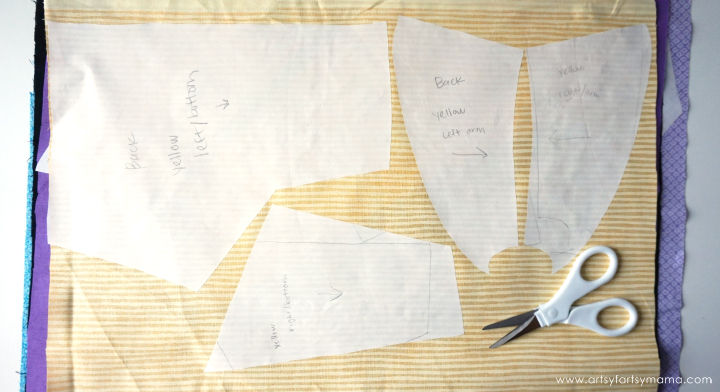
Sally's dress is pieced together, so you'll need to create a pattern for each color of fabric. Lay the front dress piece down (you can tell the difference from the front/back by the necklines). To create the dress pattern pieces, I used some copy paper to draw the shapes for each piece and marked what color and where the pattern piece belongs.

Cut the pattern piece out and lay it on the dress. Draw the next pattern piece that borders the previous one (i.e. draw left sleeve, then left chest, etc). Draw and cut out all of the pieces for the front and back of the dress to resemble Sally. The shapes don't have to be perfect by any means, but I would do your best to make sure the pieces fit together well (see image above).

DIY Nightmare Before Christmas Sally Costume Dress and Wig Tutorial

Once all of the pattern pieces have been created, you'll need some iron-on adhesive. For my cotton fabrics, I used HeatnBond Lite. It's sewable and creates a strong bond to hold those fabrics together. The HeatnBond Soft Stretch Lite is also sewable and strong, but is made for fabrics with stretch! Use whichever one works best for your project.

DIY Nightmare Before Christmas Sally Costume Dress and Wig Tutorial

Unroll the HeatnBond so that it is paper-side up. Use a pencil to trace your pattern pieces to best fit on the paper. Be sure to mark the fabric color, placement, and front/back on each piece!! Cut the pieces out and organize the pieces by fabric color.

DIY Nightmare Before Christmas Sally Costume Dress and Wig Tutorial

Place the HeatnBond glue-side down on the fabric marked on the pattern. Grab your iron and press it down for a few seconds. This will heat up the glue on the HeatnBond and adhere the pattern pieces to the fabric. Let the fabric cool completely.

Tip: Be sure that when you use a fabric where direction matters (like stripes), mark the pattern pieces which direction the pattern needs to be placed!

DIY Nightmare Before Christmas Sally Costume Dress and Wig Tutorial

Cut out all of the pattern pieces. Peel the paper backing off of the fabric to reveal the adhesive.

DIY Nightmare Before Christmas Sally Costume Dress and Wig Tutorial

Lay out the pattern pieces on top of the base dress pieces to make sure they fit well before ironing. Be sure to check the neckline for the front and back!!

DIY Nightmare Before Christmas Sally Costume Dress and Wig Tutorial

Lay down the base dress and iron to remove any wrinkles. To make sure that everything went where it was supposed to, I started ironing with the left sleeve and worked to the right, then left to right until I got to the bottom. If any of the fabric peels up, press the iron down for another couple of seconds. Repeat for the back of the dress.

DIY Nightmare Before Christmas Sally Costume Dress and Wig Tutorial

Follow the tutorial for sewing the dress together. Because the HeatnBond holds on strong, you don't need to sew the pieces down at all! I also skipped hemming the bottom of the dress and made it a bit raggedy to resemble Sally.

DIY Nightmare Before Christmas Sally Costume Dress and Wig Tutorial

To give the appearance of stitches without doing all the work, I used some black Tulip Slick Dimensional Fabric Paint! Start on one side of the dress and add random dashes and x's along all of the "seams". Carefully hang it up to dry somewhere it won't be disturbed for at least 4 hours. Then lay the dress down and add stitches to the other side of the dress. Let it dry completely.

DIY Nightmare Before Christmas Sally Costume Dress and Wig Tutorial

Now that the dress is complete (whew!), we need to create Sally's iconic long, red hair!

DIY Nightmare Before Christmas Sally Costume Dress and Wig Tutorial

Wigs can be tough, so I recommend the great tips from this 4 yarn wigs tutorial. For our Sally wig, I found a red beanie at Walmart for less than $2, and grabbed a skein of red yarn. This skein ended up being the perfect amount, but I would get two just in case you need a little more.

DIY Nightmare Before Christmas Sally Costume Dress and Wig Tutorial

Use a marker to make a line down the center of the beanie from around the middle to the front of the hat. This is where the part in the hair is going to be. I also marked a semi-circle around the hat horizontally where I would add another layer for some thickness to the wig.

DIY Nightmare Before Christmas Sally Costume Dress and Wig Tutorial

I measured how long we needed the hair to be (about 24"). Luckily, I had a blank metal sign that was just long enough. You could also cut a piece of cardboard to 24" that would also work great. Wrap the entire skein of yarn around the board. Cut one end of the yarn so that you have a bunch of long strands of "hair".

I took about 10 strands of yarn and folded them in half. I used a piece of washi tape (because it's less sticky than regular tape) to hold the strands together. Using red thread, I sewed the strands to one end of the semi-circle guideline using a straight stitch near the folded ends of the yarn. You only need to backstitch at the beginning of the guideline and at the end. Gather another 10 strands and butt them up against the end of the strands you just sewed. Repeat until you get to the other end of the semi-circle.

Next, take another 10 strands and hold them tightly together at the center, but don't fold them! Place the center of the yarn on the guideline to start the center hair part. Sew the strands down with a straight stitch at the back end of the marker line. Grab another 10 strands and butt them as close as you can to the end of the strands you just sewed. Repeat until you get to the front of the hat. You only need to backstitch at the beginning of the line and at the end.

DIY Nightmare Before Christmas Sally Costume Dress and Wig Tutorial

Place the hat on your child's head and finger-comb the hair to lay straight. Put on some black shoes, add a little red lipstick and draw some stitches on face/arms/legs using black make-up or washable markers to complete the look. This was such a fun costume to make, and my daughter can't wait for the Halloween parties to begin!


What are you/your kids going to be for Halloween this year?


Friday, October 7, 2016

DIY Girly Marshmallow Man Costume

Friday, October 7, 2016

DIY Girly Marshmallow Man Costume

Read more »
Terrorize the town with a DIY Girly Marshmallow Man Costume! I ain't afraid of no ghost!

DIY Girly Marshmallow Man Costume Tutorial at artsyfartsymama.com

My daughter is totally loving everything Ghostbusters right now. She loves the originals, so we took her to see the new Ghostbusters this summer and she absolutely LOVED it!! Some may knock the new movie, but it was amazing to see this science-loving, up-for-anything girl come out of the theater feeling empowered and ready to take on the world!

When I asked her what she was going to be for Halloween this year, I was sure she'd decide to be a Ghostbuster. She considered it, but then became adamant on being a "villain".  As we were looking through the costume store for ideas, she stopped dead in her tracks and exclaimed that she "finally decided on being the Stay Puft Marshmallow Man, but as a girl!" You got it!!

DIY Girly Marshmallow Man Costume Tutorial at artsyfartsymama.com

To make this Marshmallow Man costume more on the girly side, of course we had to incorporate a tutu! Tutus are incredibly easy to make:

1. Start by making a waistband. Measured around the waist and cut 1 inch wide elastic to an inch or two smaller than the waist measurement (the elastic stretches out a little during the process). Overlap the edges of the elastic and sew them together with a zig-zag stitch. You can also hand sew if you don't have a machine.

2. Grab some tulle! I used 3-4 rolls of tulle (6 inches wide, 30 yards). Measure your tulle into strips twice the length of your desired skirt. For example, our tutu is 8 inches long, so I cut tulle into 16 inch strips. The easiest way I've found to do this is cut a piece of cardboard 16 inches long. Wrap a roll of tulle around the cardboard. Place a rubber band around each end to hold the tulle in place. Cut each end with fabric scissors and now you've got two stacks of 16" long strips on both sides of the cardboard!

3. Add tulle to the skirt by folding two strips of tulle in half. This creates a loop on one end and two loose tails on the other. Place the folded tulle strips over the waistband so that only a few inches of the loop stick out over the top. Then fold the tail ends around the waistband and pull them through the loop. Pull the knot tight.

4. Keep adding doubled-up strips of tulle until the entire waistband is covered. Voila!

DIY Girly Marshmallow Man Costume Tutorial at artsyfartsymama.com

To break up the white of the outfit, I sewed a belt to go above the tutu. Cut two pieces of blue fabric 3 inches wide x waist measurement + 10". Sew them right sides together, flip them right side out, and iron the seams. Topstitch around the entire belt.

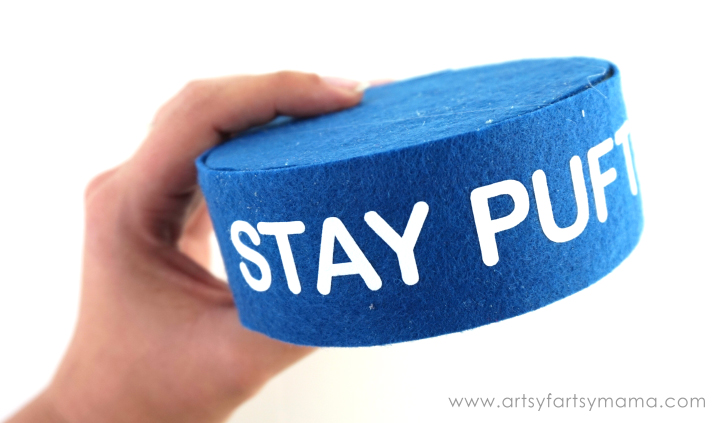
Next, I cut out the "Stay Puft" wording out of Stripflock Heat Transfer Vinyl on my Cricut Explore machine. I applied the vinyl to the belt, and to the band of the Marshmallow Man hat. Set the belt aside.

DIY Girly Marshmallow Man Costume Costume Tutorial at artsyfartsymama.com

To make the hat, you'll need a foam disc that measures about 4" x 2". Trace the disc onto some blue felt and cut out two circles. Next, cut a 2" strip of felt long enough to wrap around the side of the disc to become the hat band. I also cut out a few 1" circles and a 1" x 6" strip of red felt to place on the top of the hat.

DIY Girly Marshmallow Man Costume Tutorial at artsyfartsymama.com

For the "poof" of the hat, I first cut a 12" or so circle of white cotton fabric. Take a needle and thread and hand sew around the edge of the circle. Pull the thread tight to gather the circle and tie a knot to keep it together. To help it keep it's shape, I stuffed some tulle inside. You could also use a batting, cotton fill, or even a plastic bag!

DIY Girly Marshmallow Man Costume Tutorial at artsyfartsymama.com

Hot glue the felt circles onto the top and bottom of the disc. Let dry completely.

DIY Girly Marshmallow Man Costume Tutorial at artsyfartsymama.com

After the vinyl has been applied to the band, use some hot glue to attach it to the disc. Now the hat is ready to be assembled!

DIY Girly Marshmallow Man Costume Tutorial at artsyfartsymama.com

Add a bunch of hot glue to the top of the disc. Center the poof open-side down and hold it in place until the glue dries. Fold one end of the red felt strip in half and cut a triangle from the end. Next, add a drop of glue to the top center of the poof and place the straight edge of the red strip on top. Glue a stack a few 1" circles together, then glue it onto the top of the hat (on top of the red strip).

You can now add the hat to a hair clip or glue it onto a headband!

DIY Girly Marshmallow Man Costume Tutorial at artsyfartsymama.com

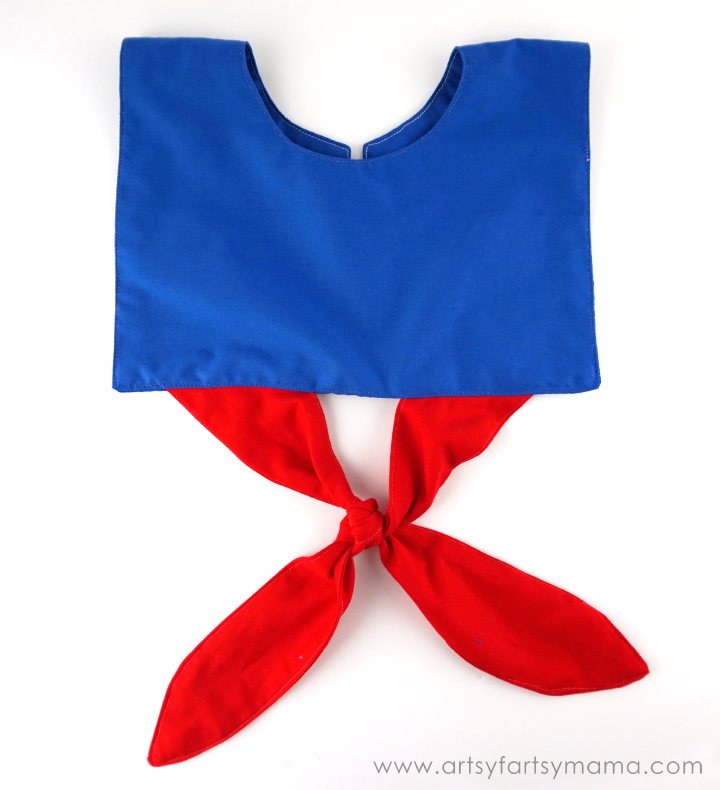
Last, but not least, is putting the collar together. Measure your child's chest to figure out how wide you want the collar to be, and also measure down from the shoulder to see how long it should go. Mine measured 7 inches wide, and 6 inches long. Double the measurement of inches long and now you've got your rectangle measurement! Cut two pieces of blue fabric to this size.

Next, I drew about a 4-5 inch circle in the center of the rectangle. Fold the fabric in half, and cut a straight line to the circle, then cut out the entire circle. The cut line will be the back, and the circle is the part that will go around the neck.

DIY Girly Marshmallow Man Costume Tutorial at artsyfartsymama.com

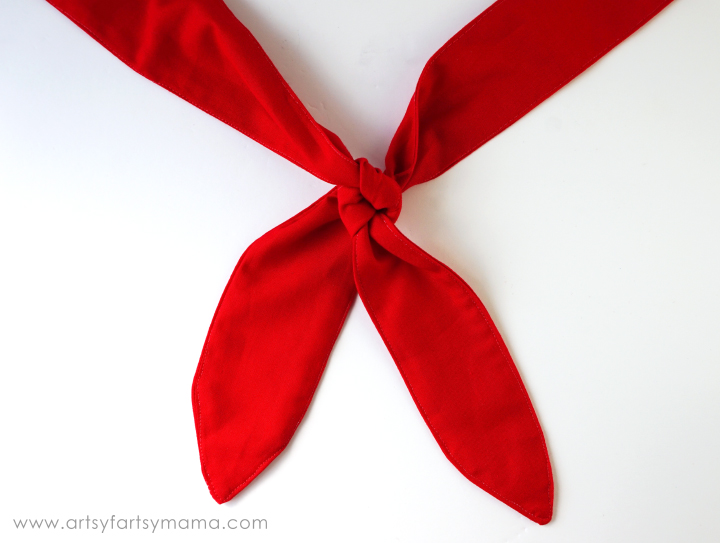
The Marshmallow Man also has a cute little red knot under the collar. So I just cut two 3 inch wide strips of red fabric and sewed them together. Instead of squared edges, I just freehanded a pointed edge. Sew them together and topstitch. Tie the strips together in a square knot.

DIY Girly Marshmallow Man Costume Costume Tutorial at artsyfartsymama.com

Place the knotted strips in between the "front" side of the collar with the untied edges sticking out. Pin all the edges in place and sew around the entire collar leaving a 4-5" opening so you can flip it right side out. Keep the extra length of the red strips just in case you need to adjust anything.

DIY Girly Marshmallow Man Costume Costume Tutorial at artsyfartsymama.com

Once you flip the collar, check that the knot is laying in the right place. If so, cut the extra red strips, flip right side out, and topstitch. If you need to adjust the knot, you'll need to unpick the seams and fix it before topstitching.

DIY Girly Marshmallow Man Costume Costume Tutorial at artsyfartsymama.com

The finishing touch is the white line going around the collar. You could tack on some ribbon, but I decided to use some white heat transfer vinyl instead. Measure where you want the line to be and draw it up in Cricut Design Space. Cut the vinyl and apply with an iron. Let it cool, and peel off the carrier sheet.

To keep the collar closed in the back, add on some velcro, buttons, or even just use a safety pin!

DIY Girly Marshmallow Man Costume Tutorial at artsyfartsymama.com

Throw on some white leggings, a white shirt (long or short-sleeved), and the costume is ready to go! In colder weather, you could also wear some white sweats. Isn't this costume adorable?! My little Ghostbuster wannabe is in LOVE and can't wait for all of our upcoming Halloween parties!!

DIY Girly Marshmallow Man Costume Tutorial at artsyfartsymama.com

She might look sweet, but don't let her fool you! Who you gonna call?!

Who's your favorite villain (any) or Ghostbusters character?
What are you/your kids going to be for Halloween this year?

Friday, October 17, 2014

Alice in Wonderland Costume

Friday, October 17, 2014

Alice in Wonderland Costume

Read more »
Alice in Wonderland Costume at artsyfartsymama.com #Halloween

My daughter decided around March this year that she wanted to be Alice in Wonderland for Halloween. I was sure she was going to change her mind since she thought about it so early, but I was wrong! She was determined to be Alice, even when all the popular Frozen costumes started coming out. I'm personally not a huge fan of purchased costumes mainly because they are expensive, and I haven't found one yet that is a good quality. Making it ourselves gives me the freedom to create a unique costume that will hopefully get more use than just one evening.

Tuesday, October 7, 2014

Glow-in-the-Dark Candy Button Shoes

Tuesday, October 7, 2014

Glow-in-the-Dark Candy Button Shoes

Read more »
This post is written as part of a sponsored campaign with The Blueprint Social and Tulip.

Glow-in-the-Dark Candy Button Shoes at artsyfartsymama.com #TulipGlow

Do you remember eating candy buttons (or candy dots) as a kid? Usually I'd eat more paper than candy, but they were still fun to try and eat!! The thing I really love most about candy buttons is the bright colors and the polka dot pattern.

Candy buttons are making a comeback in fashion form, especially during Halloween (thanks to costume inspirations like Candy Land and Katy Perry), so I decided to make my daughter some of her very own candy button shoes that can be worn on and after Halloween. Since safety is also an issue during this holiday, I used some Tulip Glow Paint so that they will glow in the dark when we go trick or treating!!

Glow-in-the-Dark Candy Button Shoes at artsyfartsymama.com #TulipGlow

To make the candy button shoes, you'll need some Tulip Glow Paint and white canvas shoes. I found the shoes for about $5, so this project is super affordable and can be made for anyone of any age!!

Any of the Tulip Glow-in-the-Dark & Black Light Fabric Paints will work for this project and will make your shoes stand out both day and night. Both kids of paints glow brightly under UV black lights - which is super fun for your Halloween black light parties!!

Glow-in-the-Dark Candy Button Shoes at artsyfartsymama.com #TulipGlow

Using a small ruler or measuring tape, mark where you want your dots to be with a disappearing ink marker or lightly with a pencil. The disappearing ink disappears in just a few hours, but test somewhere in the shoe before marking the whole thing just in case it reacts differently. You can also eyeball where you want your dots to go, but marking them will help you get a more straight and even pattern.

Glow-in-the-Dark Candy Button Shoes at artsyfartsymama.com #TulipGlow

I used the Tulip Glow-in-the-Dark Paints in pink, yellow, and blue since those are the traditional candy button colors. Test a couple of dots on a scrap piece of paper or fabric to get a feel for how the paint comes out. Then, start on one of the dots you marked and lightly press out some paint and pull up to make a dot. I did three rows of yellow and pink, and (accidentally) four rows of blue, but you can mix it up however you like!!

**Tip: start at one end of the shoe and work your way back, painting/dotting on a sturdy table. Also, try to only hold the base of the shoe when you do pick it up. You'll be less likely to bump any of the dots you already made!

The glow-in-the-dark paints work best when squeezed directly and in dimensional form (like these dots), but if you decide to paint anything solid (like the tongue or other areas), you'll need to apply 2-4 applications to ensure that they will glow brightly.

Glow-in-the-Dark Candy Button Shoes at artsyfartsymama.com #TulipGlow

If you do happen to bump your dots or put one in the wrong place, don't panic (or try not to)! I kept a small paint brush nearby to help clean up any areas. You'll still see the smudge, but it will be less noticeable. In the image above, you can see the obvious pink dot that was bumped, but I also moved the blue dot in the top right over a little and you can see the paint where it used to be.

I just thought you'd want to see that even I mess up on projects!!

Glow-in-the-Dark Candy Button Shoes at artsyfartsymama.com #TulipGlow

Once you've painted both shoes, place them somewhere that they will be undisturbed for at least 4 hours. I let mine sit out in a well ventilated room overnight. Once they're dry, you can re-lace the shoes. My daughter hasn't mastered tying shoes yet, so I put in some adorable neon pink curly laces.

Tulip Fabric Paints are non-toxic and formulated for lasting adhesion to fabric, so the dots should stay dimensional and won't crack or peel, even when you need to wash them.

Glow-in-the-Dark Candy Button Shoes at artsyfartsymama.com #TulipGlow

Black lights are the best way to get your shoes to pop and work beautifully if you need to take photos! To help your shoes glow their brightest in the dark, UV lights work best for activating the Tulip Glow Paint. Simply hold it under the light for at least one minute for maximum glow! If using a incandescent bulb, hold it for several minutes.

Glow-in-the-Dark Candy Button Shoes at artsyfartsymama.com #TulipGlow


My daughter is already excited to show off her shoes, and loves taking them into the dark parts of our home just to see them glow. It's so fun to see how different the shoes look in regular light to no light at all! The bottom photo is after holding the shoes under the UV black light for about 10 minutes - super bright and will be perfect for when we're out trick or treating after dark!! Our black light is also portable, so we can easily take it with us to "recharge" the shoes while we're out if we need to.

For more fun craft ideas and holiday inspiration, be sure to follow I Love to Create on Facebook, Twitter, and Pinterest!