Posts may contain affiliate links (see Disclosure). Thank you so much for supporting Artsy-Fartsy Mama!
Valentine box
Showing posts with label Valentine box. Show all posts
Sunday, February 2, 2020

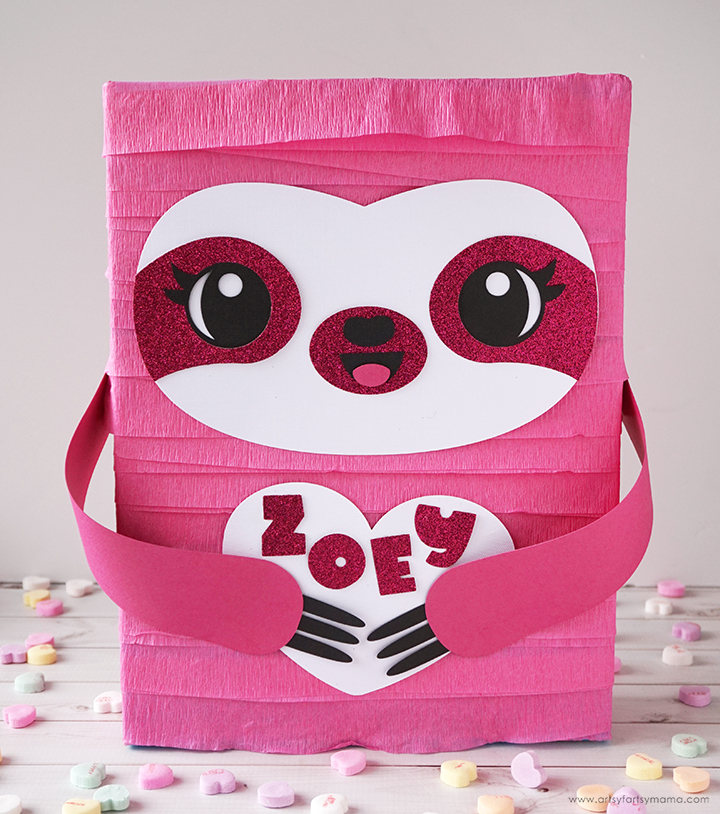
Sloth Valentine Card Box with Free Cut File

Sunday, February 2, 2020

Sloth Valentine Card Box with Free Cut File

Read more »
"Make..the...BEST...Valentine's...Day...Card...Box...this...year!"
- This Sloth, probably

Sloth Valentine Card Box

It's February, which means it's time to start thinking about Valentine card boxes to hold all those sweet notes from classmates! Making these boxes has become something I look forward to, and I am positively giddy about how this Sloth Valentine Card Box turned out! It's very simple to make (especially if you own a Cricut), ironically quick to put together, and is definitely one-of-a-kind!!

If you're looking for more creative Valentine card box ideas, be sure to check out our Unicorn Valentine Card BoxPanda Valentine Card BoxPuppy Valentine Card BoxLlama Valentine Box, and Taco Valentine Card Box!
Wednesday, January 16, 2019

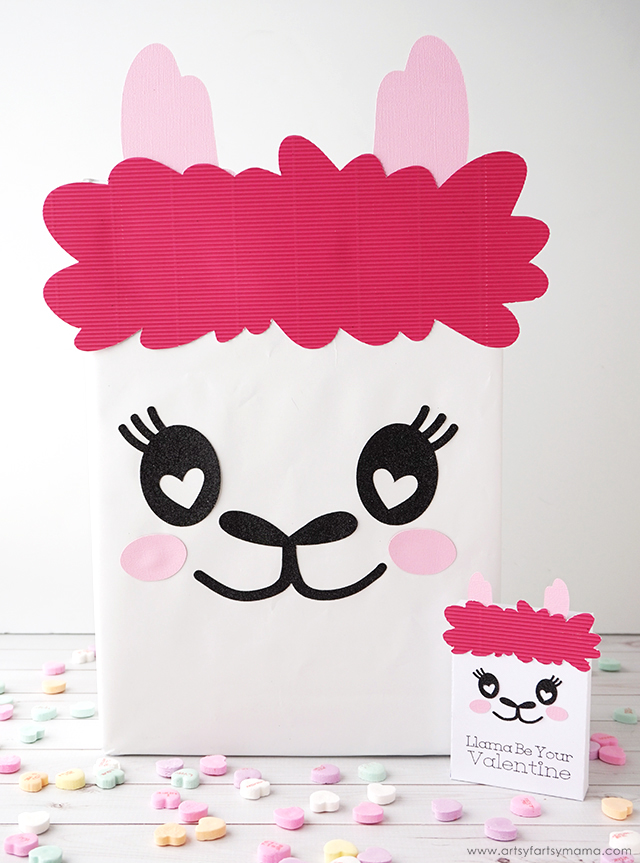
Llama Valentine Card Box

Wednesday, January 16, 2019

Llama Valentine Card Box

Read more »
Make your Va-LLAMA-ntine's Day extra special with a Llama Valentine Card Box and matching Llama Valentine Treat Boxes!

Llama Valentine Card Box and Llama Valentine Treat Boxes

Llamas are all the rage right now, so it's only natural that we would make a fun Llama Valentine Card Box for my daughter to take to her Valentine's Day party this year. This box was a "llama" fun to make, and it was easy to do thanks to some help from the Cricut Maker machine!

If you're looking for more Valentine card boxes, be sure to check out our infamous Unicorn Valentine Card Box, Panda Valentine Card Box, Puppy Valentine Card Box, and Taco Valentine Card Box!
Tuesday, February 20, 2018

Taco Valentine Card Box

Tuesday, February 20, 2018

Taco Valentine Card Box

Read more »
Taco 'bout awesome! Collect your Valentines in this adorable Taco Valentine Card Box!

Taco 'bout awesome! Collect your Valentines in this adorable Taco Valentine Card Box!

When it comes to Valentine's Day, it has become a fun family tradition to come up with creative ideas for my daughter's Valentine card box. The past few years we have made a Puppy Dog Valentine Card Box, a Panda Valentine Card Box, and and the infamous Unicorn Valentine Card Box. This year my daughter and I laughed and laughed when we decided on making the this awesome Taco Valentine Card Box to hold all those sweet notes from classmates from her Valentine's Day party!

Friday, February 17, 2017

Puppy Dog Valentine Card Box

Friday, February 17, 2017

Puppy Dog Valentine Card Box

Read more »
Collect your Valentines in an adorably lovable Puppy Dog Valentine Card Box!

Puppy Dog Valentine Card Box with Free Cut File at artsyfartsymama.com

For the third year in a row, we lucked out on creating an original and fun Valentine card box to hold all those sweet notes from classmates! Last year, we had a lot of fun creating a Panda Valentine Card Box, and the year before that was the infamous Unicorn Valentine Card Box. This year my daughter decided on making an adorably sweet Puppy Dog Valentine Card Box to take to her Valentine's Day party.
Monday, February 8, 2016

Panda Valentine Card Box

Monday, February 8, 2016

Panda Valentine Card Box

Read more »
Panda Valentine Card Box at artsyfartsymama.com

Valentine's Day is almost here, which means those kiddos need a fun Valentine card box to hold all those sweet notes from classmates! Last year, we had a lot of fun creating a unicorn Valentine card box. This year my daughter decided on making an adorably sparkly Panda Valentine Card Box to take to her Valentine party next week.

Panda Valentine Card Box at artsyfartsymama.com

Before you get to put your panda together, you'll need to do a little prep:

1. Choose your box. We used a corn dog box (from Costco) that measures about 9x10 inches, but any cardboard box you have will work.

2. Using a utility or Xacto knife, cut a rectangle in the top for kids to place valentines in. On the back side of the box, cut a flap so that the Valentines can be removed easily.

3. Grab some white butcher paper or tissue paper (we used about 5 sheets) and wrap the box like a gift. Using a thick paper or multiple sheets of tissue paper will cover up the box packaging and will give you the white backing for your panda!

4. With your fingers, find the rectangle in the top of the box and carefully cut an "X" corner to corner with the knife. Fold each triangle in and tape the paper in place inside the box. You can also add pieces of tape all around the box opening to be a bit more durable. Also cut along the lines of the flap in the back of the box and tape the paper in place all around the opening.

Now that the box is prepped, you can put your panda together!! Download the free Panda Cut File (personal use only please), and cut it out of black cardstock with your Cricut Explore machine. You'll also need some Aleene's Tacky Glue.

Don't have a cutter? No problem! You can totally cut out the panda face by hand or even paint it on!!

Panda Valentine Card Box at artsyfartsymama.com

Once the panda pieces have been cut out, add some Aleene's Tacky Glue to the back and press them on the front of the box. After the glue has set (which won't take long), your panda is ready to to be filled with all those Valentines!!

Panda Valentine Card Box at artsyfartsymama.com

If you are like us, you'll know that everything can always use a bit more sparkle! We sprayed our panda Valentine box with some glitter spray and sealer, then let it dry. You could also use some glitter Mod Podge which dries clear and adds a ton of sparkle. 

My daughter is SO excited to take this Panda Valentine Box to her class Valentine party and share such a sweet day with friends! I'd love to see pictures if you make a panda box for your children, so be sure to tag me on social media or feel free to post your pictures on my Facebook page!

Wednesday, February 4, 2015

Unicorn Valentine Card Box

Wednesday, February 4, 2015

Unicorn Valentine Card Box

Read more »
This is a sponsored post with Plaid and Blueprint Social. All ideas and opinions are my own.

Unicorn Valentine Card Box at artsyfartsymama.com #plaidcrafts #modpodge #applebarrel

My daughter loves everything unicorn. Every. Thing. I designed her some unicorn valentines to give to her friends, and when I told her we were celebrating Valentine's Day with Plaid Crafts by making a fun Valentine card box, you can guess what her answer was. With a little help from Apple Barrel Paints, Mod Podge, and a few other supplies, I think we came up with a pretty cute Unicorn Valentine Card Box that she will love showing off at her Valentine's Day party!!

To make your own Unicorn Valentine Card Box, you'll need:
  • Cardboard Box (we used a corn dog box)
  • White Tissue Paper (5-10 sheets)
  • Matte Mod Podge
  • Extreme Glitter Mod Podge (or Mod Podge & iridescent glitter)
  • Mod Podge Collage Clay
  • Apple Barrel Paints
  • Clear Tape
  • Iridescent Gift Wrap Ribbon
  • White Cardstock
  • Glitter Paper (we used pink & silver)
  • Unicorn Eye Printable

Unicorn Valentine Card Box at artsyfartsymama.com #plaidcrafts #modpodge #applebarrel

Start by cutting a hole in the top right side of the box with a utility knife for the Valentine cards to be dropped in. Mine measured about 3x2 inches. Also, cut a door in the back for larger Valentines and to be able to remove all the cards later.

You can paint the box, but I was having a hard time getting all the packaging covered even after three coats of paint... so I decided to just wrap it instead! So much easier, and way less time!! Start with 5 sheets of tissue paper and check if you can still see the packaging through the paper. If you can, add more sheets. I used 10 just to be sure nothing would show through.

Wrap the box like you would a regular present, but keep the seams on the back and the sides so they won't show on the front. Use clear tape, and try to keep all the edges as smooth as you can.

Unicorn Valentine Card Box at artsyfartsymama.com #plaidcrafts #modpodge #applebarrel

Once the box is wrapped, you need to be able to access the holes you cut. You'll be able to feel the edges of the holes with your fingers, so just kind of press around it to lightly mark where the edges are. Then, take an Xacto knife and cut an "X" from corner to corner in the top hole. Then, you can bend the 4 triangles into the box and stick them down with a piece of tape.

For the door in the back, cut around the door edges, then just tape the 3 edges down. If you cut a hole instead of a door, do the same as the top hole. This way, all the edges are covered, and you won't have tissue paper ripping off.

Unicorn Valentine Card Box at artsyfartsymama.com #plaidcrafts #modpodge #applebarrel

Using Extreme Glitter Mod Podge (or some Matte Mod Podge mixed with some glitter), paint a light coat on all sides of the box. It will crinkle a little, but I like how it looks. Once the first coat is dry, you can add a second light coat of you want a little more sparkle. I did one coat on the sides and back, and two on the front.

Unicorn Valentine Card Box at artsyfartsymama.com #plaidcrafts #modpodge #applebarrel

Next, I cut out two hearts out of some silver glitter paper for the nostrils. You can easily cut them with a Cricut machine, a paper punch, or by hand. To stick them on, I painted a light coat of Mod Podge on the back and stuck them on.

Unicorn Valentine Card Box at artsyfartsymama.com #plaidcrafts #modpodge #applebarrel

For the ears I cut an ear shape out of white cardstock, and an inner ear piece from pink glitter paper. Then, I flipped them over, and cut out a second set. Paint a light coat of Extreme Glitter Mod Podge (or some Matte Mod Podge mixed with some glitter) on the white cardstock, then just put the pink glitter paper piece on while it's still wet. Let dry completely. If it warps at all, just carefully bend it back to lay flat.

Once the ears are dry, glue them on the top front corners of the box with a little Mod Podge. Let dry completely before doing anything else to ensure they stay in place.

Unicorn Valentine Card Box at artsyfartsymama.com #plaidcrafts #modpodge #applebarrel

While the ears are drying, roll a piece of white cardstock into a cone, trim the excess and stick together with tape. Then, paint stripes onto your unicorn horn with Apple Barrel paints. We used Pink Parfait, Key West, and Purple Pansy. I only had to paint 1-2 coats, and the stripes looked great!

Once the paint was dry, I painted a couple light coats of Extreme Glitter Mod Podge (or some Matte Mod Podge mixed with some glitter) on the horn, letting each coat dry completely before adding another one. It turned out sparkly and magical, just as a unicorn horn should be!!

Unicorn Valentine Card Box at artsyfartsymama.com #plaidcrafts #modpodge #applebarrel

While the unicorn horn is drying, start cutting pieces of ribbon. I cut 20-30 pieces at all different lengths. Curl all the pieces using scissors or a ribbon curler. Then, attach two or three pieces together with a small piece of tape at one of the ends. You'll now have 10-15 pieces of hair!

Trace the unicorn horn on the top where you want it to go. Then, attach all 10-15 pieces of hair around the circle using pieces of tape.

Unicorn Valentine Card Box at artsyfartsymama.com #plaidcrafts #modpodge #applebarrel

Next, you'll need to use some Mod Podge Collage Clay. This was my first time using this product, and it is so much fun!! It's like frosting, but in craft form. It totally keeps its shape if you are using it for decorating, and comes with three different tips for a different look. It also made it super simple for me to securely attach the horn to our unicorn's head!!

Unicorn Valentine Card Box at artsyfartsymama.com #plaidcrafts #modpodge #applebarrel

Use the regular round tip for the Mod Podge Collage Clay. Pull the ribbon ends out of the way with your fingers (or ask a friend for help), and trace the circle you drew with a thick layer of Collage Clay. Then, place the horn into the collage clay, and hold in place for a few seconds. Make sure it's level, then leave it to dry for a few hours.

Unicorn Valentine Card Box at artsyfartsymama.com #plaidcrafts #modpodge #applebarrel

Now all you need are some eyes!! Print and cut out the Unicorn Eye Printable. You could also easily create some eyes from paper scraps/circle punches, add some big googly eyes, or draw them on with marker.

Unicorn Valentine Card Box at artsyfartsymama.com #plaidcrafts #modpodge #applebarrel

Once everything is dry, your Unicorn Valentine Card Box is ready to take to your Valentine party!! My daughter absolutely loves her new unicorn, and can't wait to fill it up with Valentine cards from her friends!!