
Learn all about the new Cricut Foil Transfer Tool and make your own Foiled Cactus Gift Tag and Card!

Have you been wanting to add foil to your Cricut projects? Cricut's new Foil Transfer System is the easiest way to apply foil to a wide variety of materials using your Cricut Explore and Cricut Maker machines! Just like any Cricut project, you’ll use Design Space to add foil settings on pre-made or your own custom designs. It's also easy to apply foil along with any other action (cutting, scoring, debossing, etc.).
I'm also sharing a free Cactus SVG to download to go along with two step-by-step project tutorials using the design. This will be perfect for you to try once you get your own Cricut Foil Transfer Tool! You'll also be able to see just how easy foiling on your Cricut machine can be!

The Cricut Foil Transfer Tool has 1 housing and 3 interchangeable tips: Fine, Medium, and Bold. Each tip is marked with lines that indicate the size of the tip: Fine - 1, Medium - 2, and Bold - 3. The tool is designed specifically for both Cricut Explore and Cricut Maker machines, and won't need any additional cords or adapters.
Most of the time, foil is applied to projects using heat. The Cricut Foil Transfer Tool is a pressure-activated system that was designed to work with Cricut Foil Transfer Sheets. Working with pressure instead of heat not only makes it safer, it's also a time-saver with no waiting for tools to pre-heat.

Inside the Cricut Foil Transfer Kit, you will get the Cricut Foil Transfer Tool with the 3 interchangeable tips, 6 gold and 6 silver 4"x6" Cricut Foil Transfer Sheets, and enough tape pieces to use with all of the foil!
Now that you know the basics of the Cricut Foil Transfer Tool, let me show you how it works!
Foiled Cactus Gift Tag

First, I am going to show you how to make this Foiled Cactus Gift Tag! It's very simple to make, and will be a creative way to add names and a little note to gifts. To make this project, you will need:
- Cactus SVG File (personal use ONLY)
- Cricut Explore and Cricut Maker machine with Fine-Point Blade
- StandardGrip Machine Mat (green)
- Kraft Board - white
- Cricut Foil Transfer Tool with Fine, Medium, or Bold Tip
- Cricut Foil Transfer Sheet - Silver
- 4 pieces Cricut Foil Tape

Upload the Cactus design into Design Space and bring the image into the canvas. Make sure the entire design is selected, and change the height measurement to 4.5" in the top menu bar.
*For more detailed instructions, here's a helpful tutorial for uploading your own images into Design Space.

Select the white heart and the "scribbled" part of the pot. Delete them both. We don't need those parts for this project!

Now, select everything but the outline/white part of the image. Click the Linetype drop-down menu in the top menu bar. At the bottom of the list, you will see "Foil" as a selection. Mouse over it and choose between Fine, Medium, or Bold. If you wanted to get a little more creative, you could choose all three options for different parts of the image!

Change the color of the foil by clicking the colored box next to the Linetype in the top menu bar. Look at all of those foil color options!!

We need to add a hole at the top of the image to transform it into a tag. Since there isn't enough room on the image itself to add a hole, I decided to pull in an image from the Design Space library by typing "tag" in the search bar. If you have a Cricut Access subscription, choose an image from the library with the green "a" in the top left corner and it will be free for you to use.


Select the tag and the cactus image outline piece. In the bottom right menu, click "Weld" to combine the two images into one large image. Change the color to white and make sure it is set to "Cut" in the Linetype drop-down.
Move the image to the back (in the top menu bar, click "Arrange" and then "Move to Back") so that the foil cactus image is on the front. Select everything, and then click "Attach" in the bottom right menu bar. This will make sure that the foil design will be placed on the tag. If you don't have them attached, it will keep the two images separate when you go to cut. Once you have finished this step, click the green "Make It" button in the top right corner.

Choose your material from the list of Material Settings. Not all materials will work well with foil, so be sure to click on "Compatible" at the top of the list to show you everything that will make your project a successful one. I like using kraft board for tags because it's a little thicker than cardstock.

One thing I love about Design Space is that it walks you though each step. Once the Foiling Tool is finished, you will see this screen. Do NOT unload the mat. Carefully peel the tape away from the paper. Like a washi tape or a tape with light adhesive, it shouldn't damage your paper at all. Slowly lift the foil away from the paper to reveal your design. Place the Fine-Point Blade into Clamp B, and press "Go" to finish the cut.

Here's an example of what happens when you use the wrong tip for the type of foiling you have set. I had my foil project set to "Fine", but used the bold tip for the cactus on the left. Some of the foil was transferred, but obviously didn't do the job properly. When I put the Fine tip into the housing, the result was perfection! My point is the tips all look and feel the same, so always check the lines on the tips to ensure you are using the correct one for your project.

Look at that gorgeous shimmer! When you run your finger across it there's a little bit of texture from the pressure, but the foil stays in place! If you do happen to have any foil dust on your project, gently tap it against a table or use a soft tissue to rub or brush the foil dust away.

Write a little note or to/from on the back and attach the gift tag to a gift, and that's it!! I am honestly so impressed with this Foil Transfer Tool. It looks professional, and the foil is on so evenly. I'm looking forward tomaking even more gift tags with it during the holidays!
Foil Cactus Card
This card has a few more steps than the gift tag, because I am going to show you how you can use multiple colors of foil in one project! Don't worry though. It's still very simple, and I am here to help you every step of the way!

To make this project, you will need:
- Cactus SVG File (personal use ONLY)
- Cricut Explore and Cricut Maker machine with Fine-Point Blade
- StandardGrip Machine Mat (green)
- Kraft Board - white
- Cricut Foil Transfer Tool with Fine, Medium, or Bold Tip
- Cricut Foil Transfer Sheet - Silver
- Cricut Jewel Sampler Foil Transfer Sheets
- 16 pieces Cricut Foil Tape

First, you are going to start with a card base. There are a lot of options available in the Design Space library, and a lot of them are FREE with Cricut Access subscription. Type "card" in the search bar and check the "Cricut Access" in the left menu bar to show Access cards only. I chose this basic green card image to insert into a new canvas.
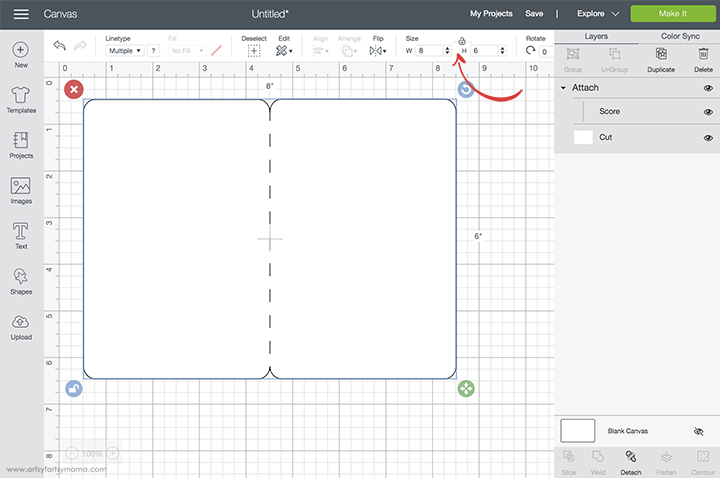
Select the card image, and change the color to white. In the Size area of the top menu bar, click the "lock" icon to be able to add custom measurements. I wanted to make a 4" x 6" card, so I changed the measurements to 8" x 6". Click the icon again to "lock" it when you are done.

Upload or insert the Cactus SVG into the canvas. Keep the image selected, and resize it to 5 inches tall. Center the image on the "front" of the card.

Next, go back into searching images in the Design Space library and look for a "rounded rectangle". Because the card has rounded edges, a regular rectangle with sharp edges would look a little strange. Select a basic image like the one above, and insert it into the canvas.

Unlock the measurements again, and resize the rectangle to 3.75" x 5.75". Change the color to pink, and center it on the front of the card.

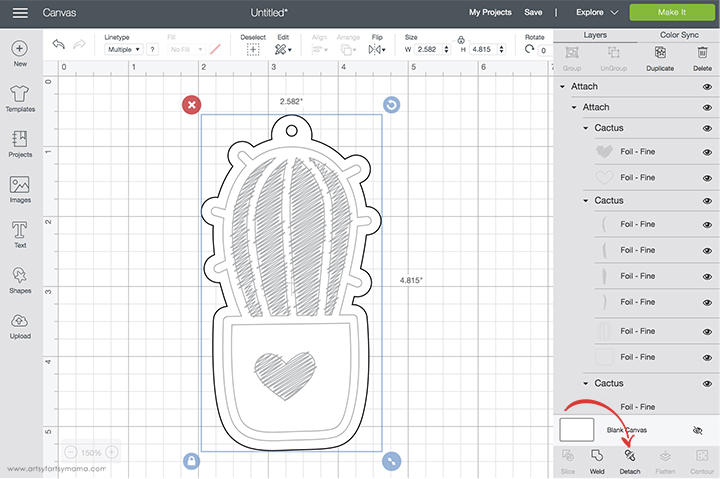
Select the cactus image and ungroup it. Move the outermost part of the cactus (white) and move it to the front (Click "Arrange" in the top menu and select "Move to Front").
Have you ever tried the "Slice" feature? Think of it like a cookie cutter. The white cactus piece is like the cookie cutter, and we are going to cut the shape out of the pink rectangle. Select both the cactus image and the rectangle and click "Slice" in the bottom right menu. Now you will have 3 pieces: the original white cactus, a pink cactus, and the outer part of the rectangle. Select the 2 cactus pieces and delete them because they aren't needed anymore. All you should have left is the pink rectangle with a cactus cut out of the center.

Move the card and rectangle to the back via the "Arrange" tool in the top menu bar. Select the black and pink parts of the cactus ONLY. Change the Linetype to "Foil" in the drop-down menu and choose between Fine, Medium, or Bold.

While the pieces are still selected, change the foil color to purple by clicking the colored square next to the Linetype drop-down menu.

Keep the hearts selected, and then select the white heart as well. Make sure the white heart is still set to "Cut" and not "Foil". Click "Attach" in the bottom right menu to keep these parts together.

Select the rest of the cactus image and click "Group" in the upper right menu. Change the Linetype to "Foil" in the drop-down menu and choose between Fine, Medium, or Bold.

Now everything is already set to foil, and all you have to do is change the colors. Start by changing the border of the cactus to silver (or gold).

Next, select both of the pot pieces and change their foil color to aqua.

Last, change the 5 cactus pieces to green foil.

Select the entire cactus image (not the heart) and the entire white card (with score line). Click "Attach" in the bottom right menu to make sure the foil is applied to the front of the card. Click the green "Make It" button in the top right corner.

When you go to the mat preview, you should see that the card has the foil cactus on the front, and the heart is a separate cut with purple foil. If you see anything different than this, then you need to go back and make sure the right pieces are attached to each other.
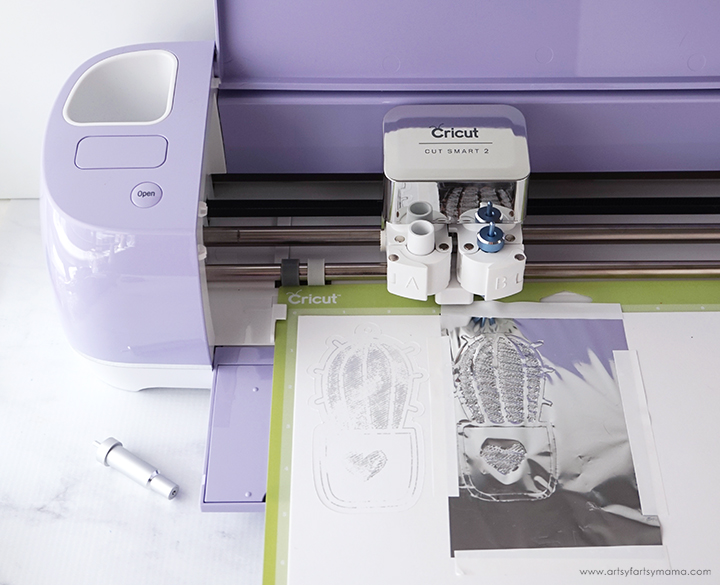
Change the material to cardstock, and then load the Foil Transfer Tool into Clamp B and a Scoring Stylus into Clamp A to score and foil all at once!
Lay the green foil sheet down on the paper where it is shown in the mat preview. Tape the foil down with the included tape strips on all four sides. Make sure it is completely smooth. If it's not, the foil can rip and ruin your project. Load the mat into the machine and press the flashing Cricut icon.

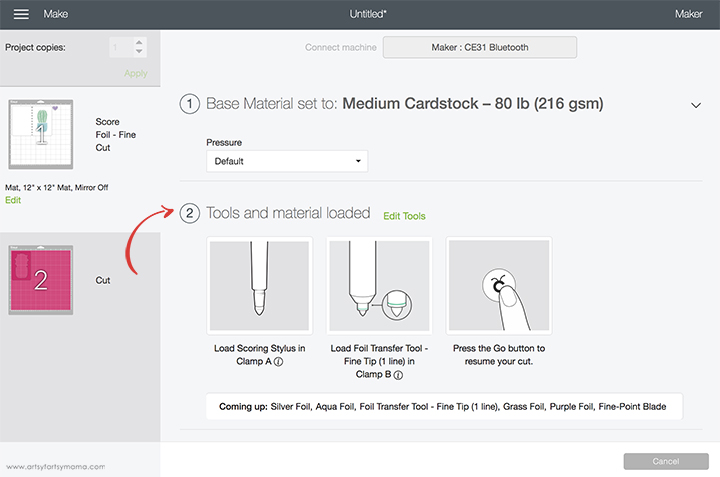
After each color of foil is applied, you will see this screen to be prompted to change the foils.

Do NOT unload the mat between changing foil colors. Carefully peel the tape away from the paper and slowly lift the foil. Place the new color of foil down as instructed, and press "Go". Remember that the purple foil is not ON the card, but to the right of the card! After the foiling steps are complete, place the Fine-Point Blade into Clamp B, and press "Go" to finish the cuts.

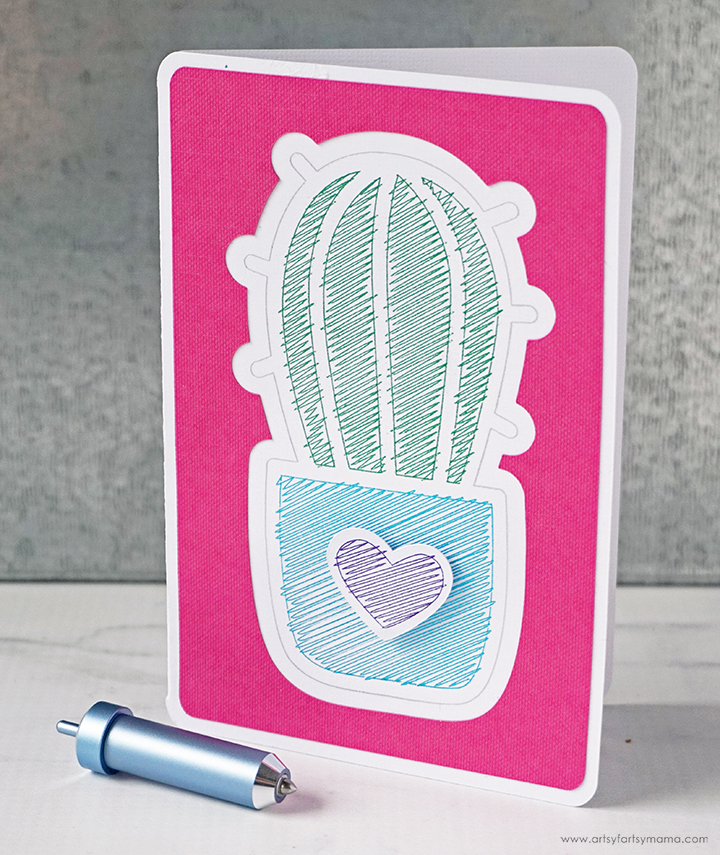
Use some paper adhesive to attach the pink cardstock to the front of the card.

Place a pop-up dot of adhesive to the back of the foiled heart. Stick the heart to the front of the card on the blue pot. This will add some dimension to your card and the heart will pop off the page!
This card is a lot of fun to make, and actually a lot simpler than I thought it would be to apply foil in multiple colors. Just take it one step at a time, and you'll do great! As always, I would love to see your creations! Please tag me on Instagram and Facebook, or leave a comment/photo on the project pin on Pinterest!
What do you think of the new Cricut Foil Transfer System?
Don't forget to Pin, Like, and Share!


