
Create a rustic "Welcome to Our Patch" Pumpkin Sign (with FREE cut file) for some welcoming fall decor!

Are you thinking about decorating for fall? I am so excited for the cooler weather, changing colors, and everything FALL to be here! This "Welcome to Our Patch" Pumpkin Sign is a great project to welcome this new season to your home, and can be customized to coordinate with anyone's home decor. I've even got a FREE cut file for you to use to make this project a little easier!

To make your own Pumpkin Sign, you will need these supplies:
- Wood Slat Pumpkin
- FolkArt Chalk Paint
- FolkArt Wax
- Sponge Brush
- Small Detail Brush
- Sandpaper
- Cricut Maker or Cricut Explore machine
- "Welcome to Our Patch" Cut File (personal use only)
- Removable Adhesive Vinyl or Stencil Vinyl
- Transfer Tape
- Weeding Tools

Paint the Wood Slat Pumpkin with a coat or two of FolkArt Chalk Paint in White Adirondack.

Upload the "Welcome to Our Patch" cut file (personal use only) in Design Space. Size the image to fit the pumpkin sign. Once you are happy with the size, click the green "Make It" button in the top right corner and follow the prompts in the next couple of screens to cut the design out of removable adhesive vinyl or stencil vinyl.
*Here's a great tutorial on how to upload your own images into Cricut Design Space.

To apply the transfer tape, place the piece of vinyl over the transfer tape and cut a piece that is slightly larger than your design. Press the transfer tape down at the top of the vinyl, then slowly work your way down the design. Use a scraper tool as you go to press the transfer tape down to remove any air bubbles.

Carefully pick up the transfer tape, turn it over and place the top edge down on the pumpkin and slowly work your way down using the scraper tool. Once the vinyl has been laid down, rub it again with the scraper tool to help the vinyl really stick to the wood.
Like you did with the vinyl backing before, slowly peel the transfer tape away at a 45º angle. If the vinyl isn't sticking to the wood, lay it back down and rub it with the scraper again until it sticks.
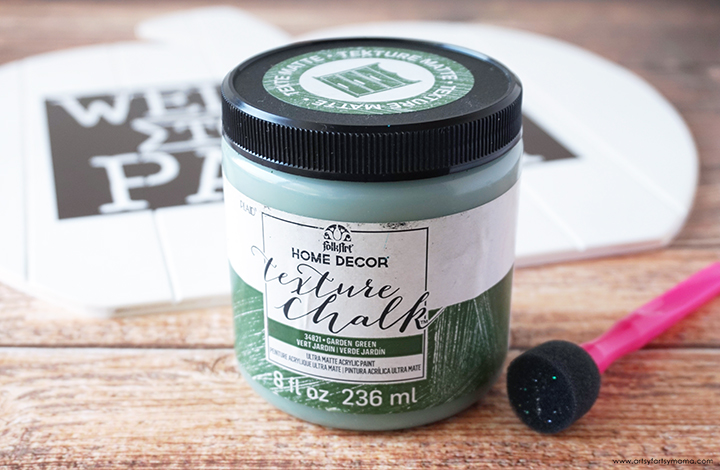
Choose the color of paint you want the words to be. I decided on this FolkArt Texture Chalk paint in Garden Green. You will also need a small sponge brush to apply the paint.


Like you did with the vinyl backing before, slowly peel the transfer tape away at a 45º angle. If the vinyl isn't sticking to the wood, lay it back down and rub it with the scraper again until it sticks.
*If you're new to working with vinyl, I've got a great tutorial on how to apply vinyl!
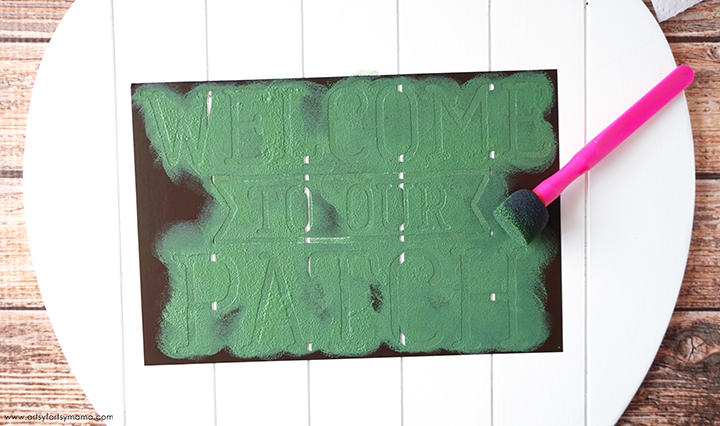
When it comes to painting with stencils, paint in light coats and dab the sponge brush on a paper towel a few times before applying it to the pumpkin to remove excess paint. This will make it less likely that you get paint seeping under the stencil. Cover all of the words, and be careful not to paint outside the vinyl.
Use a small detail brush to fill in the spaces between the slats under the stencil.
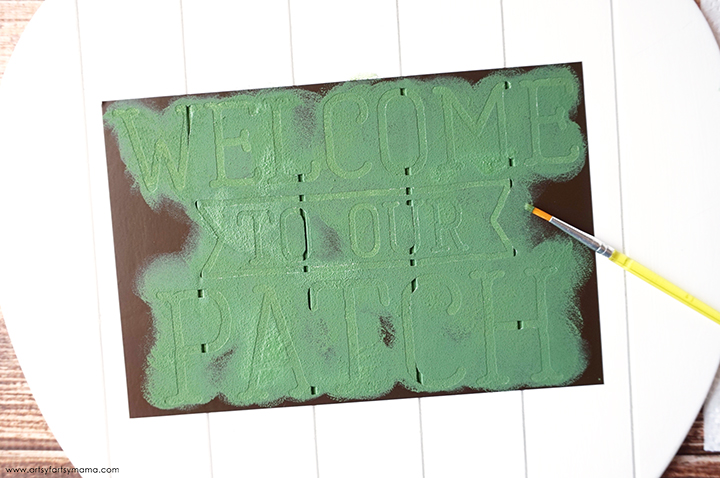
Carefully remove the vinyl from the pumpkin. Use weeding tools to remove the smaller, hard to peel pieces (like the insides of letters).
Let the paint dry completely and lightly sand the whole pumpkin. This will make the wording look a little worn and distressed.
...oh boy... this is awkward...
Usually you add a coat of wax over chalk paint to give it a nice finish and protective layer. I added a light coat of FolkArt Antique Wax over the pumpkin, thinking it would add a hint of brown to the sanded areas. That obviously did not happen how I imagined. I mean, it's not horrible, but it isn't even close to what I was going for. See?! I have craft fails, too!!
The good thing about wood projects is the fact that you can always sand it down and start over! As I was sanding off most of the wax layer, the pumpkin miraculously started looking more like I wanted. Hooray!!
Unfortunately, the sanding took off a little bit too much of the word paint than I wanted. Instead of putting a new stencil on top, I just used my small detail brush to repaint the lettering. Once the paint has dried, lightly sand the words to rough them up a bit.
Stir (not shake) the FolkArt Home Decor Wax and paint a thin layer over the entire sign with a wide brush. The wax is kind of watery and will look white and a bit grainy as you paint it on, but don't worry - that's totally normal! Once the sign is covered, leave it undisturbed overnight (or about 12 hours) to dry. You'll know that it's dry once it is completely clear and no longer tacky.
Use a lint-free cloth to wipe the sign and "buff" the wax. The more you wipe down the sign, the more of a satin-sheen finish you will get on your project!
Tie a coordinating ribbon, twine, or raffia to the stem of the pumpkin. Now you can proudly display your new piece of fall decor!
I would love to hear what you think about this pumpkin sign! As always, if you make this project, I would love to see your creations! Tag me on Instagram and Facebook, or leave a comment/photo on the project pin on Pinterest!
Looking for more pumpkin craft inspiration?
Check out this collection of OVER 100 creative pumpkin craft ideas!!
Don't forget to Pin, Like, and Share!


