
This set of summery Tie-Dye Swimsuit Earrings are made of wood and topped with a vibrant tie-dye effect!

Did you know that May is National Mod Podge Month, and that National Mod Podge Day is May 16th? Mod Podge has always been a staple in my crafting arsenal, and is so versatile to help you bring your projects to life. For example, these Tie-Dye Swimsuit Earrings are made of wood and topped with bits of tissue paper that have been decoupaged on using - you guessed it - Mod Podge! These earrings are a colorful summer accessory that will have everyone talking, and are so easy to make. I hope you get inspired to grab a bottle of Mod Podge and give this project a try!


To make your own Tie-Dye Swimsuit Earrings, you will need these supplies:

Upload the Swimsuit Earring design into xTool Creative Space. In the right menu bar, change the material setting to 3mm Basswood. When you upload an SVG design, you need to make sure each part of the design is set for cutting, scoring, and/or engraving. For this project, everything just needs to be cut!
*Feel free to adjust the size of the earrings to suit your preferred earring length. The pieces I cut were about 1.75" tall.
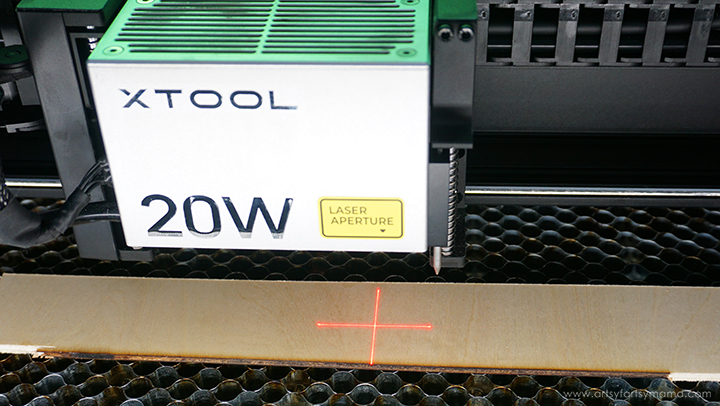
Place a piece of 3mm basswood into the xTool S1 machine - earrings are always a great project for scrap pieces of wood! Manually pull the laser box with your hand so that the red "+" is located on the material - it doesn't have to be centered.
In XCS, you will see "Distance (mm)" in the right menu bar. Click on the target icon to the right of that space, and the machine will automatically measure your material.
For more details on how to complete this step, be sure to check out my review of the xTool S1 Laser Machine!
Make sure that the earring design elements are within the marked bounding box in XCS, and then click the green "Process" button in the bottom right corner to proceed to cutting the project.

After removing the earring pieces from the machine, I would highly recommend cleaning the soot away from around the edges of the wood using a Magic Eraser or baby wipes to prevent making marks all over your hands and workspace.
Once cleaned, paint the front and back sides of the earring pieces using white acrylic paint or paint markers. Even though it will be covered up soon, you will only need 1-2 coats of paint on each piece. The white paint underneath will help the colors on top look more vibrant.

Grab one pink, blue, green, and yellow tissue paper square and then tear them all into tiny pieces. Separate the torn pieces into small piles.

Next, you'll need to gather your supplies for the decoupage part of the project: painted earring pieces, 4 tissue paper piles, Mod Podge (any finish), and a paint brush.

Paint a thin layer of Mod Podge in one small section of the earring piece. Place pieces of tissue paper over the area, overlapping* the edges. Tear the tissue paper into smaller pieces to fit, if necessary.
*Besides being bright and fun, primary colors (or similar) are a great choice for this project because the colors mix well when overlapped. Colors that are opposites (i.e. blue/orange, yellow/purple, etc) can sometimes end up looking like a grayish brown when blended.
To prevent any missed areas around the edge of the earring pieces, arrange the tissue paper on with the ends hanging off of the wood. Paint a little more Mod Podge over the top of tissue paper as you go to keep it in place. If necessary, re-coat any areas if the Mod Podge has dried before you can get to it.

Repeat adding tissue paper to the surface of all the earring pieces until they are completely covered. Top the tissue paper with a thin coat of Mod Podge. Allow it to dry completely - as long as it's a thin coat, it shouldn't take long at all.

Use a craft knife to carefully cut away the excess tissue paper from around the edges and to cut the holes of the earring pieces open. Be extra careful around the smaller areas!


The top coat of Mod Podge is actually plenty for keeping these earrings looking great, but I love the way UV resin looks on top of wood earrings. It "domes" on top as well as giving it a glossy finish.
Use a toothpick to cover the entire surface with resin, making sure to get it right to the edges. Pop any surface bubbles with alcohol.
Cure the resin under the UV light for at least 3-5 minutes. The resin should no longer be tacky to the touch. If it is, the resin needs to cure for a longer time.


Aren't these Tie-Dye Swimsuit Earrings so fun? They are the perfect summer accessory, and depending on the tissue paper, you can make earring sets in all kinds of different colors! These are a fun project to make using the xTool machine, and are a great item to sell or to gift to friends and family. I would love to see if you make some for yourself using this tutorial. Leave me a comment, or tag a photo on Facebook, Twitter, or Instagram! #AFMcrafts
Looking for more tie-dye inspiration?
Check out this collection of OVER 100 creative tie-dye craft ideas!!
Don't forget to Pin, Like, and Share!


