
Freshen up your home with a gorgeous Paper Succulent Wreath!
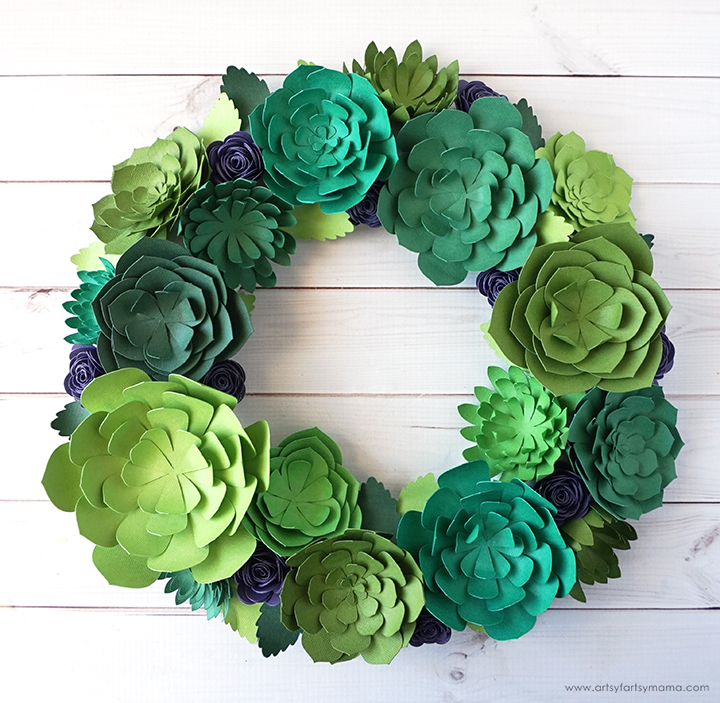
I love succulents, but I just can't keep them alive. The best way I've found to bring succulents into my home without feeling guilty is to go faux! Paper succulents are surprisingly easy to make, and you can create so many things with them. This wreath was made with only four different succulent patterns cut out of multiple shades of green paper using my Cricut Maker. Speaking of which, be sure to read through to the end for an awesome Cricut GIVEAWAY!
This post contains affiliate links for your convenience. As always, I only share products that I use myself and truly recommend!

I’m excited to be sharing my Paper Succulent Wreath as part of the Cricut Summer of Flowers! Click on the image above to visit all of the hosts and to see more Cricut flower inspiration.

Open the Paper Succulent Wreath Project in Design Space. All four of the succulent patterns are there, as well as some leaves and a basic flower. Click "Customize" to go into the canvas to make any edits - like duplicating, resizing, and changing the color of the succulents for more variation in your wreath. When you are finished making edits, click the green "Make It" button to take you to the cutting process.

I made all of the succulents with multiple shades of green cardstock. Using papers of different thicknesses, shades of color, and patterns will give you the best results. Place the paper onto a green or blue machine mat and load it into the machine. Design Space will walk you through the cutting process, and the mat previews will show which colors to cut until your project is complete.
Each succulent is made a little bit differently, and takes a few steps. I'm going to walk you through each of them to make it easy for you to make them on your own. Keep in mind that I'm no botanist, so I don't know the technical names for these little guys!
Succulent #1

This succulent pattern is probably the easiest one to make. There are five star-shaped pieces, each one a different size.

Use some scissors, a pencil, or even your fingernails to curl the ends of each petal up, kind of like how you curl wrapping ribbon. These succulent petals are easy to tear, so be careful when curling them up. I found it helpful to hold the center of the succulent between my thumb and forefinger in the opposite hand while scraping the petals with my other hand to keep the paper from ripping.

Stack the pieces up biggest to smallest, with a small dot of quick-drying adhesive in between each layer. Hold the succulent in the center until the glue sets, then "fluff" up the petals to give the succulent more shape.
That's it! Easy, right?
Succulent #2

This next succulent pattern, is a few more steps, but is still incredibly simple. This succulent has 11 pieces, with three petals each. There are two of each size, except for the smallest piece, which has three.


Stack the pieces up again, biggest to smallest, with a small dot of quick-drying adhesive in between each layer. Place the last small piece on top and hold the succulent in place until the glue sets. Curl in and "fluff" the petals to give the succulent more shape.
Succulent #3

This succulent is slightly more difficult, but I be-leaf in you!! This succulent has 7 different sized pieces with a more succulent-y shaped petal. Curl up the ends of all the petals.

Start with the piece with the circle in the center. Add a small amount of glue to one of the straight-sided petals. Bring the piece next to it over and line it up on top of the glued petal. Hold the petals in place until the glue sets. Bend each of the petals down around the circle.

Add a drop of quick-drying adhesive in the center of the largest piece and place the layered succulent piece on top. Let the glue dry completely.

Stack the rest of the pieces on top from biggest to smallest, with a small dot of quick-drying adhesive in between each layer. Place the last small piece on top and hold the succulent in place until the glue sets. Curl in and "fluff" the petals to give the succulent more shape.
Succulent #4

This succulent is probably the most time consuming of the four to put together, but is still pretty simple. Once it is all cut out, there are 18 leaves and two three-petaled pieces.

Curl up the petals of the three-petaled pieces only. Then glue them on top of each other, offsetting the petals. Set this piece aside for later.


Add a small dab of glue and overlap the ends of the leaf. This will make the leaf look more like a cupped petal shape. Repeat this step for all of the leaf pieces.

Glue three of the same size pieces together in the center to make six sets.

Stack the sets from biggest to smallest with the petals offset, adding a small dot of quick-drying adhesive in between each layer. Place the last small piece on top and hold the succulent in place until the glue sets.
Rolled Flower

I also made some simple flowers to go on the wreath. I would recommend using a color of cardstock that stands out next to the green to really make it pop. Pinks, purples, and yellows all look great! If you want to learn to make a bunch of other flowers, check out my Paper Flower Wreath!

Slide the end of the flower piece into the tip of the Quilling Tool. Roll the paper up around the quilling tool.

When you get to the center/end of the flower template, carefully remove the flower from the Quilling Tool. Add a drop of quick-drying adhesive to the circle and fold it over the bottom of the rolled paper. Hold it in place until the glue dries, otherwise it will quickly come unrolled!

Make a bunch of flowers and keep them on hand to fill in any empty spaces of your wreath.

Gather all of your paper succulents and flowers together. Glue each succulent onto a wreath form, one at a time using a glue gun.

Glue leaves and flowers on the wreath to fill in the empty spaces. I am so excited with this new wreath! It's perfect for late summer and fall decor, and the best part is I don't have to worry about keeping it alive!!
There are so many options when it comes to paper succulents!
What will you do with yours?
***Enter this giveaway for an amazing prize pack of Cricut supplies and Infusible Ink goodies! Giveaway runs until 8/4 MST and is open to USA AND CANADA residents 18 and older.***
Enter the giveaway using the form below:
Don't forget to Pin and Share!


This is STUNNING! I love it! Thanks for joining us for the Summer of Flowers event!
ReplyDeleteSo beautiful!
ReplyDeleteWoah! I be-leaf you are freaking awesome with paper flowers/succulents! (totally stole your hilarious pun) Nice work, Lindsay!
ReplyDeleteWhat are the numbers of for the succulents you used in Cricut design space?
ReplyDeleteHi Amy, I believe the design numbers are: #M103643E, #M3D7E1, and #M124F11. Hope that helps!
DeleteHi! I'm a bit distraught, I contacted you via email and didn't receive a response. Hoping to reach you here. I'm such a newbie to cricut, I'm looking everything up on google and youtube. I purchased this succulent project about a month or so ago, my first ever purchase (LOVE IT!). I saved it to my Favorites. I have been able to access it easily and make my customizations so I can size the leaves to my liking. I go in today to do the same because I need a few more to complete a frame I'm making for my son's bday. Suddenly it won't allow me to, says in red at the top that the project has been saved as private. No idea what that meant and everything I look up is trying to show me how to save a project as private but nothing about how to undo it. And as I'm watching the steps on how to make it private, I'm about 99% sure I didn't do that. Can you advise? Thank you!
ReplyDelete-Panicky mom
Hi, I'd love to make this as my first cricut project, but when I click the link for the pattern nothing happens. Is there any other way to access the project?
ReplyDelete