Step up your sneaker game with DIY Galaxy Shoes that are out of this world!
My daughter has been spending her summer at the skate park, and has needed some better shoes for a while. While out shopping for new shoes, she has been begging for the ever-popular "galaxy" style shoes. The problem is that all the ones we found were SO much more expensive than other styles, and I don't have the budget for that. So we compromised with getting plain black shoes (for a great deal) that will be perfect for the skate park, and I would customize them for her to look like galaxy shoes myself!
Thanks to Zuru for making this post possible. As always, all opinions are my own.
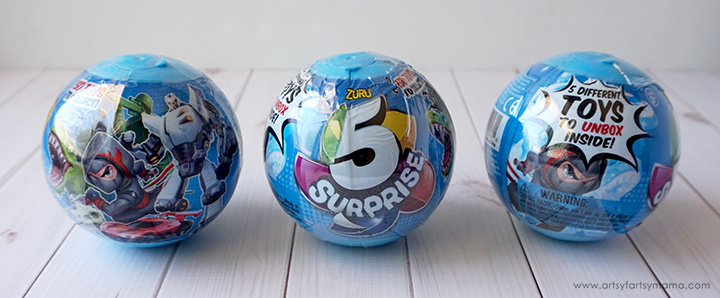
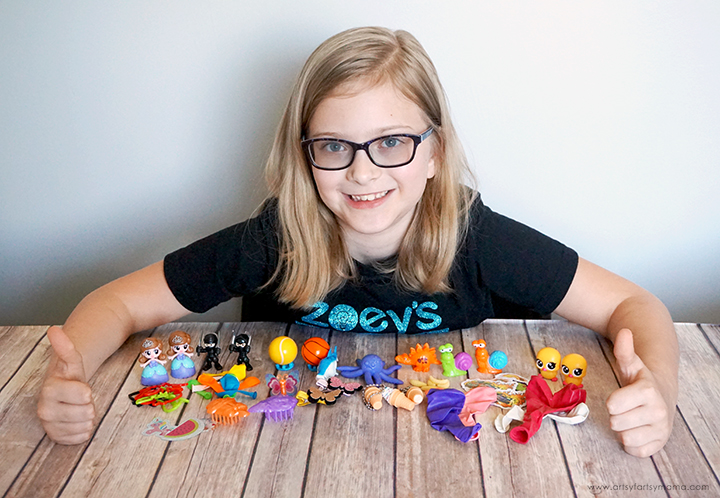
What will you unbox? 5 Surprise combines the magic of unboxing with the thrill of collecting toys!
"Unboxing" surprise toys is all the rage right now. There's just something about opening up a mystery toy that has my daughter obsessed with them all. She even loves watching videos of other people opening toys! We just discovered ZURU’s 5 Surprise, one of the newest toys that combines the magic of unboxing with the thrill of collecting toys!
We found ZURU 5 Surprise capsules at Walmart for only $4.99 each. This is a great price to stock up and keep on hand for summer boredom, to give as birthday gifts, or even a fun party favor idea! My daughter loves these things, and the surprises from just one capsule kept her entertained all afternoon. I call that a win.
My daughter had the best time unboxing ZURU 5 Surprise capsules to share on our YouTube channel! It was a lot of fun watching her surprise every time she opened a package. If you enjoy the video, she would be thrilled if you left her a comment!
These capsules come in either blue or pink with 5 surprises in each. Since there are 150 different surprises per color, the chance of duplicates is pretty low. Combined, this series of ZURU 5 Surprise gives you the opportunity to collect 300 different toys! From dinosaurs to silly putty to mermaids, there is literally something for everyone!
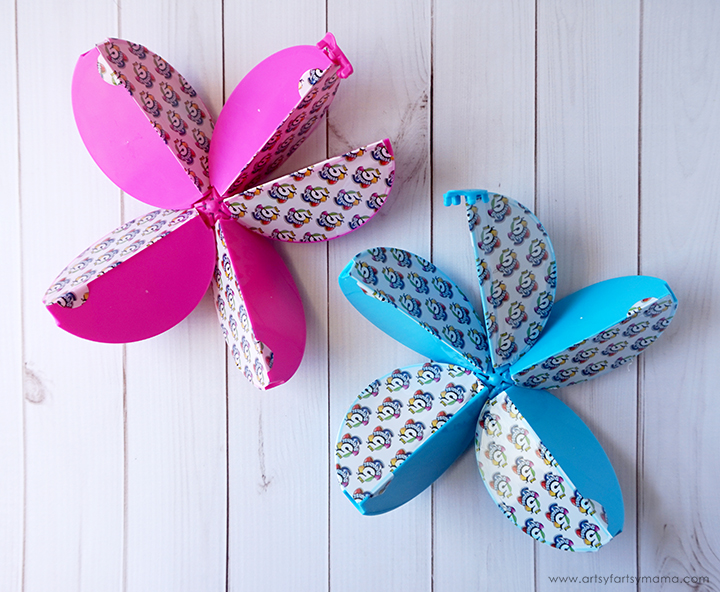
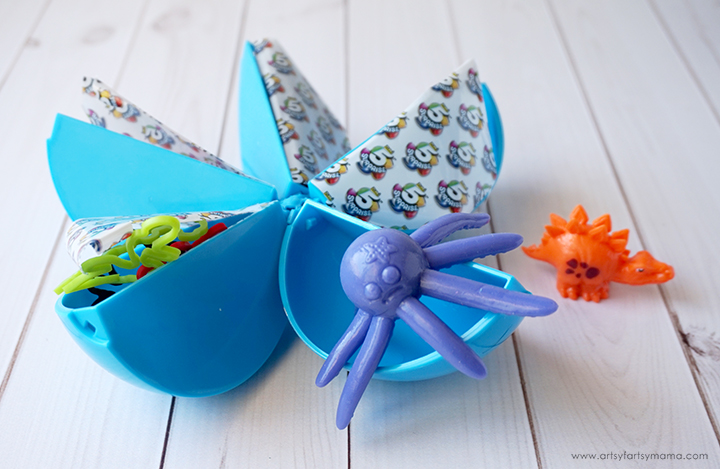
Each 5 Surprise capsule "blooms" to reveal 5 sealed segments that are hiding an awesome and different toy, with the best part being the SURPRISE! The kids do not know what they are getting until they unwrap the segments, which means every capsule is a new experience.
The pink 5 Surprise capsules have over 150 toys to collect, including rings, glitter pens, hair clips, key rings, stamps, beads, cute pet figures, dress-up princesses, and more! The surprises are so fun for kids of all ages.
Peel the packaging away one section at a time to reveal the surprises. Each toy is individually wrapped, so younger kids will need some help getting them open.
Every capsule comes with a collector’s guide, so your kids can keep track of the surprises they have received. There are many possible variations of toys available, so it's a lot of fun to see what you're going to get!
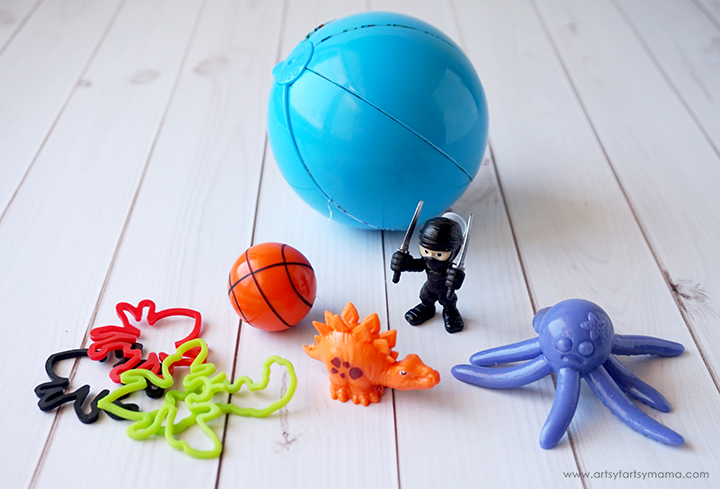
The blue 5 Surprise capsules also have over 150 toys to collect, including action figure ninjas, glow-in-the-dark zombies, super sticky squishies, prank toys, stickers, and more!
I love how each of the sections are individually packaged, so that the surprises don’t all have to be opened at once. They can easily be split up to be incorporated into a reward system, to make a road trip more exciting, or just as a fun surprise!
With so many toy variations, you can build up quite a unique collection of toys! My daughter has had a ton of fun with the ninjas, bouncy balls, and squishies!
This is a sponsored post and contains affiliate links. As always, all opinions are my own.
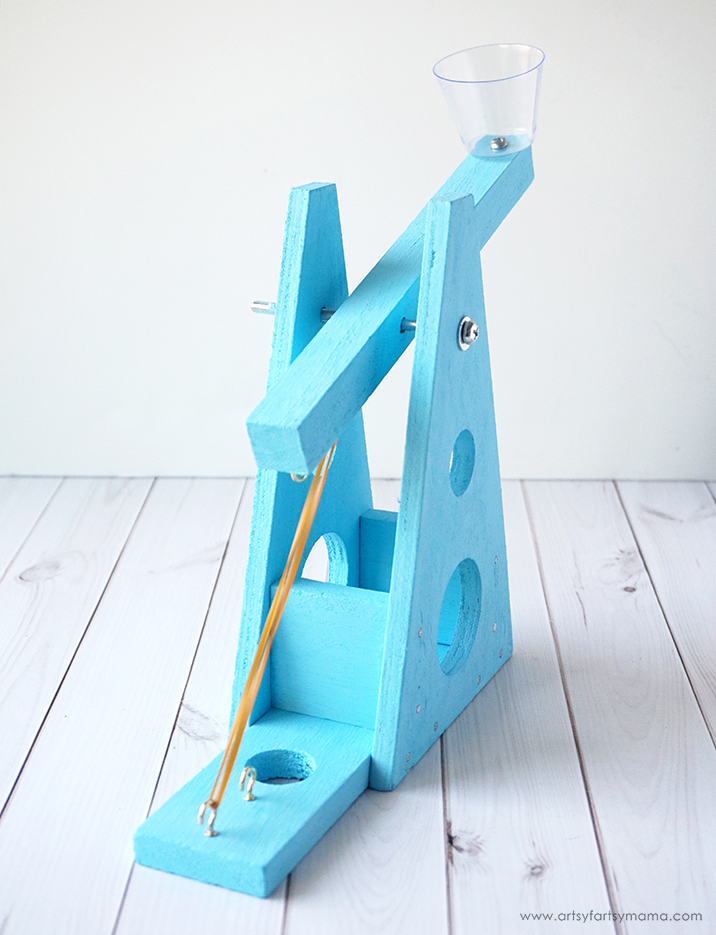
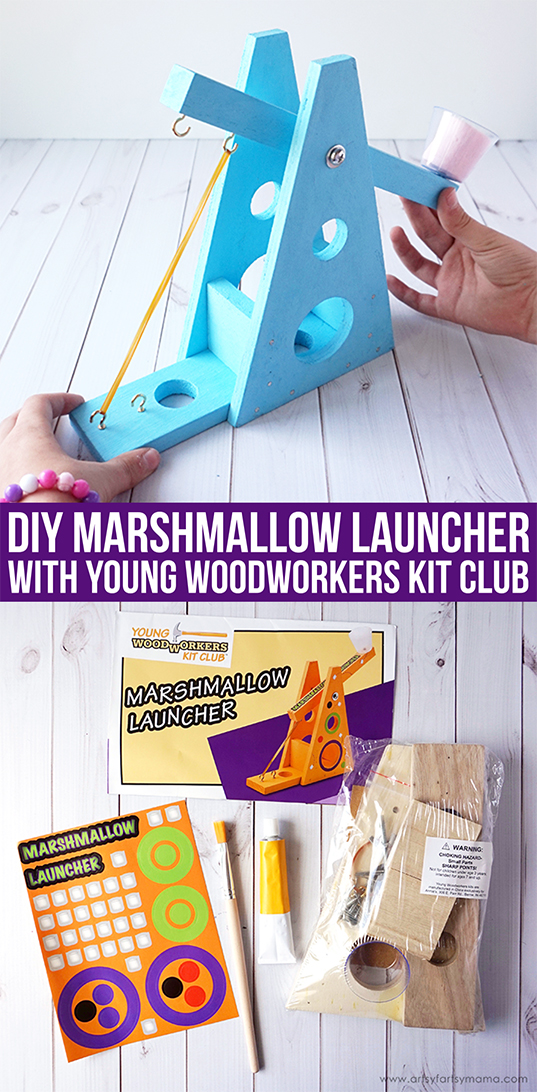
My daughter has always enjoyed helping my husband when he's working on projects around the house and assembling small building kits found at our local home improvement store. Allowing kids to help with these kinds of projects will help kids learn new creative skills, work independently, and most importantly, gain confidence! The latest project my daughter and husband worked on together was this Marshmallow Launcher kit from Young Woodworkers Kit Club!
The Young Woodworkers Kit Club is a woodworking kit series designed for children 7-12 years old. This is the perfect age to start teaching basic woodworking skills, including handling a hammer, learning to use small screws and nails, using sandpaper to round off rough edges, learning the importance of making careful measurements and much, much more! When you sign up for the Young Woodworkers Kit Club, a new kit will arrive in the mail every 4-6 weeks with a real wood project for your child to complete, like this Marshmallow Launcher Kit!
Each kit comes with easy-to-follow instructions with photos of every step, and all the pre-cut wood your child needs to complete each project from start to finish, including pre-drilled nail holes and all the necessary nails and fasteners. This Marshmallow Launcher Kit also came with a paint brush, paint, and stickers to customize your project after it has been built!
Along with the kit, you also get a set of tools to help complete the project: Young Woodworkers Kit Club hammer, tape measure, Phillips screwdriver, mini screwdriver, and an L-square ruler.
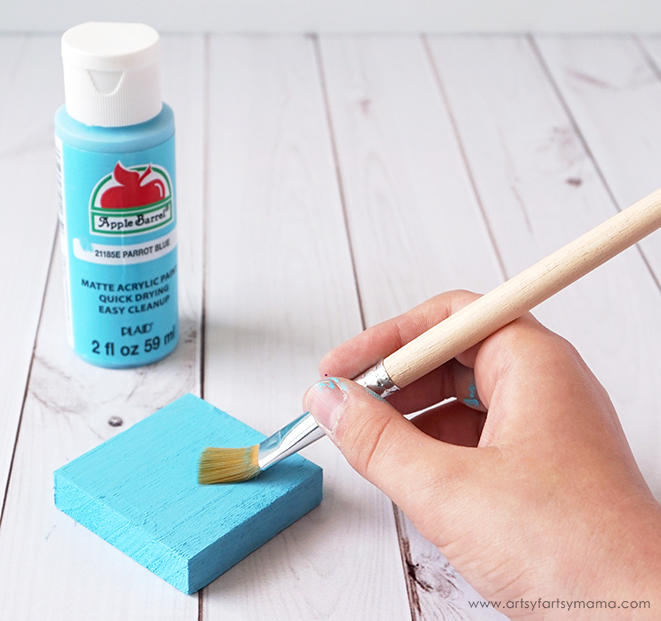
My daughter painted the wood pieces before assembling the Marshmallow Launcher. Instead of using the yellow paint from the kit, she made it her own by using some Apple Barrel craft paint in Parrot Blue color. These paints are perfect for kids crafts because they are water-based and easy to clean with soap and water!
She painted each piece with 2 coats of paint, letting the paint dry completely between each coat. Don't worry - this paint dries quickly, so they won't be waiting long!
After everything has been painted, start assembling the launcher by following the easy-to-follow, illustrated instructions with photos of every step. The pre-drilled nail holes in the wood pieces make it easier for kids hammer the nails in place.
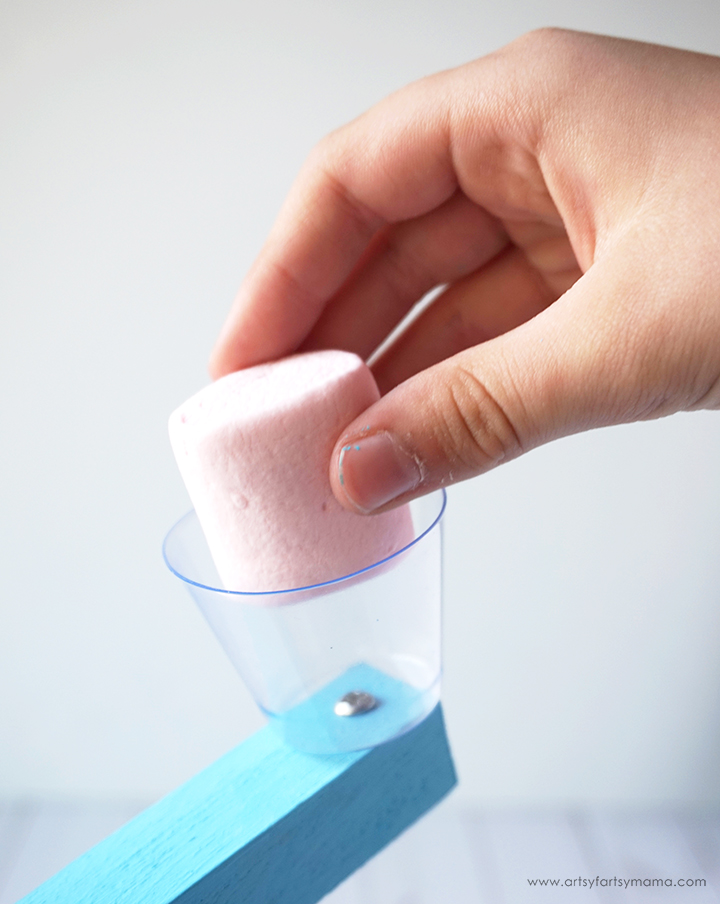
As you follow the directions, the marshmallow launcher starts to come together! Assemble the arm and attach it to the base of the marshmallow launcher with a screw and a wing nut.
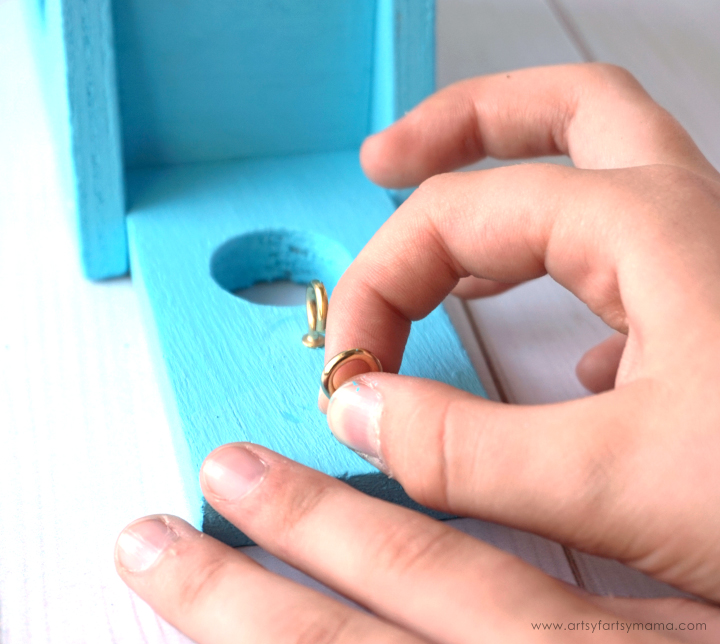
Next, attach hook screws to the base according to directions. You don't need any tools for this step, just your hands!
Hook the rubber band that comes with the kit to the hooks on both the base and the arm. As you pull on the arm, you can feel the resistance, making it possible for you to launch those marshmallows!
Not only is this Marshmallow Launcher a TON of fun, but it's also a great STEM activity that proves that you CAN learn while having fun! How far can you launch the marshmallow? Can you hit a target? What can you change to make the marshmallow fly the farthest?
There's so much to learn about physics (science!), when pulling the arm of the launcher back and letting go. We can use technology to learn different ways to adjust the marshmallow's flying distance. We used our engineering skills to actually build the Marshmallow Launcher. Finally, get playing and use math to measure your distance after launching marshmallows!
My husband and daughter had so much fun building this Marshmallow Launcher, and it was a great bonding moment for the two of them. We also had a fun time competing to see how far we could shoot marshmallows!
If you’re looking for a gift idea or summer fun for creative kids, visit Young Woodworkers Kit Club to subscribe and check out fun project ideas! You can also follow them on Instagram and Facebook for more creative inspiration.
How do you encourage creativity through the summer?
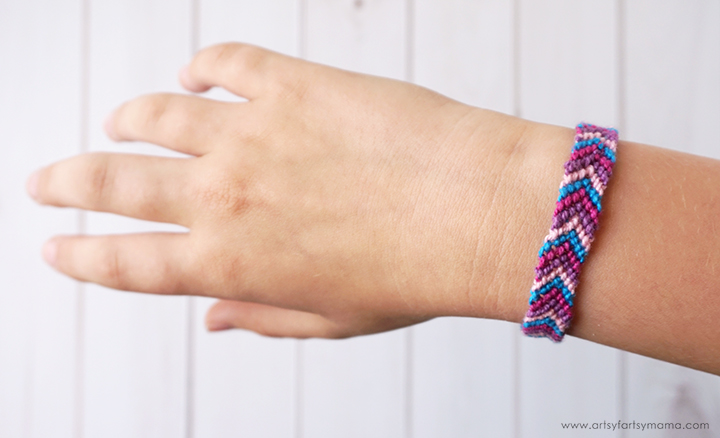
Celebrate National Best Friends Day with a DIY Friendship Bracelet tutorial inspired by LEGO Friends!
Today is National Best Friends Day, and what better way to celebrate than with the LEGO Friends group?! These girls are great examples of being a good friend and supporting each other. We've got some fun, new sets that you can get in the LEGO Friends line, as well as an awesome DIY Friendship Bracelet tutorial so that you can tell your own BFFs just how much you appreciate them!
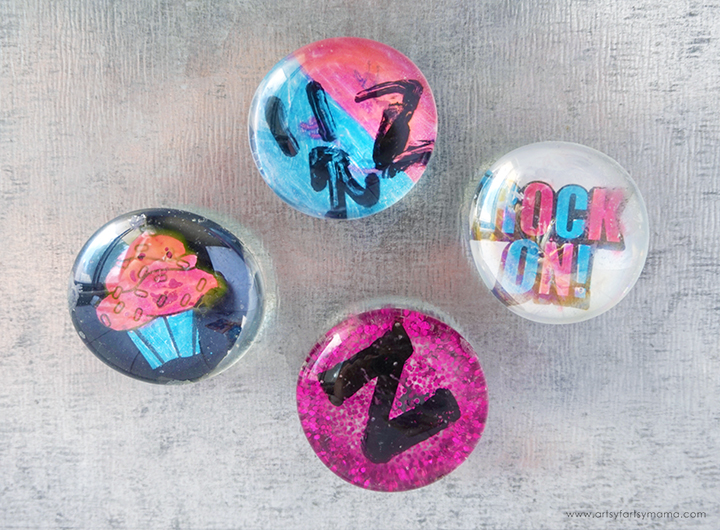
Encourage girls to make DIY Glass Gem Magnets with this kit from Creative Girls Club!
This is a sponsored post and contains affiliate links. As always, all opinions are my own.
Summer's here and we're always looking for things to keep busy over these next few months. Along with the educational, it's important to also encourage creativity throughout the school break. My daughter had a blast making her own custom glass gem magnets using the Clearly Cool Magnet Kit from Creative Girls Club!
The Creative Girls Club is the ultimate crafting kit club for girls ages 7-12. About every six weeks, the girl in your life will receive two craft kits that are bound to inspire, entertain and enlighten! Even better, the kits will be marked as a special gift from YOU! I don't know about you, but I could use a few brownie points for being a "fun parent" once in a while...
My daughter wanted to put a video together to show how fun this kit is. If you'd like, head on over to YouTube and leave her a comment!
Each kit includes all of the materials you need to complete the project. It also includes easy-to-follow instructions with photos of every step so that girls can create with little to no supervision needed. This will help girls to learn new creative skills, work independently, and most importantly, gain confidence!
Start making your magnets by coloring in one of the die cut circles with the provided pens. There are 9 printed die cut designs, and 3 blank circles if you want to draw and color your own design. There is also a black marker included in the kit. Please note that the marker will bleed through the paper, so protect your surface!
Once your design is colored just how you want it, carefully punch the circle away from the paper. If you are having a hard time, you can use scissors.
Use some white school glue or your favorite craft glue and add a small amount to the flat side of the glass gem. Don't be afraid to get messy and spread it around with your finger! Place your design face down on the gem. Press well, especially around the edges to get any air bubbles out.
*Try not to use too much glue, otherwise it can ruin the paper and take too long to dry.
Add a small drop of glue to one of the magnets. Place it on top of the back of the paper. Hold it in place for a moment, then set them aside to dry.
When you turn the gem over, the magnets will have a hazy, white look. Don't worry! They will clear up as they dry.
Encouraged by the instructions, my daughter wanted to make her own custom magnet design using some of the other supplies. She drew a backwards "Z" on the magnet using the black marker. The reason it is backwards is because when the magnet is turned over, the Z will be the right direction.
Add a little bit of glue right on top of the marker. Carefully spread the glue around with your finger so that the glass gem is evenly covered.
My favorite part! Place the glue-covered gem on a scrap piece of paper. Open up a corner of a glitter packet, and pour it right over the gem. Gently tap the pile over the gem to pack the glitter into the glue. Let it set for a minute or two to let the glue dry a little. Pick up the gem and tap it on its side a few times to remove the excess glitter. Set aside to finish drying.
Tip: to prevent glitter from flaking off every time you touch the magnet, spray a layer of clear spray paint over the gem!
Add a little bit of glue to a magnet and stick it to the glittered side of the gem. Hold in place for a minute or two for the glue to set.
At first, the magnet will look white and you'll barely see any glitter. Again, don't panic. Once the glue dries completely, it will go clear and the glitter will shine through.
Leave the magnets to dry overnight in a flat area. Make sure they are spaced apart from each other! Otherwise the magnets will pull themselves away from the gems if the glue hasn't dried enough.
After the magnets have had time to dry, they are ready to put to use! These magnets are great as fridge or locker decor, a creative way to hang up your favorite photos, and are fun DIY gifts to make for friends and family.
This kit was a ton of fun, and kept my daughter busy all afternoon. I love that it was easy for her to make all on her own, and that she felt so confident as she showed off her finished creations.
Here at Artsy-Fartsy Mama, you'll find a little bit of everything: crafts (even ones for the kids), FREE printables and SVG cut files, easy recipes, educational ideas, travel tips, sewing tutorials, and so much more to add creativity to your life!
Join Our Newsletter!
Let's be friends! Get the latest DIY ideas, recipes and freebies delivered straight to your inbox!


 Here at Artsy-Fartsy Mama, you'll find a little bit of everything: crafts (even ones for the kids), FREE printables and SVG cut files, easy recipes, educational ideas, travel tips, sewing tutorials, and so much more to add creativity to your life!


