Posts may contain affiliate links (see Disclosure). Thank you so much for supporting Artsy-Fartsy Mama!
Wednesday, October 26, 2016

Classroom Halloween Party

Wednesday, October 26, 2016

Classroom Halloween Party

Read more »
Thanks to Oriental Trading for helping make our Classroom Halloween Party even more awesome!

Classroom Halloween Party Inspiration and Ideas at artsyfartsymama.com

This year I signed up to help with my daughter's classroom Halloween party. My plan is to have a main table as the central area of our party to hold party favors, treats and a few activities. I am really excited about it, but am also a little nervous since this is my first time doing this! Hopefully we can all learn some new tricks together, right?
Tuesday, October 25, 2016

Free Printable Halloween Bookmarks

Tuesday, October 25, 2016

Free Printable Halloween Bookmarks

Read more »
Download Free Printable Halloween Bookmarks for kids of all ages to color!

Free Printable Halloween Bookmarks for kids to color at artsyfartsymama.com

I am helping to plan my daughter's classroom Halloween party and thought it would be fun to make all the kids some Halloween bookmarks to color! This activity will give kids (of all ages!) time to enjoy coloring as well as have something to take home as reading encouragement.

Friday, October 21, 2016

No-Bake Chewy Granola Bars

Friday, October 21, 2016

No-Bake Chewy Granola Bars

Read more »
This shop has been compensated by Collective Bias, Inc. and its advertiser. All opinions are mine alone. #Healthy4School #CollectiveBias

No-Bake Chewy Granola Bars Recipe at artsyfartsymama.com #Healthy4School

The school year is well underway, which also unfortunately means that the germs are spreading like crazy. My husband is a teacher, so that means he's surrounded by adorable children (as well at their germs) all day, every day. Eating healthy snacks (like these No-Bake Chewy Granola Bars) and washing hands often obviously helps a lot, but by incorporating Centrum® vitamins and Chapstick into his daily routine, he's getting that extra boost of vitamins he needs to get through this season!

No-Bake Chewy Granola Bars Recipe at artsyfartsymama.com #Healthy4School

By taking the Centrum MultiGummies daily, my husband and I are supporting our immunity, energy, and metabolism. Plus, getting to have gummies everyday definitely makes you feel like a kid for a minute or two!
New Centrum® MultiGummies® for Men and Women. So advanced, they have more Vitamin D3 than any other men’s or women’s gummy*
*Among leading men’s and women’s gummy multivitamins.
Here in Utah the air is already dry, but in winter it's even drier. My lips get super chapped with the air conditions, so my go-to Chapstick flavor is always the Classic Medicated because of the way it moisturizes & softens for smooth lips everyday. It's literally Skincare for lips™!

No-Bake Chewy Granola Bars Recipe at artsyfartsymama.com #Healthy4School

You can find Centrum MultiGummies vitamins and any flavor of Chapstick in the health section at Walmart. You can also grab all the ingredients to make some No-Bake Chewy Granola Bars while you're there!

These granola bars  are great snacks or fast breakfasts. They’re nut-free, so they'll be safe for bringing to school. Plus, making them homemade is less expensive than getting them from grocery store. Did I mention that you can throw these together in less than 10 minutes? Yep. Have I convinced you to try these yet? Because you totally need to.

Start with some crispy rice cereal and some quick cook oats and mix them together in a large mixing bowl. Meanwhile in a saucepan, melt some butter, brown sugar and honey together on medium to medium-high heat until it starts to bubble. Once's it's a steady simmer, lower the heat and let it cook for another 2 minutes. Remove the pan from the heat and let it cool for about 5 minutes. The sauce will thicken as it cools, which is important for these granola bars to work!

No-Bake Chewy Granola Bars Recipe at artsyfartsymama.com #Healthy4School

Pour the liquid mixture into the bowl of oats and cereal and combine together with a rubber spatula until all the oats and cereal are coated. Since it will still be a little warm, wait a minute or two before stirring in the chocolate chips so that they don't melt.

Put all the granola bar mixture into an ungreased 8x8 glass baking pan. Pack down the granola bars into the pan so that they will stick together. Don't worry, they'll still be delightfully chewy and delicious! Grab a handful of chocolate chips or chocolate chunks and sprinkle them on the top of the granola bars and lightly press them down so they stick well.

Let the bars cool, then cut them into 10-12 bars. You can even double that by cutting those in half to make smaller bars!

No-Bake Chewy Granola Bars Recipe at artsyfartsymama.com #Healthy4School

No-Bake Chewy Granola Bars
Makes: 10-12 bars
Recipe adapted from Rachael Ray

Ingredients:
1/4 cup butter
1/4 cup honey
1/3 cup packed brown sugar
1/2 teaspoon vanilla
2 cups quick cook oats
1 cup crispy rice cereal
1/3 cup mini chocolate chips or chunks, or 1/8 cup each

Directions:
1. Stir oats and rice cereal together in a large bowl and set aside.
2. Melt butter, honey and brown sugar together in a small pot over medium high heat until it comes to a bubble. Reduce the heat and simmer for 2 minutes. Remove from heat and stir in vanilla. Let cool for about 5 minutes (it will thicken as it cools).
3. Pour honey mixture over dry ingredients and mix well to coat all of the oats and rice cereal. Stir in chocolate chips.
4. Place granola bar mixture into a glass 8x8 baking pan and press firmly to pack it together really well.
5. Sprinkle mini chocolate chips and/or chocolate chunks onto the top and press down lightly.
6. Cool granola bars in the refrigerator for about 30 minutes, or on a countertop for two hours.
7. Use a knife to cut into 10-12 bars.

No-Bake Chewy Granola Bars Recipe at artsyfartsymama.com #Healthy4School

The granola bars can get too dry if they are left out. To keep them better longer, wrap bars in parchment paper or plastic wrap and place in a freezer bag. Store at room temperature to enjoy anytime, or place them in the fridge to enjoy in a lunch box.

No-Bake Chewy Granola Bars Recipe at artsyfartsymama.com #Healthy4School

No-Bake Chewy Granola Bars are great snacks or breakfasts, and pair well with Centrum and Chapstick to keep you feeling great!

What are your tips for staying healthy during the school year?

Wednesday, October 19, 2016

DIY Ta-Da List Notepad

Wednesday, October 19, 2016

DIY Ta-Da List Notepad

Read more »
Celebrate everything you get done today with a DIY Ta-Da List Notepad!

DIY Ta-Da List Notepad with Free Printable at artsyfartsymama.com #CupForCrushingIt

Do you ever feel like no matter how much you seem to do during a busy day that you still aren't getting it all done? I have been feeling like that a lot lately and it really gets overwhelming. Instead of focusing on the things on your to-do list that isn't getting crossed off, we should be celebrating all the things we DO get done. That's why I created a Ta-Da List to share with you to make us all feel a bit more like we're crushing it! Sometimes those seemingly menial achievements feel like like an epic win, and THOSE are the things that really matter!
Sunday, October 16, 2016

No Tricks Just Treats Gift Idea

Sunday, October 16, 2016

No Tricks Just Treats Gift Idea

Read more »
Surprise your friends with this No Tricks Just Treats Gift Idea!

No Tricks Just Treats Gift Idea with Free Printable Tag at artsyfartsymama.com #popcornboxparty2016

Halloween is such a fun time of year! It's finally fall, there's pumpkin-flavored everything, and dressing up is a blast. I've always been a little anxious when it comes to trick-or-treating though. What if someone decided to trick instead of treat?! Well, with this gift idea, there's nothing to worry about. The box literally tells you what's inside. No tricks. Just treats. Perfect for your favorite teachers, friends, and co-workers!! 

No Tricks Just Treats Gift Idea with Free Printable Tag at artsyfartsymama.com #popcornboxparty2016

First thing you'll need to make this gift is a box to put your goodies in. It might not look the part right now, but this World Market Popcorn Box is a cute and convenient way to package up some sweet treats for your Halloween gift. All it needs is a little paint and a touch of sparkle!!

No Tricks Just Treats Gift Idea with Free Printable Tag at artsyfartsymama.com #popcornboxparty2016

To cover up the red and white stripes, I added a couple of coats of black spray paint to both sides of the box while it was still folded flat. Each coat of paint needs dry completely. Then, I added some gold sparkle with FloraCraft Spray Glitter. Let the box dry while you prepare your treats!

*If you choose to use spray paint, keep in mind that any food that is added to the box MUST be packaged. Using acrylic paints or paper to cover the box would make a better food-safe option.

No Tricks Just Treats Gift Idea with Free Printable Tag at artsyfartsymama.com #popcornboxparty2016

Print out the No Tricks Just Treats Gift Tag, cut it out, and stick it onto the popcorn box with some glue or tape. I really love using Aleene’s Tacky Line Runner for projects like this because it holds strong and is easy to use.


Some things you should know before downloading:
*Artsy-Fartsy Mama printables are for PERSONAL USE ONLY.
*You may NOT modify, re-sell, or claim the design as your own.
*If you'd like to share this project, credit MUST be given and linked back to this post.

No Tricks Just Treats Gift Idea with Free Printable Tag at artsyfartsymama.com #popcornboxparty2016

Fill the box with some orange shredded crinkle paper and package your treats in a Halloween cellophane bag. For a little extra cuteness, I tied the top of the bag with some black pom pom ribbon! Now the gift is ready to share with your favorite friends, teachers, or whoever might need a little treat in their lives!

a Rafflecopter giveaway
Since this is a Popcorn Box Party, here are the rest of the awesome projects other talented bloggers created using the same popcorn box that I used in my project! You can also check out more images on social media using the hashtag #popcornboxparty2016


Friday, October 14, 2016

DIY Leather Bows

Friday, October 14, 2016

DIY Leather Bows

Read more »
DIY Leather Bows at artsyfartsymama.com

I always love making new hair accessories for my daughter. These DIY Leather Bows look chic and are totally affordable. Plus, it helps that they are easy to make using the Cricut Explore machine!
Friday, October 7, 2016

DIY Girly Marshmallow Man Costume

Friday, October 7, 2016

DIY Girly Marshmallow Man Costume

Read more »
Terrorize the town with a DIY Girly Marshmallow Man Costume! I ain't afraid of no ghost!

DIY Girly Marshmallow Man Costume Tutorial at artsyfartsymama.com

My daughter is totally loving everything Ghostbusters right now. She loves the originals, so we took her to see the new Ghostbusters this summer and she absolutely LOVED it!! Some may knock the new movie, but it was amazing to see this science-loving, up-for-anything girl come out of the theater feeling empowered and ready to take on the world!

When I asked her what she was going to be for Halloween this year, I was sure she'd decide to be a Ghostbuster. She considered it, but then became adamant on being a "villain".  As we were looking through the costume store for ideas, she stopped dead in her tracks and exclaimed that she "finally decided on being the Stay Puft Marshmallow Man, but as a girl!" You got it!!

DIY Girly Marshmallow Man Costume Tutorial at artsyfartsymama.com

To make this Marshmallow Man costume more on the girly side, of course we had to incorporate a tutu! Tutus are incredibly easy to make:

1. Start by making a waistband. Measured around the waist and cut 1 inch wide elastic to an inch or two smaller than the waist measurement (the elastic stretches out a little during the process). Overlap the edges of the elastic and sew them together with a zig-zag stitch. You can also hand sew if you don't have a machine.

2. Grab some tulle! I used 3-4 rolls of tulle (6 inches wide, 30 yards). Measure your tulle into strips twice the length of your desired skirt. For example, our tutu is 8 inches long, so I cut tulle into 16 inch strips. The easiest way I've found to do this is cut a piece of cardboard 16 inches long. Wrap a roll of tulle around the cardboard. Place a rubber band around each end to hold the tulle in place. Cut each end with fabric scissors and now you've got two stacks of 16" long strips on both sides of the cardboard!

3. Add tulle to the skirt by folding two strips of tulle in half. This creates a loop on one end and two loose tails on the other. Place the folded tulle strips over the waistband so that only a few inches of the loop stick out over the top. Then fold the tail ends around the waistband and pull them through the loop. Pull the knot tight.

4. Keep adding doubled-up strips of tulle until the entire waistband is covered. Voila!

DIY Girly Marshmallow Man Costume Tutorial at artsyfartsymama.com

To break up the white of the outfit, I sewed a belt to go above the tutu. Cut two pieces of blue fabric 3 inches wide x waist measurement + 10". Sew them right sides together, flip them right side out, and iron the seams. Topstitch around the entire belt.

Next, I cut out the "Stay Puft" wording out of Stripflock Heat Transfer Vinyl on my Cricut Explore machine. I applied the vinyl to the belt, and to the band of the Marshmallow Man hat. Set the belt aside.

DIY Girly Marshmallow Man Costume Costume Tutorial at artsyfartsymama.com

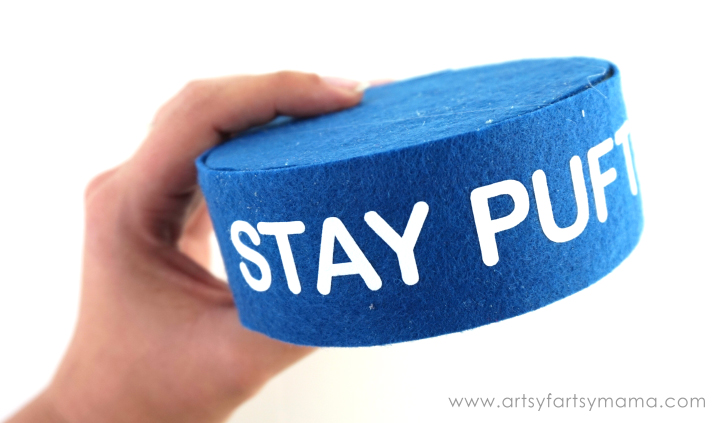
To make the hat, you'll need a foam disc that measures about 4" x 2". Trace the disc onto some blue felt and cut out two circles. Next, cut a 2" strip of felt long enough to wrap around the side of the disc to become the hat band. I also cut out a few 1" circles and a 1" x 6" strip of red felt to place on the top of the hat.

DIY Girly Marshmallow Man Costume Tutorial at artsyfartsymama.com

For the "poof" of the hat, I first cut a 12" or so circle of white cotton fabric. Take a needle and thread and hand sew around the edge of the circle. Pull the thread tight to gather the circle and tie a knot to keep it together. To help it keep it's shape, I stuffed some tulle inside. You could also use a batting, cotton fill, or even a plastic bag!

DIY Girly Marshmallow Man Costume Tutorial at artsyfartsymama.com

Hot glue the felt circles onto the top and bottom of the disc. Let dry completely.

DIY Girly Marshmallow Man Costume Tutorial at artsyfartsymama.com

After the vinyl has been applied to the band, use some hot glue to attach it to the disc. Now the hat is ready to be assembled!

DIY Girly Marshmallow Man Costume Tutorial at artsyfartsymama.com

Add a bunch of hot glue to the top of the disc. Center the poof open-side down and hold it in place until the glue dries. Fold one end of the red felt strip in half and cut a triangle from the end. Next, add a drop of glue to the top center of the poof and place the straight edge of the red strip on top. Glue a stack a few 1" circles together, then glue it onto the top of the hat (on top of the red strip).

You can now add the hat to a hair clip or glue it onto a headband!

DIY Girly Marshmallow Man Costume Tutorial at artsyfartsymama.com

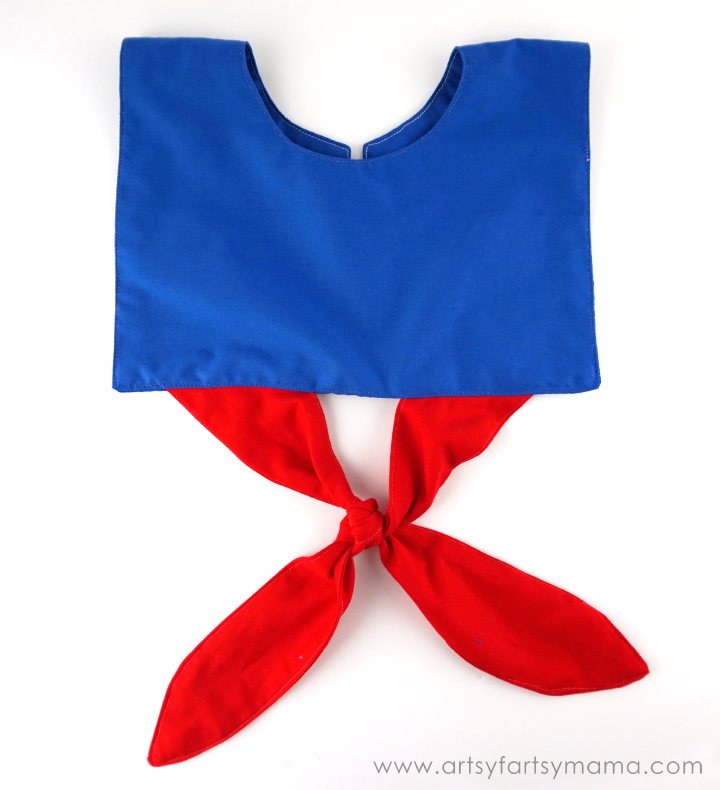
Last, but not least, is putting the collar together. Measure your child's chest to figure out how wide you want the collar to be, and also measure down from the shoulder to see how long it should go. Mine measured 7 inches wide, and 6 inches long. Double the measurement of inches long and now you've got your rectangle measurement! Cut two pieces of blue fabric to this size.

Next, I drew about a 4-5 inch circle in the center of the rectangle. Fold the fabric in half, and cut a straight line to the circle, then cut out the entire circle. The cut line will be the back, and the circle is the part that will go around the neck.

DIY Girly Marshmallow Man Costume Tutorial at artsyfartsymama.com

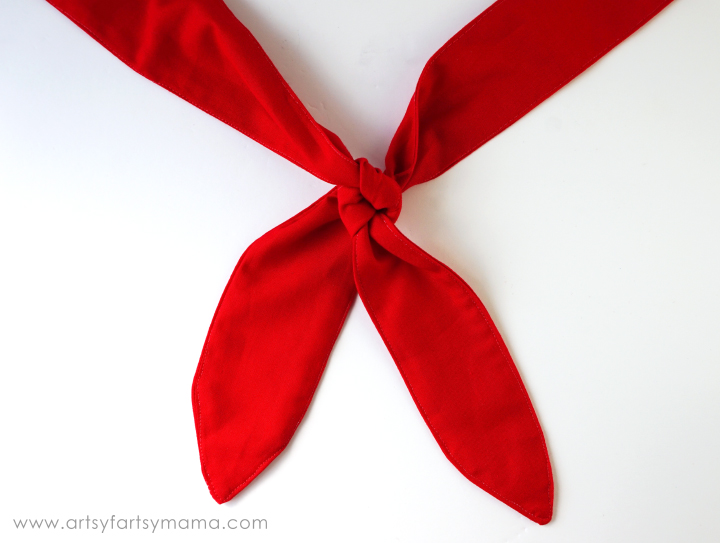
The Marshmallow Man also has a cute little red knot under the collar. So I just cut two 3 inch wide strips of red fabric and sewed them together. Instead of squared edges, I just freehanded a pointed edge. Sew them together and topstitch. Tie the strips together in a square knot.

DIY Girly Marshmallow Man Costume Costume Tutorial at artsyfartsymama.com

Place the knotted strips in between the "front" side of the collar with the untied edges sticking out. Pin all the edges in place and sew around the entire collar leaving a 4-5" opening so you can flip it right side out. Keep the extra length of the red strips just in case you need to adjust anything.

DIY Girly Marshmallow Man Costume Costume Tutorial at artsyfartsymama.com

Once you flip the collar, check that the knot is laying in the right place. If so, cut the extra red strips, flip right side out, and topstitch. If you need to adjust the knot, you'll need to unpick the seams and fix it before topstitching.

DIY Girly Marshmallow Man Costume Costume Tutorial at artsyfartsymama.com

The finishing touch is the white line going around the collar. You could tack on some ribbon, but I decided to use some white heat transfer vinyl instead. Measure where you want the line to be and draw it up in Cricut Design Space. Cut the vinyl and apply with an iron. Let it cool, and peel off the carrier sheet.

To keep the collar closed in the back, add on some velcro, buttons, or even just use a safety pin!

DIY Girly Marshmallow Man Costume Tutorial at artsyfartsymama.com

Throw on some white leggings, a white shirt (long or short-sleeved), and the costume is ready to go! In colder weather, you could also wear some white sweats. Isn't this costume adorable?! My little Ghostbuster wannabe is in LOVE and can't wait for all of our upcoming Halloween parties!!

DIY Girly Marshmallow Man Costume Tutorial at artsyfartsymama.com

She might look sweet, but don't let her fool you! Who you gonna call?!

Who's your favorite villain (any) or Ghostbusters character?
What are you/your kids going to be for Halloween this year?

Monday, October 3, 2016

Disney Cuties Coloring Shirt

Monday, October 3, 2016

Disney Cuties Coloring Shirt

Read more »
Color your own Disney Cuties shirt to wear at home or on a Disney vacation!

Disney Cuties Coloring Shirt at artsyfartsymama.com

The last time we made a coloring shirt, my daughter wore it almost every day. It is such a fun project for kids and adults alike, and adding a Disney element just takes it to a whole other level!! The best part about this Disney Cuties Coloring Shirt shirt? With a little help from Expressions Vinyl, you don't have to have any drawing skills AT ALL. Plus, it would be awesome to make some as a family to wear on vacation, to give as a gift, or to just wear for fun!