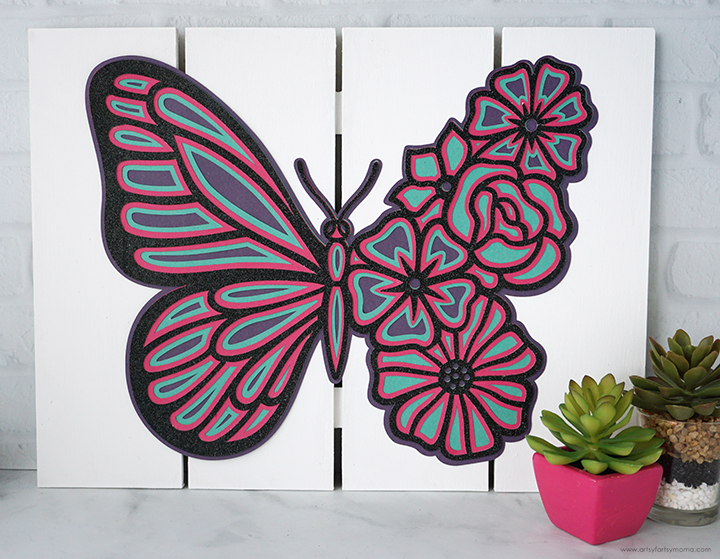
This Layered Paper Butterfly Wall Art is a colorful addition to your spring decor!
![Layered Paper Butterfly Wall Art](https://blogger.googleusercontent.com/img/b/R29vZ2xl/AVvXsEhTb1Sa6h3GR8eLRB0dxeT6KtgFXFqRDXmK9tZqB7kCFR7yjF4s9fAF5Esx1AV9R1pIthkkoeFIf_LIZSpavFFAb_fPaSi1VlptiuEfHFLK3XGkIPXWVpyFC6WpYjeRmPEu80ms5z-TCi8hZ3ob1JF0g-qsqxDoUy38WGtTUznbbXqZA7xya9p_0A/s16000/Butterfly-Decor.jpg)
![Layered Paper Butterfly Wall Art](https://blogger.googleusercontent.com/img/b/R29vZ2xl/AVvXsEioOvkihcvohmUstZrCl1gXIs-AQv0JVbTUtgfAwCkRUESYXJlrfDKOliJIWIvceUE_ZfboN0a1G6Nyx9t9H0tvIe5Yo_Db-bt3Q6AAoajf0w_8EoxNuRjrNcFM17Sk0SDyu9C72uIBpcIurDoELARXZb7cDcjog9labr7pD5J7V4_A7Hgw_ybyNA/s16000/Butterfly-Supplies.jpg)
To make your own Layered Paper Butterfly Wall Art, you will need these supplies:
![Layered Paper Butterfly Wall Art](https://blogger.googleusercontent.com/img/b/R29vZ2xl/AVvXsEiv5Nkb2n5yTv8dfa4fraMUtsUsMeRghHUcVX_5dDsj3mn9t2w-SJvJ-eYhEqc6iQ0IKb3yJh5BS1SWNzyfuRm_fiu-WNr29ZDp9gNuqEM92YJTdfqZ--DTTzIo-UlDa2Y89tm2dkYz7-T10efSU-J7OaL9HK4eYwxCHPM-GTHau1SXTeEMRIvF-w/s16000/Butterfly-Cricut.jpg)
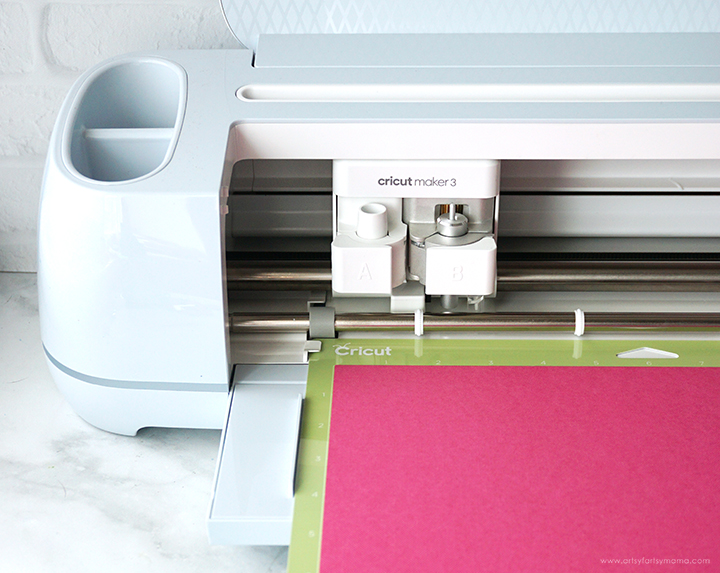
Upload the Butterfly SVG cut file in Design Space, and adjust the size to fit the pallet. Make sure to have all of the layers selected when you adjust the size, otherwise the project won't fit together properly! Select each layer of the design and change colors as necessary to match your colored cardstock or glitter cardstock. Next, cut the pieces out with your Cricut Maker or Explore machine.
If you're using Design Space, here's a tutorial on how to upload your own images so that you can easily create your projects.
![Layered Paper Butterfly Wall Art](https://blogger.googleusercontent.com/img/b/R29vZ2xl/AVvXsEivwLoMfM5sGIt_sLe9R3rHjMoNK_1HBk7lWsjLH9YXtmq30TTX_JlUv7gyc0jg-E1xPyZwExVflUTLEUANIZZd927clJgQdngBwzaPbhrGZR9NwtxI92t6HdUd7UegjQ1iCRNV9KmAtZnrVbeUx5Y2e_9QeyMY3CK61Ksrg_4G1DJmgUWRY9qOdA/s16000/Butterfly-Papers.jpg)
I cut the top layer out of glitter cardstock for some extra texture. If you make your design larger than 12", you can line two matching papers up on a 12x24 cutting mat and piece them together! To prevent the paper from curling when you are peeling it away from the mat, here's a tip: turn the mat upside down, and peel the MAT away from the paper instead! The mat is totally flexible, and it will keep your paper flat.
![Layered Paper Butterfly Wall Art](https://blogger.googleusercontent.com/img/b/R29vZ2xl/AVvXsEgHa3AydasPxDFRG7vfIiwSpAGn4iq2IPL5qX3Rs8j0U1oSAR9zd7jYveRemXJ7hsslO40CMp8RzWhfPCs7Tc9xXwTtPwFMOGv-6pDPJPyyj6XYxD_rWiwDhOun-B8v0GHl4ubzht01yXtQOPF-w99axXiJZl-bohOXeGpJ0Z82rVwm27SaJU6nGw/s16000/Butterfly-Green.jpg)
Assembling layered paper art is easier than you think! Start by laying the bottom layer (purple) down, facing up. Grab the next layer (green) and line some Ultra Bond adhesive all over the back. Make sure to focus adding adhesive around the edges, but be careful not to add too much. If you do happen to add too much, the adhesive dries clear so it shouldn't be a problem.
Carefully turn the green paper over and center it on top of the purple. The adhesive dries quickly, but you have a couple of seconds to adjust the position, if needed. Run your hand lightly over the paper to help press the layers together.
![Layered Paper Butterfly Wall Art](https://blogger.googleusercontent.com/img/b/R29vZ2xl/AVvXsEj2i159gnUdYzFv0cplVq9Ziu3oqdstH5mrB4r-gW207NLBG82sN4WRRPa5W3VrmWshfb2jr73SxrEWR8AR7ZyyrTfYHY7n9iQUirkikWl0YSSrxgA2C8MJZPIGIMe_5CUSGgCVTFSJ6uhTVYUIbb83SPSWj7fBc2EyLBNrLdfQJnW3iHWcoqIa7Q/s16000/Butterfly-Pink.jpg)
Get the next paper layer, and add adhesive over the back the same way as before. Once it's been covered, line it up on top of the layers of paper and lightly press them together.
![Layered Paper Butterfly Wall Art](https://blogger.googleusercontent.com/img/b/R29vZ2xl/AVvXsEhpf3pdo3ZSmm6ayqR3d7695LRe2haHLHRdCwdCB0tiKUxih9otHkiohC9gTUP0iWh5qHfK4NRFx7ouNHbFBosp1vzdCvbB0yNslpWkXCv7R1hZH2B0AEWXY2nIuqzXA8eMOI0G5gwLtK_aJSS58kIupP0Rfkm2R_VGsHtMCX9sGYviLUlAie0Hqw/s16000/Butterfly-Black.jpg)
The top layer has a lot more detail, which also means thinner lines. The fine tip nozzle on the adhesive is extra helpful to get into those tiny areas! Try your best to make the lines as thin as possible, and make sure to add some to those little edges.
![Layered Paper Butterfly Wall Art](https://blogger.googleusercontent.com/img/b/R29vZ2xl/AVvXsEiBTh5uJjo4jhQGspNBA4ZRLgqXiLTf_qCCXgHEIghbnpGFVha15KRn91bJ7_XlE7kIl5jYYLaHyCQYkwCFc44-eB9HlEM8I-BcMwHukmbp1kqpnNHoshufunlNM_C3hv8E3pfdmqTYWGZxpf188RSyJ0OD4iE_eaRbkBsDRdHqo_nb71NbNunP3g/s16000/Butterfly-Assembled.jpg)
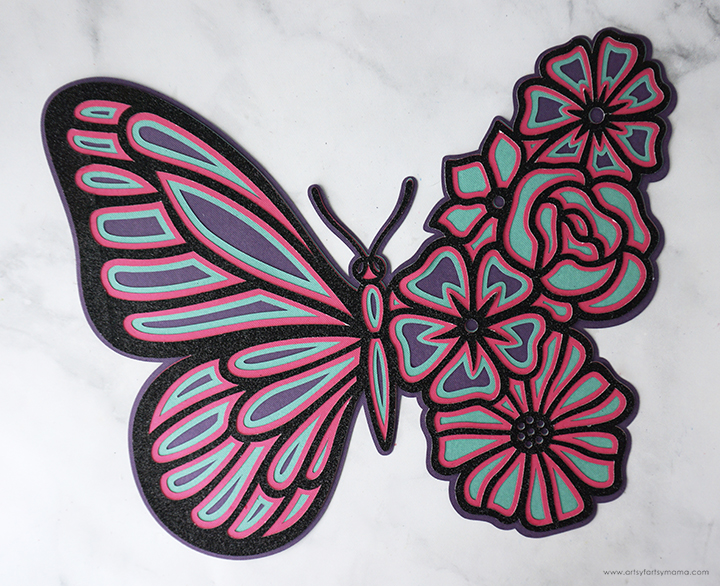
Press the glittery top layer into place, and take a minute to admire your work! I love this beautiful butterfly, and how all of the colors look together. It's so fun to make these layered paper projects all your own by using different colors of cardstock and adding texture with glitter cardstock.
![Layered Paper Butterfly Wall Art](https://blogger.googleusercontent.com/img/b/R29vZ2xl/AVvXsEhz2A1Qt-1XA1UsawJojiTHKZyd9hWqGolYGod7p5lBWhwnkFrG0l1AbuQiDSbYHtrBN510_Nhf0RfBZ2aPMVGRwxwy2gmkbrNrfiVDgD3tUwfNjtDJQFp--g-fzFVKLwXzXDQuA4kCqxnz_yzM_RRqKAdftwG23qKS42BE1xubWAzTbJVIxb9FFw/s16000/Butterfly-Paint.jpg)
Start by sanding the edges of the wood pallet, if necessary. Paint the pallet with white acrylic paint or chalk paint. Both are great options! Once the first coat dries, add another coat (if needed).
![Layered Paper Butterfly Wall Art](https://blogger.googleusercontent.com/img/b/R29vZ2xl/AVvXsEgAmxjr83KlWtGrteMdOljW32DmhV6R74MiCccP24LDev1k-lY9MAT4HIWM7PGAFzjPCUQsemKnjLWC8ZIHmiGw76WwWW1y_q_elhr8EY07T3Qe4bZp-EHZWwX6Hu22-vX7qfGmjVsu9ECVVNwVZGzmamBn-XRDpkc7AsEGtoytF2nJAHxfhY7nvw/s16000/Butterfly-Back.jpg)
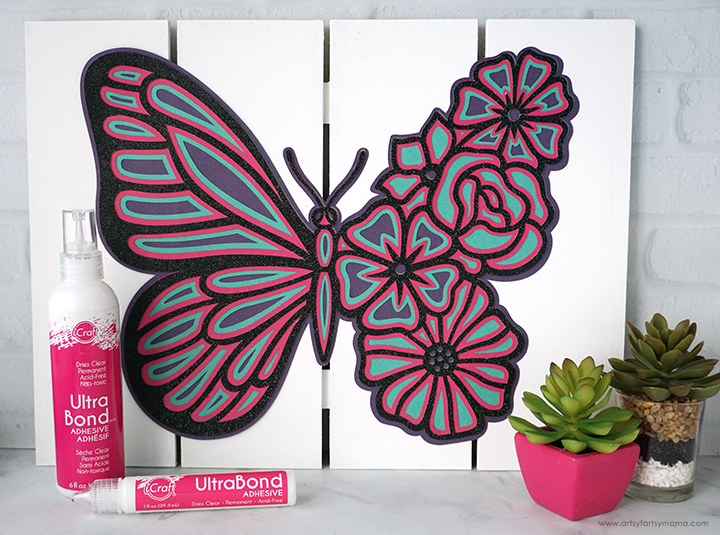
Make sure the paint on the pallet is completely dry, and then add a generous amount of adhesive to the back of the butterfly. The adhesive between the layers should already be dry, so you likely won't have any trouble with the papers shifting around while moving the butterfly around.
Center the layered paper butterfly on the front of the pallet, and press it down well. Allow the adhesive to dry completely - which doesn't take long!
![Layered Paper Butterfly Wall Art](https://blogger.googleusercontent.com/img/b/R29vZ2xl/AVvXsEgyWFxQNVQA8s5l88WvF9XBEBcyYf6Kpn3CdEMkdfBRm5mN4B36c2xIuAOMwhQncTiJjjOGPpDOIuA69HXEubbraBB0KaYaB94IjURLTn2ZIWd7XbyTwX6IrtsHr4e6Re_Vec60-IC4bYZkWbeW5hL3NUAMoRl1e-J0Cc4qPAjB0EEIKO7tHHlkpg/s16000/Butterfly-Final.jpg)
I absolutely love how this Layered Paper Butterfly Wall Art turned out, and think it's such a fun piece to display for spring. Of course, it would also be great for year-round decor in a girl's bedroom or craft room. As always, if you make any of these projects for yourself, I'd love to see your creations! Tag me on Instagram and Facebook, or leave a comment/photo on the project pin on Pinterest!
Don't forget to Pin, Like, and Share!
![Layered Paper Butterfly Wall Art](https://blogger.googleusercontent.com/img/b/R29vZ2xl/AVvXsEhPVwbwMY86LYcUUtUkGWTLLee4U9eeA9OPZCZVHOEGw_NeJSSn03Tnndc2MDiNpnsVfEVNO-ess1aNfUAf5WV84RrygvcW9WVy8ErG3R5yKfyuaQScJg3-UU7LoZl-hBh95D1e_4FIJJCP2n2huVLBw-syiBEWzUNUu6DV6Ar9SlYJwI-8LnzOeQ/s16000/Butterfly-Decor-Pin.jpg)