
Use polymer clay to create your own miniature Harry Potter-Inspired Cornish Pixies!


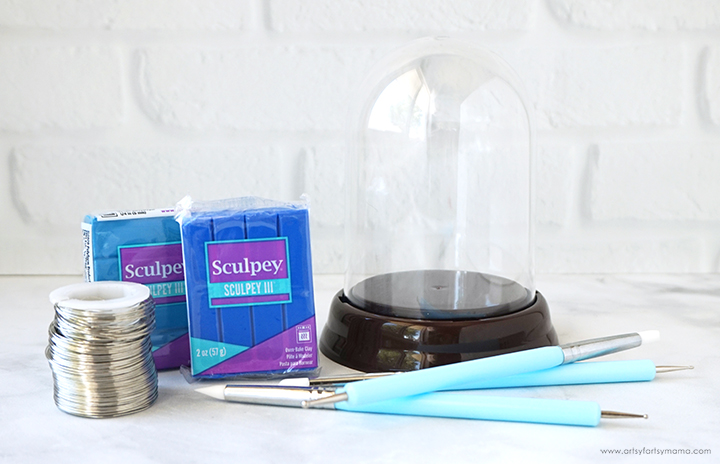
To make your own Cornish Pixies, you will need these supplies:

Cut a length of wire measuring about 20 inches or so using jewelry wire cutters. Fold the wire in half, and then in half again. Shape the two ends into "feet" by bending the last 1/2" or so. Go up each end of the wire another couple of inches for legs, and then twist the remaining wire together to shape the body. If it seems too "tall", round the excess wire into the head. Cut another length of wire, twist it together, and wrap it around the body to form the arms.
Now you have a body form to work from to create a Cornish Pixie. Shape the body, arms, and legs into any pose you'd like the pixie to have. Keep in mind that Cornish Pixies are "devilishly tricky little blighters", so make sure to give them some attitude in their body pose and facial expression!!
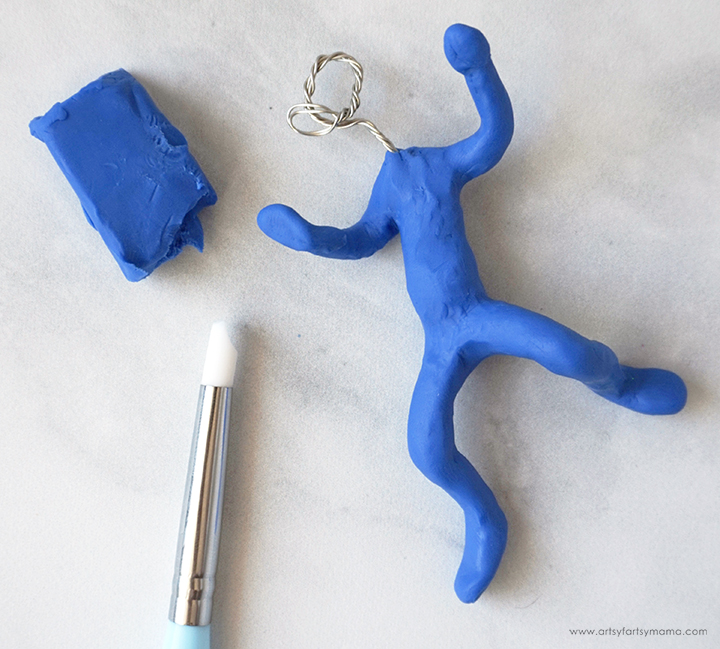
Remove the top section of the blue polymer clay and knead the clay to warm it up. Take small pieces of clay and wrap it around the wire to form the body of the Cornish Pixie. Because this sculpture is a bit small, it's helpful to have a set of polymer clay tools to help smooth and shape the clay. Leave the neck and head section of the wire form uncovered.
Fun fact: Cornish Pixies have 3 fingers (2 fingers and a thumb), and their feet are separated into two toes!

Once the body is formed and sculpted, begin working on the head. Form a ball of clay and hold it next to the body to determine what size would be best for your pixie. I wanted mine to have a larger head in proportion to the body, so my clay ball was around 1.5-2". Use smaller bits of clay to build a nose and eyebrows on the face, and then use polymer clay tools to create eye holes, a mouth, and to form other facial features.
Carefully cut the wire "head" loop away from the body using wire cutters, and then add a little bit of clay above the shoulders for a "neck". Carefully poke the head onto the wire. If the wire starts coming out the top, remove the head and trim the wire a little bit. Place the head back on, and make sure to smooth over the hole! Use the clay tools to smooth out the seam between the head and the neck.
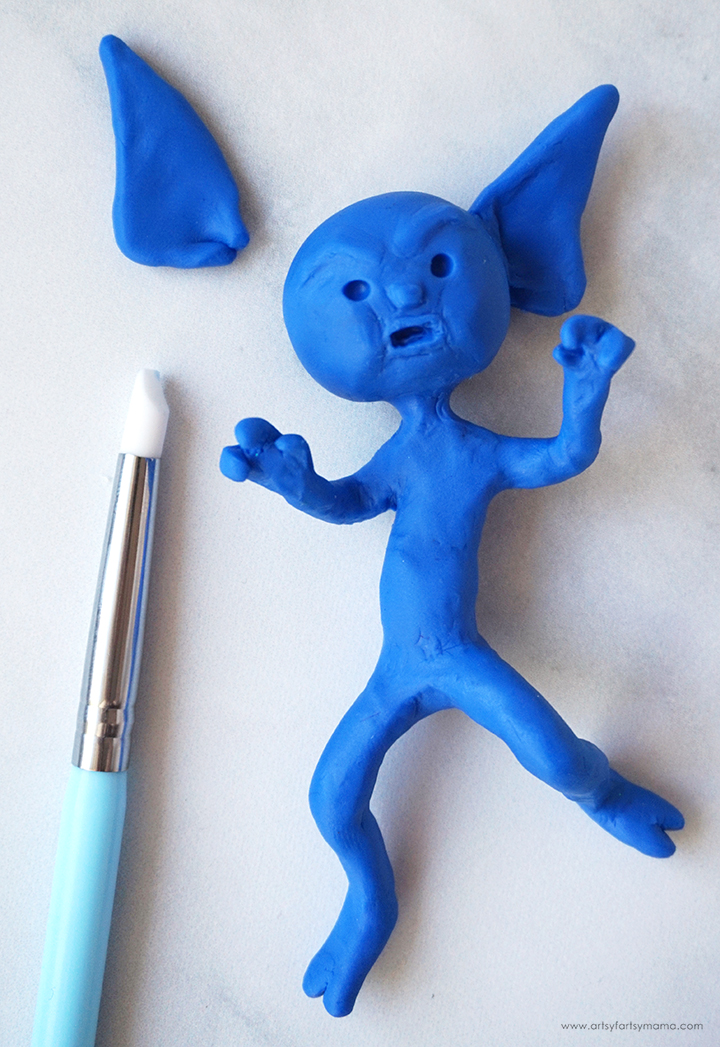
To make the Cornish Pixie ears, make two right triangles that are similar in size, but mirroring each other. Tap your fingers around the top corner and the "right" corner to make them rounded. Fold the other corner and flatten it a little to make it easier to attach to the head. Repeat for the other ear.
Place the ear on the side of the head and use clay tools to smooth out the seam. You can also use the tools to add detail inside the ear. Repeat this process for the other ear.

Cut a 1" piece of wire and fold it in half. Cut the wire at the fold with wire cutters, and poke the wire into the head for antenna, with the folded ends facing up. Wrap the wire pieces in a little piece of clay, and then form small clay balls to attach at the ends of the antennae.

Fill those soulless eye-holes with black or blue iridescent seed beads. Gently press the beads into the holes sideways, and use the clay tools to smooth things out. Add a little more clay around the eyes, if necessary.
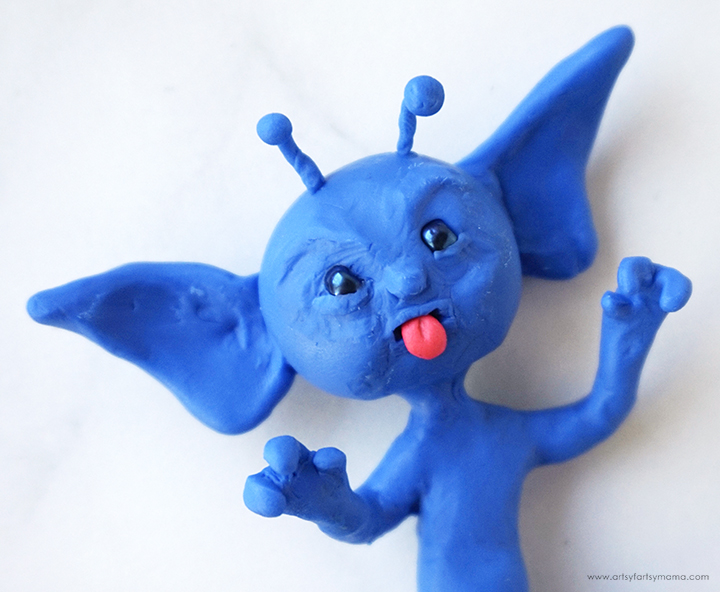
To finish the Cornish Pixie face, I sculpted a little tongue using bright pink clay and stuck it into the pixie's mouth using clay tools.
Carefully lay the Cornish Pixie figure on a baking sheet lined with an oven-safe work mat, foil, or parchment paper. I definitely recommend keeping a designated pan just for clay projects. Bake the clay according to package directions. For Sculpey, it's usually 275º for 15 minutes (1/4" thick). Let the clay cool completely before handling!
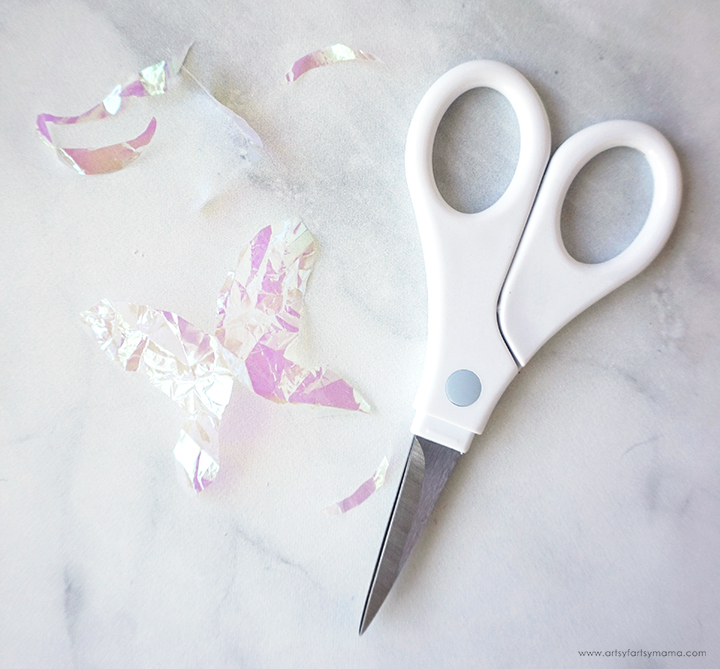
While the clay is baking, cut a set of wings out of iridescent cellophane using scissors. Thinner wings, like fairy wings, will look better than say, thicker butterfly wings.
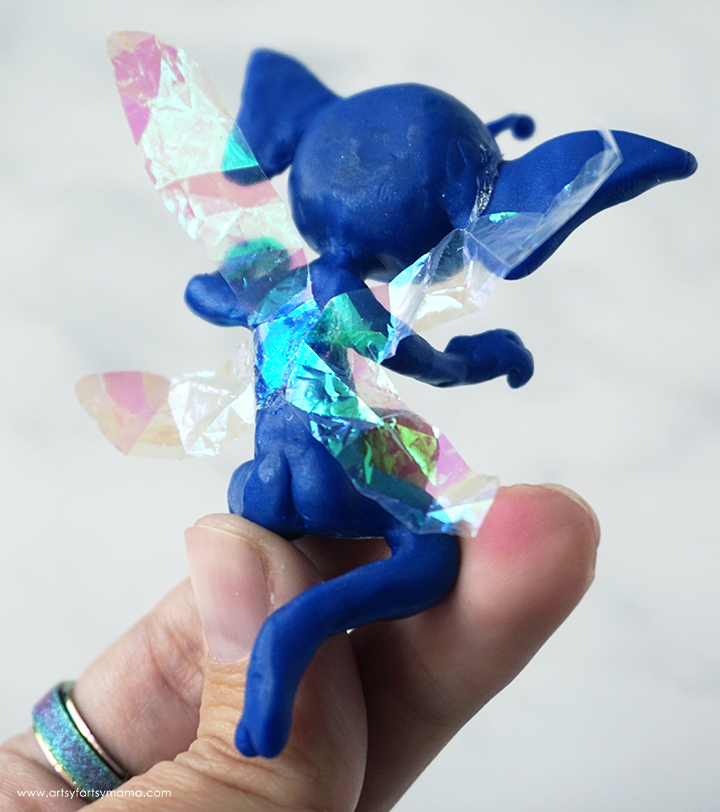
Make sure the Cornish Pixie has cooled completely. Add a little bit of adhesive to the back of the pixie and center the wings on the adhesive. Press the cellophane wings down well so that they won't come off!
Also, can we have a little bit of a laugh over those tiny Cornish Pixie cheeks?! It's the little details, people.
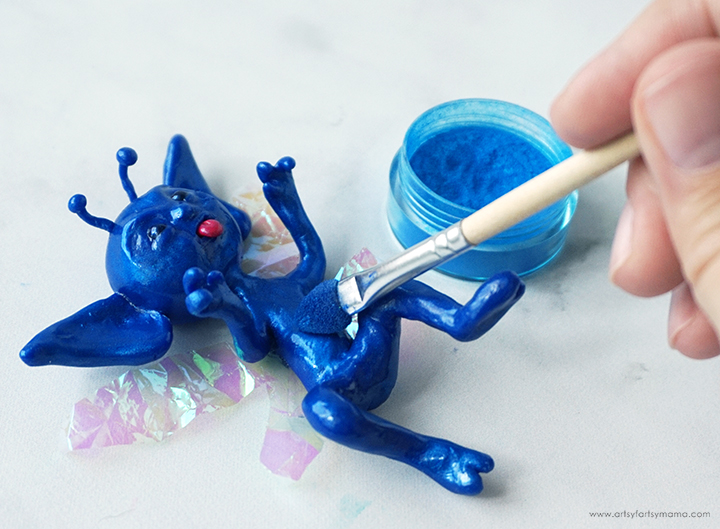
To add a little extra shimmer to the pixie, I used an eyeshadow applicator to apply metallic blue mica powder to the entire pixie's skin. Once covered, spray the pixie with clear sealant to prevent the mica from rubbing off. This step is totally optional, but I really like the look of the extra shimmer.

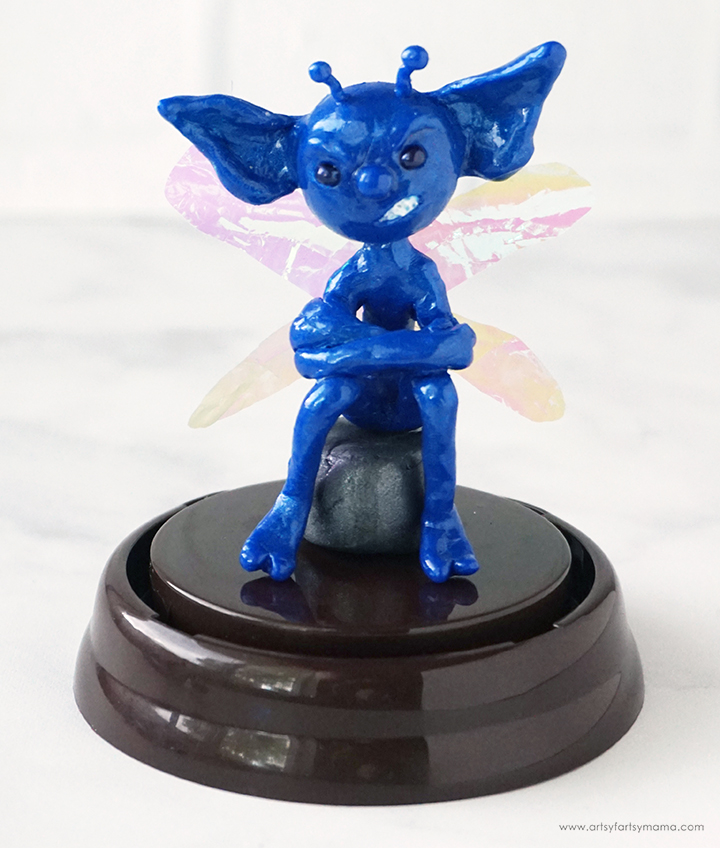
Once dried, the Cornish Pixie is ready to put on display! I'm naming this sassy little guy Carl the Cornish Pixie, and I am absolutely in love. Unfortunately, Carl is a little too tall to fit in my mini plastic cloche from the Dollar Store, so he gets to be free....for now.

Carl can't get into trouble alone, so may I present Captain Crankypants! I made this little guy for a few reasons: I had too much fun making Carl, and couldn't resist making another, and I wanted to make this one a little smaller to fit in the cloche.
Captain Crankypants was made the same way, using wire and clay. Instead of a tongue sticking out, he's got a grumpy smirk. I also used a chunk of gray clay to look like a rock for him to sit on. I left it looking imperfect, but shaped it enough for Crankypants to sit on. Bake the pixie figure and the rock separately, and then put them together afterwards.
I attached the rock to the center of the mini cloche base using adhesive, and then added a drop of adhesive to the top of the rock. Set the Cornish Pixie down on the rock and hold in place until the adhesive is set. For some extra decor, you could add some faux moss around the rock.

Place the cloche lid over the pixie and attach it to the base. My hope was to make it look like I caught a Cornish Pixie and am keeping him in the cloche for safe keeping. You can also do a similar display using a miniature cage!

Captain Crankypants is trapped in his cloche, looking grumpy as ever. Since Carl can't stand, I laid him down in front and laughed out loud. It looks just like the Cornish Pixies in the movie after Hermione cast the "Immobulus" charm and froze them in place!!
I am absolutely in love with these polymer clay Cornish Pixie figures, and had so much fun creating them to share in this tutorial. They are currently on display next to my set of polymer clay Mandrake Roots and they make me smile every time I walk into the craft room.
I would love to hear what you think about these Cornish Pixies! As always, if you make any of these projects for yourself, I'd love to see your creations! Tag me on Instagram and Facebook, or leave a comment/photo on the project pin on Pinterest!

I'm excited to share this project as part of Team Creative Crafts: Harry Potter Crafts Edition!
I love collaborating with other creative bloggers and sharing ideas!

Check out all of the other Harry Potter crafts made for this Team Creative Crafts collaboration by clicking through the links below. I'd love to hear which ones are your favorites!
- Room of Requirement Sign - Me & My Inklings
- Polymer Clay Cornish Pixies - Artsy-Fartsy Mama
- Harry Potter Party Favor Bag - Creativities Galore
- Dollar Store Harry Potter Flying Keys - Creatively Beth
- Floral Deathly Hallows Cut File - Liz on Call
- Cornish Pixie Jars with Printable Tag - Creatively Beth
- Dobby Crocheted House Elf - Five Little Monsters
- Harry Potter Flying Broom - Debra Quartermain
- Harry Potter Movie Night Printables - Little Dove
- Resin Chocolate Frog Earrings - Artsy-Fartsy Mama
- DIY Harry Potter Hat - Michelle's Party Plan It
- Bowtruckle Bread and Bakery Printable - Me & My Inklings
- DIY Hogwarts House Scrunchies - Smiling Colors
- Harry Potter Mug - We Can Make That
- Harry Potter Magnetic Bookmarks - Laura's Crafty Life
- Harry Potter Printable Word Search - The Girl Creative
- Harry Potter Fund Savings Jar - She's Crafty
- Harry Potter Printable Spells List & Wand Pencils - Raegun Ramblings
- Adult Coloring Harry Potter Book - Jenny's Crayon Collection
- Patronus Fortune Teller - Sunshine & Munchkins
Don't forget to Pin, Like, and Share!


Hey there. Do you ever sell your pixies? I love the grumpy one.
ReplyDelete