
Use polymer clay to create your own miniature potted Harry Potter-Inspired Mandrake Roots!
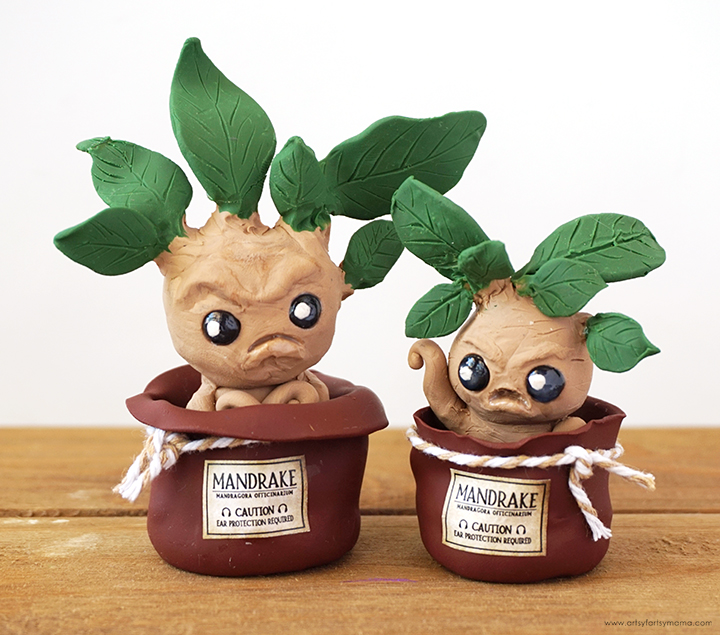
Oh, how I love making Harry Potter-inspired crafts. Polymer clay is a lot of fun to work with, and is the perfect medium to make these grumpy, little, potted mandrakes! Like Pygmy Puffs, Mandrakes are also creatures that are briefly mentioned in the Harry Potter books. This is probably one of my favorite projects that I've made. I start laughing every time I look at them on display, which is just what this Potterhead needs!

For those who haven't read the books, here's the description according to Harry Potter Wiki: A Mandrake, also known as Mandragora, is a magical and sentient plant which has a root that looks like a human (like a baby when the plant is young, but maturing as the plant grows). When matured, its cry can be fatal to any person who hears it.

Not all polymer clays are the same. I've worked with a bunch over the years, and using the right clay for your project will give you the best results. Personally, I recommend using the Sculpey Naturals multi-pack to make mandrakes because it has all of the colors you need, plus extra to work with on other projects!

Along with your clay, I also recommend finding some tools to work with. I absolutely love the 5-in-1 Tool that includes five interchangeable heads for all of your detailing, smoothing, and shaping. The Essential Tool Kit is also a good clay tool kit that comes with everything you need!
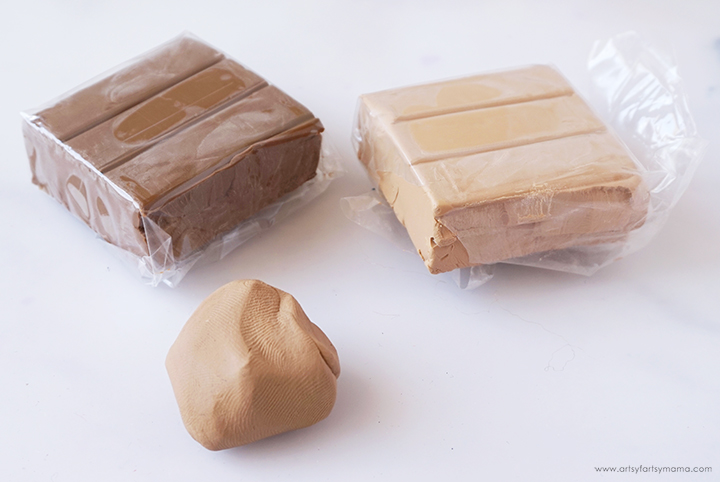
Start by mixing one bar of the lighter brown clay with the darker brown clay. Knead the clay so that it's mostly combined, but still has some streaks.

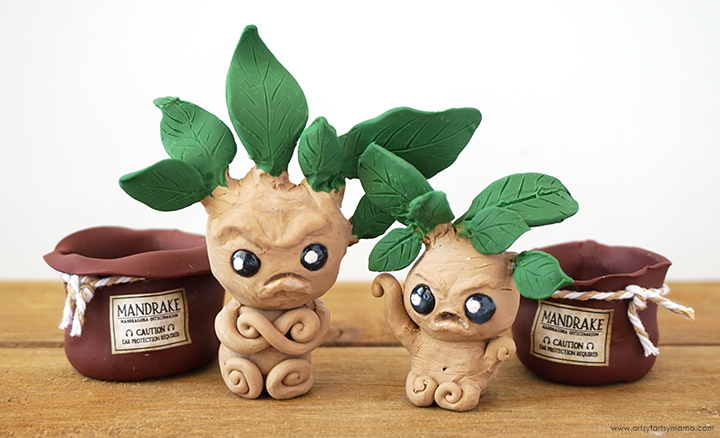
Make a little ball, about an inch or so, and shape it into a little "body". Since this is a plant, it doesn't have to look realistic. Have fun with it and be creative! Next, roll out some little "worms" with one end going to a point on each. These will be the arms/legs/roots.

Put the arms onto the body and use the cone tip shaper tool to smooth and blend the seams at the shoulders and keep them from falling off. Gently roll the ends of the arms to give them a more "root" look, and then position the arms into whatever pose you want your mandrake to be in. Mine is pouting, so I crossed the arms.
Attach the legs the same way, roll them up a little at the ends, and then position them however you want. I just rolled mine up and placed them in front. Set the body aside.

Roll a larger ball out of the extra clay. Hold it up to your mandrake's body and adjust the size as needed. I think they are cute with slightly larger heads and little bodies. The head can be as misshapen and wonky as you want. Like I said, have fun with it!
Add a few little branches coming out of the head. Use the cone tip shaper tool to smooth any seams, if necessary.

Lay the head down and gently press the Ball End Tool into the clay to make some eye holes. If you mess up, you can move the clay around to fill them in and start again.
Grab a small glob of clay and set it next to the head. Use the Needle Tool to make a mouth. Keep in mind that mandrakes are like babies and are known for their screaming and crying! Instead of full-blown tears, this is a grumpy and pouty little guy. I started by making a frown with the needle tool, and then rolled a little worm for a lower lip. Add the worm to the bottom of the mouth, and blend it in with the cone tip shaper tool.
Next, roll out two little worms and add them above the eyes to create expressive eyebrows. Blend the clay into the head. See how much attitude those eyebrows give him?!! I love it.
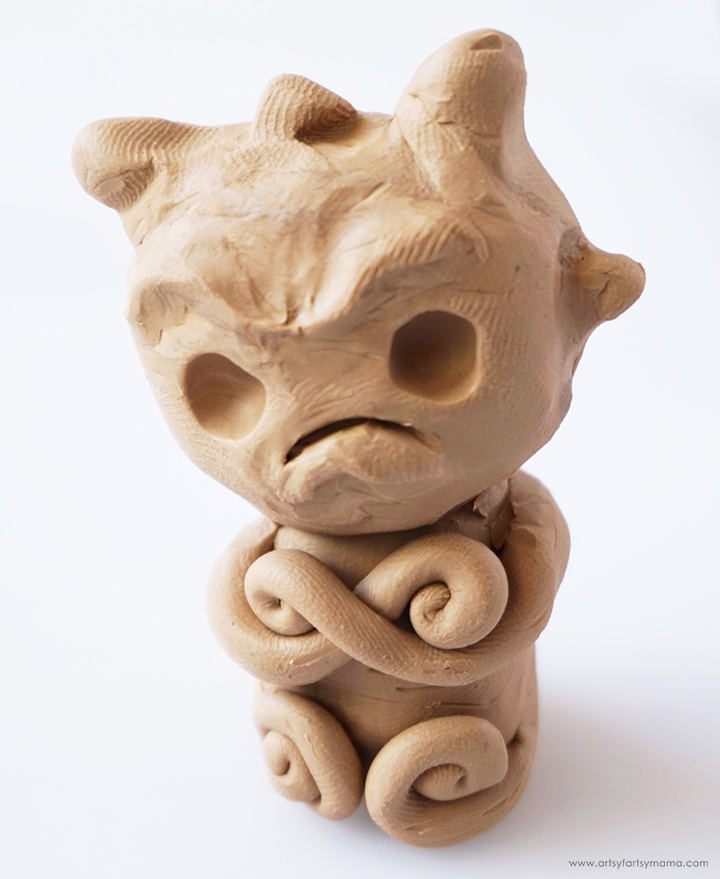
Carefully place the body on the head. Try putting it on at different angles to see how it looks best and to make sure it won't tip over from being too top-heavy. Smooth the neck seam with the cone tip shaper tool, but be careful not to smash the arms and legs!

Next, roll out some little balls out of black clay. Gently drop them into the eye holes. If you have too much clay, carefully pull the clay out and make it smaller. If it fits, gently tap the clay down with your fingers to press the clay into the holes.
Roll out some tiny - and I mean tiny - balls of white clay to make a highlight for the eyes. When I say tiny, I mean probably 1/2 or 1/4 the size of a nonpareil sprinkle! Carefully set one of the balls of clay onto the eye in the upper right or left side. If it seems too big, take it off and make it smaller. When it looks how you want, gently tap the clay ball down to flatten it on the eye. Use the needle tool if necessary to reshape or move the clay around once it's attached. See how the highlights just bring him to life?!

Now it's time to make some leaves! Grab a little ball of dark green clay, and shape into a little teardrop using your fingers. Use a roller to flatten the leaves out. Make 5-6 leaves in all different sizes, and lightly draw the leaf details using the needle tool.

Attach the leaves, one at a time, to the branches on the mandrake's head. The leaf will fall off easily if you just press it on, so you need to add some stability. Hold the leaf in place at the base, and add a little bit of the brown clay to the back to attach the leaf to the branch. Use the cone tip to blend the clay together at the seams. The leaves should be able to stand in place on their own. Repeat for all of the leaves.
Yes, I did add a little booty to the mandrake. I had a little bit of clay left over, and I couldn't resist...

Next, we're going to make a custom pot for the mandrake to sit and pout in! Roll out a ball of some dark brown clay. I added a little bit of red to give it more of a darker terra cotta look. Flatten the ball out to about 1/4" - 1/2" thick. Set the mandrake on top of the base to see how it fits. The base should be a little bit larger than the mandrake. Adjust the base size as necessary.

Get another ball of clay and use the roller to flatten it out into a long, imperfect rectangle. I made this pretty thin, but you can make it as thick as you want. Wrap the rectangle around the base and press the ends together. Use the cone tip tool on the inside of the pot to blend the seam together.
Place your mandrake inside and see how it fits. I wanted to make mine more of a planter bag instead of a pot. This plan actually worked well because I made the pot/bag too tall, so I just folded the edge over and made some creases!
Bake the clay mandrake and pot according to package directions. Let the pieces cool completely before handling. Also, be sure to keep the mandrake stable. If it tips over, the leaves can snap off. If this happens, don't panic. You can easily glue them back on!
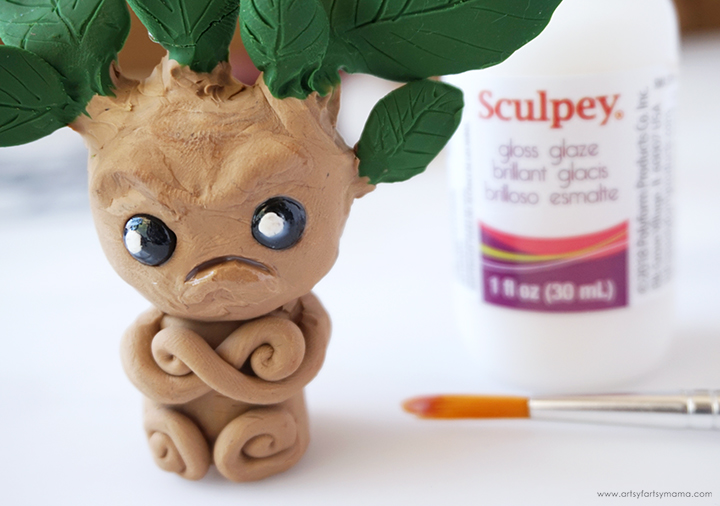
I wanted to add some gloss to the eyes to make them a little more life-like. Sculpey Gloss Glaze is perfect for this! Just get a small paint brush and apply a couple of thin coats to the eyes and inside the mouth. Let the glaze dry completely. If you want, you can also apply a thin coat of Sculpey Satin Glaze to the rest of the project for a matte, smooth finish to protect your project.

Some things you should know before downloading:
*Artsy-Fartsy Mama printables are for PERSONAL USE ONLY (okay for home, school & libraries).
*You may NOT modify, sell, redistribute, or claim the design as your own.
*Please do not remove the credits/watermarks.
*If you'd like to share this project, you may use ONE photo and credit must be given to Artsy-Fartsy Mama and linked back to this post.
How hilarious are these grouchy, little mandrakes?! They make me laugh every time I look at them, especially the tiny one! Since this project is a bit more work, I would recommend it for teens and adults only. Kids would be able to make one, but they might struggle and need some extra help.
Now I can keep these little creatures on my craft room shelf to keep me company while I create. Their grumpy little faces make me smile, which reminds me that that's the whole point of making things like this, right?! I would love to hear what you think, and what types of mandrakes (or other clay creations) you would like to try making!
If you make some Mandrake Roots or any other Harry Potter-inspired crafts, leave me a comment and let me know, or tag a photo on Facebook, Twitter, or Instagram! #AFMcrafts
Looking for more Harry Potter inspiration?
Check out this collection of OVER 100 magical creative Harry Potter crafts!!

Don't forget to Pin, Like, and Share!


Totally AWESOME, Lindsay! You are so talented!! <3
ReplyDeleteThese are adorable!!
ReplyDeleteToo cute! Thank you so much for sharing!
ReplyDeleteThis is so awesome! I have never had much luck with polymer clay, but loved reading through this post, and seeing the process.
ReplyDeleteAlexandra
EyeLoveKnots.com
awww trying this rn fr
ReplyDeleteThese are phenomenal! My 7yo daughter and I have been reading the books together and just finished the 2nd! We made these today to celebrate and they turned out adorable. Thank you for sharing.
ReplyDeleteSuper cute, well done! I'm not sure if you're aware that LitJoy Crate came out with a mandrake in their recent Magical Classes subscription box, but I can't help and notice how similar their mandrake looks like yours. I wonder if they asked for your permission to use your label design on the pot and style of the mandrake for their version?
ReplyDeleteThat's definitely interesting! I had no idea. Would have loved to collaborate!
DeleteI made one of these for my sister. she LOOOOOVES it!
ReplyDeleteThese are super cute! But how big do these come out? For the amount of clay used, seems like they would pretty small?
ReplyDeleteThis is awesome! Thank you! It’s exactly what I’m looking for. I’ve never used polymer clay… does this harden? I’m wondering how I should store them when it comes to putting the finish product away for the season.
ReplyDelete