
Create a bright and colorful Paracord Collar to fit any sized pet!

My little doggos have worn down their year-old collars and needed something new. Instead of spending a bunch of money on a collar that won't last or one that digs into their neck, I decided to take matters into my own hands and make one myself using paracord! Not only are the collars good-looking, but they are SO simple and made to custom-fit your pet. These would also be a fun project for teens to make and sell to have a little extra spending money!!

To make your own paracord dog (or cat) collars, you will need these supplies:
- 2 Colors Paracord 550 - I used neon pink, neon multi-color, and a neon pink & purple
- Paracord Jig (optional, but helpful!)
- 5/8" Plastic Buckle
- 1" Metal D Ring
- Scissors
- Lighter
The amount of paracord you'll need depends on the size of your pet's neck. However, this collar is thicker than a regular "cobra" paracord bracelet, so you will need to add 1"-2" to the neck measurement. My dog's neck is 10", and I ended up making the collar 11.5" total for the perfect fit.
You will need two feet of cord for every inch of your neck measurement, and then cut a length of both cord colors from that measurement. For example, my original neck measurement is 10" long, so I cut 20' each of purple/multi and pink cord each. You will have extra cord left when you're done, but it's always good to have more cord to work with rather than running out!!
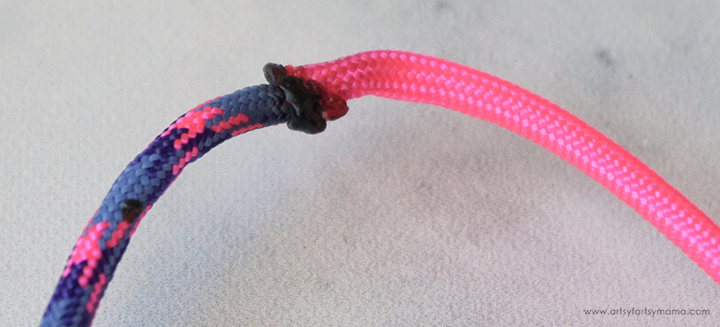
Fuse the ends of the cords together to make one long length of cord. There are two different ways that you can do this:
- Use the lighter to melt the two ends of cord and squish the ends together (as seen above). Hold in place until it cools down.
- Cut away some of the inner strings of one cord's unfinished end. Place the melted end of the other cord inside the unfinished cord. Use the lighter to carefully melt the edges of the unfinished cord and use pliers or the side of your lighter to press the melted ends to the "seam".

Separate the buckle and use tape to anchor one side down on your workspace. Place a tape measurer next to the end of the buckle and measure down to the length you want the collar to be. Use tape to hold the opposite end of the buckle in place at the measurement mark.

An alternative to taping down on a table is to use yardstick paracord jig. This is a helpful little tool we made to use for making paracord bracelets, but will work great for making collars, too. However, collars are a bit longer than bracelets so you will need to build your jig a bit larger for bigger animal collars.
No matter which way you set up the collar buckles, these next steps with weaving the paracord will be the same. Fold the cord 1"-1 1/2" away from the fused area. Bring the loop down through the bottom buckle. Bring the ends down through the loop, and pull them through to make a knot on the buckle.

Bring the loose ends down through the opposite buckle (the one at the top, if taped down). Make sure the cords aren't twisted!

Now you are going to make cobra knots, just like in the paracord bracelets we made. Decide which color you want to be in the center of your collar - for example, I wanted the purple in the center and the pink going down the sides.
Fold the "center" cord (purple) over the center of the cords, making a "4". Bring the opposite cord (pink) under the cords and up through the "center" cord loop. Pull both of the cord ends tight to make the knot. For the second knot (as seen above), fold the cords the same way (over/under), but in the opposite direction. Bring the purple cord over the center cords, making a backwards "4". Bring the pink cord underneath the center cords and up through the purple cord loop. Pull the ends to tighten the knot.

Keep repeating the knots to create the Cobra knot pattern. If you see that your outer (pink) cord is ever going across the center, that means you made a mistake and need to untie it. The key is to make sure your center-color cord is always going OVER the center cords, and the outer is going UNDER the cords. Once you get the hang of it, the knots come together quickly.

Tie alternating knots until you get to the knot at the opposite buckle. If you were making a bracelet, you would be done at this point, but we need something a lot more sturdy when it comes to a pet - especially if they like to pull!
Turn the jig upside-down or remove the taped ends from your workspace and turn the collar "upside-down" so that the working ends of the cord are now at the top, like when you started on it.

These knots will sit in the grooves of the previous knots, and you will be able to notice if you make any mistakes.


The collar is now complete and ready to be worn. There are SO many fun colors and patterns of paracord out there that make it possible to make a special collar to match any pet's personality! I love how both these collars have neon pink, but look so different with the other color cord paired with it.

Don't you agree that Penny and Lulu look adorable in their new, colorful collars?! Once the collar is on your pet, hook a leash onto the D ring, and you're ready to go for a walk around the neighborhood! The King Cobra knots make this collar extra sturdy, and the thickness also helps to prevent the collar from digging into the dog's necks like a thinner collar does.
Keep tying knots until you get to the opposite end, making sure to pull the knots tight as you go. Once you get to the end, cut the cords and melt the ends with the lighter to keep them from fraying. While the cord is still hot, use some pliers to press the melted cord down onto the cord next to it. This will smooth the ends and keep the collar held together securely.
If you liked this project, don't forget to Pin, Like, and Share!

Looking for more pet craft inspiration?
Check out this collection of OVER 100 creative pet craft ideas!!


I LOVE how much you LOVE your dogs! These collars are PRECIOUS!!
ReplyDeleteHow pretty! Nice and sturdy too.
ReplyDeleteAlexandra
OnRockwoodLane.com
EyeLoveKnots.com