
This DIY Rotating School Supply Organizer is fun to personalize and will keep your pencils, glue, and markers within reach!

Whether your kids are learning from home or in a school building, it's almost impossible to keep all of those school supplies organized and easy to find! This DIY Rotating School Supply Organizer is a project that you AND your kids can work together to create using Plaid paints to keep all of your pencils, markers, and glue within easy reach while doing schoolwork.

To start, you will need these few supplies to build the base of your organizer:
- Lazy Susan Hardware
- 8" x 8" x 1" Wood Square
- 10" - 12" Wood Circle
You can cut the wood pieces yourself, or you can find similar items at most craft stores.

To build the Lazy Susan (which will make your organizer rotate), first attach the hardware to the square wood piece. Because this isn't going to be holding that much weight, I used some strong adhesive to attach it instead of using screws. Once you have placed the hardware on top of the wood, place something heavy on top to keep it in place while the glue sets.
Next, add some adhesive to each corner of the top of the hardware. Lay the wood circle face-down on your work surface and then place the hardware/wood square in the center of the wood circle. Place something heavy on top to keep everything in place until the glue sets.
Turn the wood circle around a few times and see how well it rotates. If it needs it, you can add a little bit of oil to the hardware to help it turn smoother.

Pick out your favorite paints. To make an organizer with a similar look to ours, you will need some white FolkArt Multi-Surface acrylic paint, and Apple Barrel acrylic paints in a variety of colors!

Paint the top and side edges with the white FolkArt Multi-Surface acrylic paint of the base using a 1" paint brush. The reason multi-surface paint is best for the base is because it has a self-sealing formula that resists moisture and has a quicker drying time than other paints. I usually only need 1-2 coats, but if you need more just be sure to let each coat of paint dry completely before adding another layer.
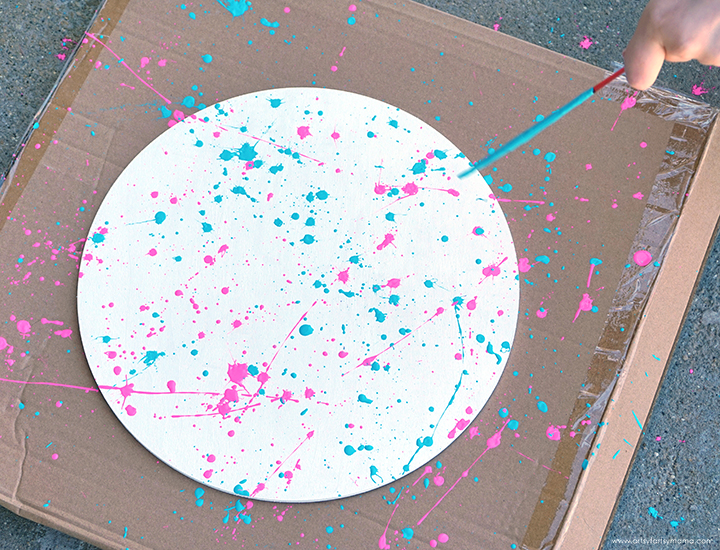
Grab the kids for the next step! I recommend taking this outside, but you can work anywhere that you can get messy! Place the base on a piece of cardboard or something to protect your workspace. Grab 4-5 of your favorite colors of Apple Barrel acrylic paints and 4-5 small brushes.
Dip the brushes into the paint, and splatter it all over the base! Have fun, and don't worry about making a mess. Apple Barrel paints are easy to clean up using soap and water. Once you are done splattering paint, place the base somewhere to dry where it won't be disturbed. You don't want to mess up your beautiful creation!

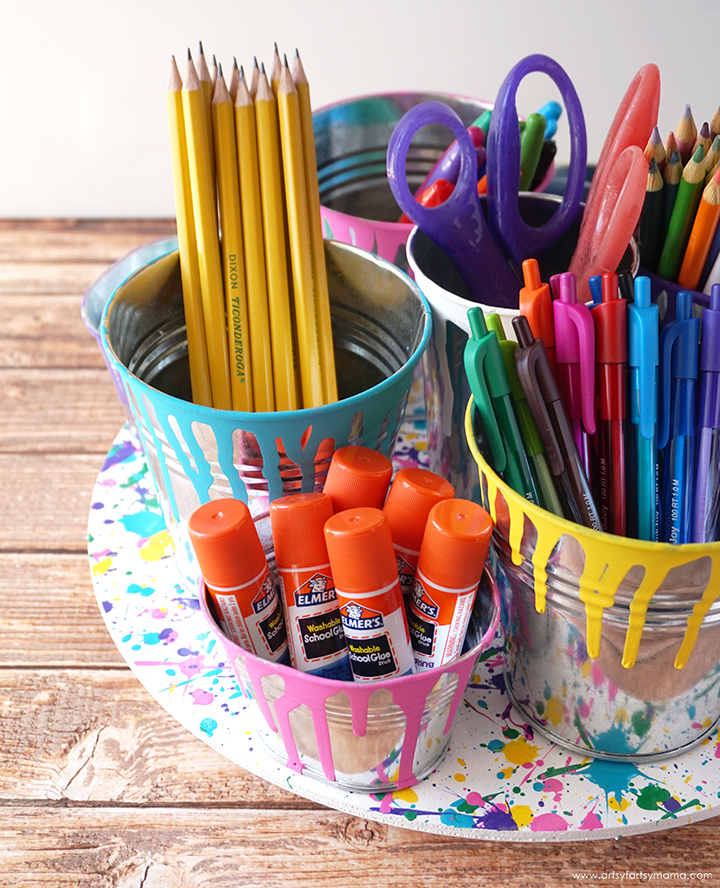
To keep your supplies organized, you will need some type of cups, pails, or another kind of open container to place on top of the base. Get creative! We chose these metal pails in 3 different sizes that I found at the craft store. One taller/skinnier pail, four larger pails, and four smaller pails. I also grabbed some magnets (you'll see why in a little while!).

Wipe the pails down with alcohol to clean them. Use some white, plus four colors of Apple Barrel paints (preferably the same ones used on the base) to add some color to the pails. Work with one color at a time and lay something down to protect your workspace.
Load a paint brush with some paint, and scrape the brush on the top edge of the pail so that the paint will drip down the side. Repeat this process all around the pail until you have drips all the way around. Be careful not to touch the paint drips!

I chose to paint one small pail and one large pail with the same color, and used four colors total: blue, pink, yellow, and purple. I did the same paint drip technique on the taller pail, but used white paint instead. Leave all of the pails to dry in a safe place so the drips don't get messed up.

Look at that base with all of that vibrant color!! My daughter is so proud of this creation, which makes her more excited to keep it on her desk while she works on her school assignments.
I was worried about pails falling off of the board, but didn't want to attach them permanently. To solve this problem, I decided to attach magnets to the base using strong adhesive. Once the magnets have been glued down, place something heavy on top to keep everything in place while the glue sets.

Because we will be moving the pails around the base, I wanted to protect the paint splatters from being scraped off or otherwise worn down. Mod Podge Ultra dries quickly, and self-levels without leaving a stickiness behind once it dries. It is a water-based, non-toxic formula that can be used for indoor/outdoor projects, with the quality you can expect from the Mod Podge brand.
Lay down something to protect your work surface and place the base on top. Shake the Mod Podge Ultra bottle vigorously for 10-15 seconds. Prime the pump of the bottle by doing some test sprays on a paper towel. It's ready to use when you have a consistent spray coming from the nozzle.
Spray a thin, even layer of Mod Podge Ultra on the base. Keep in mind that using thinner layers works much better than thicker ones. Let each coat dry 4+ hours.
Before storing the Mod Podge Ultra, you need to clean the pump so that it will spray smoothly again next time. I rinsed the pump and nozzle well in warm water, and then put it back in the bottle.


Since the pails are attached using magnets, you can easily move the organizer without everything falling off! It's also easy to take off the pail if you need the supply to be a little closer, and know exactly where to put it back when you are done!


Brilliant idea for any type of storage!! I'd love for you to share over at our weekly Wednesday Creative Crafts Linky Party
ReplyDeletehttps://creativelybeth.com/creative-crafts-linky-party-9-join-in-the-fun/
Have a great week!
Creatively, Beth