
Every Star vs. The Forces of Evil superfan needs a DIY Star Butterfly Wand!

One of my daughter's favorite shows is Disney XD's Star vs. the Forces of Evil. She's constantly quoting the show, and even plans to dress up like the main character, Star Butterly, for Halloween! Star's magic wand is her most popular accessory, so we put our 3D printer to the test to make one for ourselves. Honestly, it's not hard at all to make, but it does take a little time and patience. Once finished, it's just what any Star Butterfly superfan needs for hours of pretend play, cosplay use, or to put on display!

The Royal Magic Wand is the greatest heirloom of the royal Butterfly family. Star Butterfly is given the wand by her mother, Queen Moon Butterfly, when she turned fourteen. Her job is to protect it while attempting to master its power. The wand can make whatever the user thinks of a reality, like puppies, snakes, and other creatures. It can also be used to create attacks like a rainbow fist punch, jellybean hallucination mist, and mega narwhal blast!

If you don't have a 3D printer, I would ask around and find someone who does. For example, our local library and even some of the local schools have them! Print out all seven pieces of the Star Butterfly Wand Set (FREE) using white or gray PLA filament.

When you make something with a 3D printer, you almost always need to add supports to the print to keep it in shape while it's built. For example, take a look at the wand handle in the image above. All of those lines are from the supports. You can also see all of the supports in the image with all of the printed pieces, especially on the wings
If you plan on working with 3D printed pieces a lot, I would recommend getting a craft knife set similar to this one. It will help you remove the supports SO much easier than doing it by hand. Along with this tool kit, you will also need some pliers for removing some of the tougher support structures.

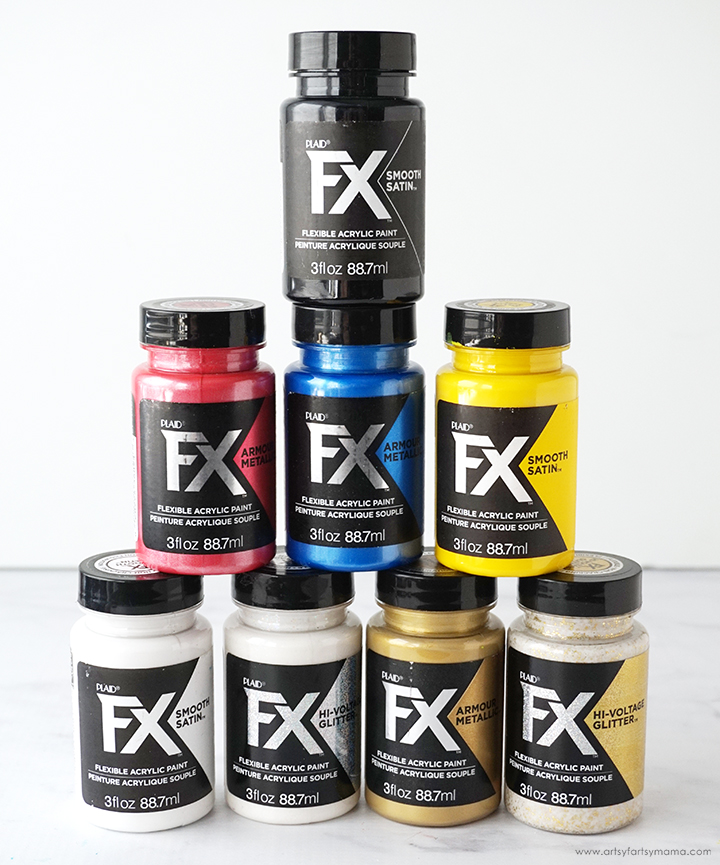
Now, for the fun!! PlaidFX is a new flexible acrylic paint that is perfect for cosplay and painting 3D prints. It comes in a variety of colors and finishes, and even has GLITTER! These are all of the PlaidFX paint colors/finishes that I used for this project, along with a couple of FolkArt Multi-Surface acrylic paints to get the specific color shades that I needed for the pinks and blues.

Use a 1/2" paint brush to paint the pieces. I recommend painting one color at a time, over multiple pieces. For example, a few of the pieces need yellow paint: the star on the face of the wand, the butterfly piece, and the heart at the bottom of the handle. Paint all of those parts at the same time. Then paint the white of the wings, etc. Some parts may need multiple coats for full coverage, especially with light colors like white and yellow. Let each coat of paint dry for at least an hour before adding another coat for best results.

Because we all know how much I love glitter, I decided to add some of the gold and silver PlaidFX glitter paints to add highlights to the wand pieces: the face, wings, crown, butterfly, and handle pieces all have a bit of sparkle and shine that I think Star Butterly would totally approve of.
Look at all that sparkle! I am totally impressed by the coverage of the PlaidFX glitter paints. The glitter on the face is from only ONE coat, and it doesn't rub off at all. That glitter isn't going anywhere anytime soon! The black on the inside of the star was a mixture of black glitter and some Extreme Glitter Mod Podge.

Once everything is painted, it's time to assemble the wand! I recommend using a strong adhesive, like E6000 or Gorilla Glue to stick the pieces together, especially if it will be played with by kids or used as a cosplay prop. First, glue the crown to the top of the ball piece. Hold in place until the glue sets.

Next, place the butterfly on the bottom of the ball and glue in place. Again, hold in place until the glue sets.

Dry fit the wings to the side of the ball and into the open sides of the butterfly. It should be a tight fit, but not impossible to put in place. Work on one side at a time, and add a bit of glue to the side of the ball and inside the open end of the butterfly (NOT the bottom). Press the wing into place and hold until the glue sets. Repeat for the other side.

Add a small amount of glue around the edge of the face of the wand. Drop it into the opening of the ball and press it into place. Make sure the star is facing right-side up!

Before adding the handle to the rest of the want, you need to add the purple ribbon stripes. You can do this with paint, but I decided to use a couple strips of mini purple DuckTape instead. I love how it turned out, and know that the tape isn't going to go anywhere!!
Add a drop of glue to the top of the handle and press it into the opening of the butterfly to complete the wand! Hold in place until the glue sets. Leave the entire wand somewhere it won't be disturbed for at least 12 hours to let the glue dry completely.

You don't have to do this, but I sprayed a couple of coats of clear sealant over the entire wand because I know how much it is going to be used, and I don't want any of the paint to come off.

My daughter is absolutely thrilled with this new, SHINY wand, and I can't say I don't blame her! I had quite a bit of fun myself putting it all together! This is one of my biggest 3D printing projects, and I'm excited to make more soon. What do you think? Are you a Star vs. The Forces of Evil fan?
As always, I would love to see your creations! Please tag me on Instagram and Facebook, or leave a comment/photo on the project pin on Pinterest!
Don't forget to Pin, Like, and Share!


