![DIY Glittered Easter Egg Wreath](https://blogger.googleusercontent.com/img/b/R29vZ2xl/AVvXsEhW8RmvlREQgJ3OZz77dhZooDYYkgKDxNt8VKKih1PoGHN808gdyV8pRkpwbaKTF5fnpKAdRisrXI5epBzuavRFNxS9QNV7YdBi9s80aa4LCc-LPRVK02tP1Mm7_iZZOKhVVdqTZCt5cg/s1600/Glitter-Egg-Wreath-Title.jpg)
After doing a little Easter shopping for our upcoming family Easter egg hunt, I came across these glittery beauties and couldn't resist adding them to the cart. Instead of filling them with sweet treats and surprises though, I decided they needed to adorn my walls every spring instead in the form of a wreath!!
![DIY Glittered Easter Egg Wreath](https://blogger.googleusercontent.com/img/b/R29vZ2xl/AVvXsEgBeajzJpbjHUofQoufpdE0d-oNqi0Ym3p3yY78egNAjsPrkteemMsH94TSqLZgCzp_u4VX8ersgu5ktqF9kVjjH1GzxPStilzF6rc0TMlysbUUv1ythIKp_GpNhC55t-DWTbdnT2BDDA/s1600/Glitter-Egg-Wreath-Supplies.jpg)
You only need 3 supplies:
4 dozen Multi-Colored Glittered Easter Eggs (I found mine at Walmart)
Glue Gun & Glue Sticks
![DIY Glittered Easter Egg Wreath](https://blogger.googleusercontent.com/img/b/R29vZ2xl/AVvXsEjK9CGmmDy6Tf1bdRMAmnn77EIkUYibcboj0QBGDnQD40HQjZIphWW6fpV4pHysWiwaSdBFozbCs5EdL_nMbbJXycnhEyPedy_L8X9fZyyqZ7LSI67Vl_Tfx3QMrUzQQPuTs-CqX7CoEg/s1600/Glitter-Egg-Wreath-Egg.jpg)
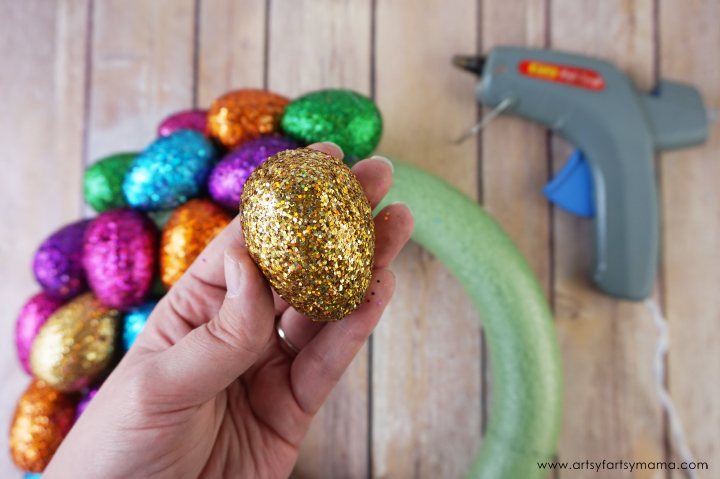
Step 1: Hold the egg carefully in your hand and add a large drop of glue on the center of the egg.
![DIY Glittered Easter Egg Wreath](https://blogger.googleusercontent.com/img/b/R29vZ2xl/AVvXsEjo1yftE3AByFmMTVAJjgTBR9wRAnqS1Uw_9XGrScuDA3TzyZJIjd1u6TCUm6Sw_d-MjgY2cCd6mB6KCiIFRk85E_rv2QwEBSsJXSvKgD0_1-geMY3OS84ZXlDAP2zC-1kLDmmW8cvZdQ/s1600/Glitter-Egg-Wreath-Glue.jpg)
Step 2: Carefully place the egg on the wreath form and hold in place for a few minutes until the glue has set.
![DIY Glittered Easter Egg Wreath](https://blogger.googleusercontent.com/img/b/R29vZ2xl/AVvXsEhk5f9qdCkwksisjVXvAIAKoe7OtnZ05_YT6r0SMzdQGShhAV-efxA0j6lnmVzUqKs9pYl-QJN6jcQTgJkY2Q_hKnEc9jDq0DqZ3l0gHgPFokE3R2qvyvftyHLIrjDJlWHOFAJCLAWCUA/s1600/Glitter-Egg-Wreath-Half.jpg)
Step 3: Place the rest of the eggs close to each other until the wreath is covered. You won't need to cover the back of the wreath since it won't be seen.
![DIY Glittered Easter Egg Wreath](https://blogger.googleusercontent.com/img/b/R29vZ2xl/AVvXsEgyLRohTF58pPXs6xpBKCGuud6hiVJqweSG68KqbS35Ywn0q3RkaspXbdCOYC9WEtlfuRlhMrNXUUkwqRQctTHdgDcyfjA5f4dTRv2CxWZ7sTpHkpP7QJNcMwSJXc03dUxDf2fZ6z-vMQ/s1600/Glitter-Egg-Wreath-Done.jpg)
![DIY Glittered Easter Egg Wreath](https://blogger.googleusercontent.com/img/b/R29vZ2xl/AVvXsEhb1OcXTY-4-ASoB8WE64Chn1oFrNu1DBVVPC2ZPkl3YjFs3NW6v0T8BFq0tRuSelrrhbdG8pvW85cBgOvTgMYCnXmVG4KuU9_p1QUkXqKojVd5d-J1mX-ndWc94fFLZVl_t9SxuiBCfw/s1600/Glitter-Egg-Wreath.jpg)
This wreath is so easy to make and doesn't take too long at all. It's a great crafternoon or girl's night project, but prepare to be covered in glitter when you're done! Obviously, the larger the wreath, the more eggs you will need. I also recommend putting on your favorite movie or binge-watching some Netflix while you make your wreath since the gluing can get a little monotonous after a while. Just watch your fingers so you don't burn yourself!!
Hang the wreath on your door or walls, or stand it up on a shelf with your favorite Easter knick knacks and decor. I am absolutely loving this wreath and hope you do, too!