Posts may contain affiliate links (see Disclosure). Thank you so much for supporting Artsy-Fartsy Mama!
Showing posts sorted by relevance for query leggings. Sort by date Show all posts
Monday, March 9, 2015

Easy 18 Inch Doll Leggings Tutorial

My daughter got this adorable 18 inch doll for Christmas from my mom, including all kinds of matching clothes and pajamas for the two of them. They have become BFFs and do everything together. We're pretty lucky that grandma likes sewing new clothes for the doll, because purchasing clothing and accessories for these dolls can cost a lot of money that this mama doesn't have!!

Easy Leggings for 18 Inch or American Girl Dolls with Free Printable Pattern at artsyfartsymama.com

Friday, December 11, 2015

Easy to Sew Leggings Tutorial

Easy to Sew Leggings Tutorial and Winter Shoe Shopping at artsyfartsymama.com #ohsofamous

Kids grow too fast. School just started a few months ago, and her pants are already starting to get floody on her. After creating a pattern to make some 18 inch doll leggings, I decided to apply the same tutorial and adjust it to sew up some new shiny (literally), longer leggings that will hopefully last her all winter long. Luckily, we were already needing to purchase new shoes for her to wear this winter, so maybe we can hide those older, shorter pant hems in some boots and high tops!
Saturday, October 10, 2020

DIY Star Butterfly Costume

Make your own Star Butterfly Costume (inspired by Star vs. the Forces of Evil) to wear for Halloween or cosplay!

DIY Star Butterfly Costume

For Halloween this year, my daughter asked me to help her put a Star Butterfly costume together inspired by Disney XD's Star vs. the Forces of Evil. We both love the show, and I always have a great time making her costumes, so of course I was up for the challenge! I was able to DIY everything for this costume, and have been so excited to share it with you. If you're a fellow Star fan, this costume is perfect for Halloween and cosplay! 
Monday, October 8, 2018

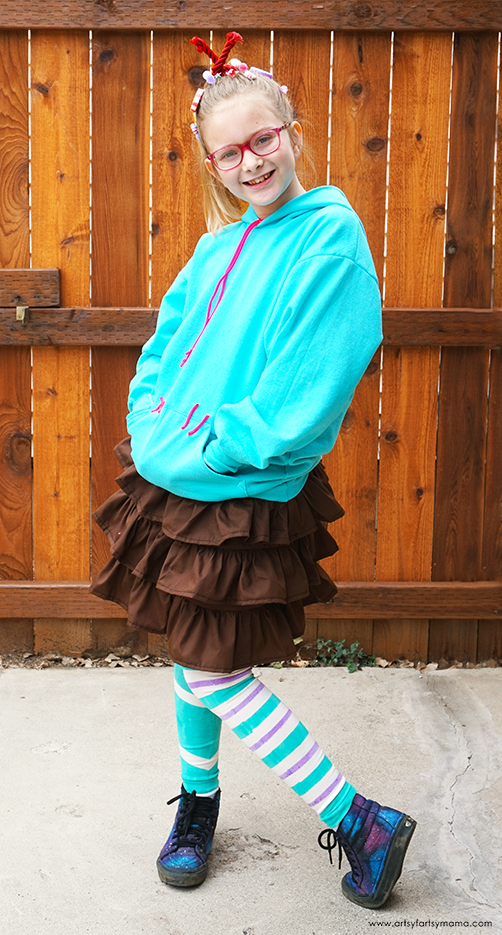
DIY Vanellope von Schweetz Costume

Bring Vanellope from Wreck-It Ralph to life this Halloween with this DIY Vanellope von Schweetz Costume!

DIY Vanellope von Schweetz Costume

We love Wreck-It Ralph and are looking forward to Wreck-It Ralph 2 later this year! One of my daughter's favorite characters is Vanellope von Schweetz and relates to her a lot, actually. She has ADHD and sometimes thinks of herself as a "glitch" because she thinks differently than others do. Just like Vanellope does, my daughter uses her "gift" to stand out from the crowd and accomplishes her goals in her own special way!

I really enjoy making my daughter's Halloween costumes, and this year she is thrilled to go trick-or-treating as Vanellope von Schweetz from Wreck-It Ralph!
Tuesday, August 10, 2021

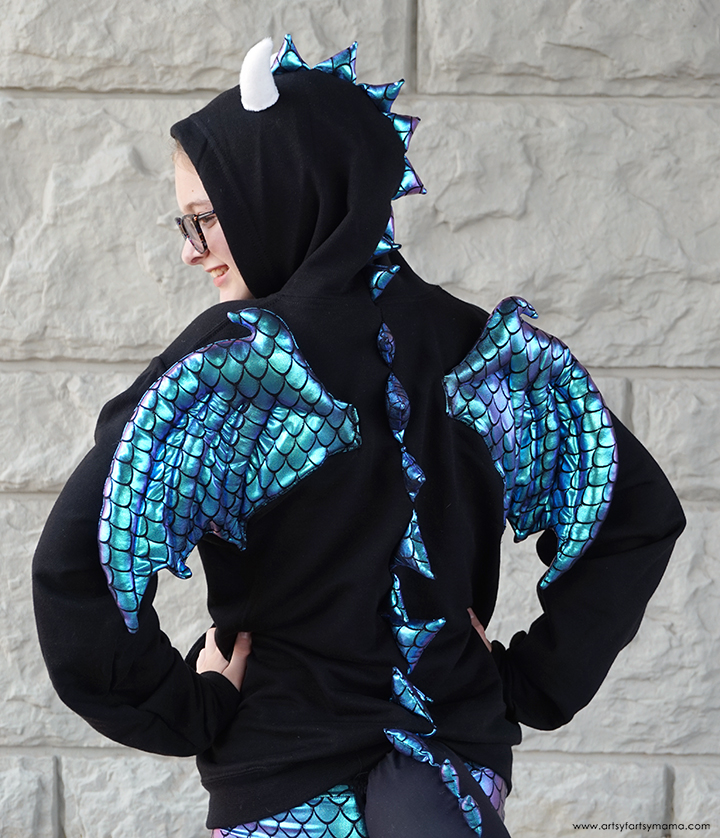
DIY Dragon Hoodie Costume

Have an adventure this Halloween with your own Dragon Hoodie Costume!

DIY Dragon Hoodie Costume

One of my favorite things about Halloween season is deciding what kind of Halloween costume to make for my daughter every year. I've been making her costumes since she was a baby, and I'm so excited to share what we've decided on for this year. With a little help from Fairfield World, we were able to put this Dragon Hoodie Costume together, and I couldn't be more thrilled with it. Not only is it an eye-catching costume, but it's also comfortable (which is important) and the main outfit can be worn again after Halloween!
Monday, October 14, 2019

DIY Luna Lovegood Costume

Accio costume! Whether you're a wizard or a muggle, this Luna Lovegood costume is perfect for Halloween or cosplay!

DIY Luna Lovegood Costume

For Halloween this year, my daughter asked me to help her put a costume together to look like Luna Lovegood, a friend of Harry Potter. We are both obsessed with Harry Potter, so this was a fun challenge! Instead of going store-bought, we were able to DIY/thrift everything we needed for this costume which saved us a lot of money and allowed us to get creative. If you also admire this unique character, this costume is perfect for Halloween and cosplay!

*Check out all of our Harry Potter projects!
Wednesday, February 10, 2021

DIY 18" Doll Bean Bag Chair

This comfy Bean Bag Chair is simple to make for your favorite 18" doll to relax in!

DIY 18" Doll Bean Bag Chair

I'm excited to be a part of the Fairfield Design Team this year, and this month's theme is finding a creative way to use bead fillers. My daughter and I love finding new things to make for her 18" dolls. Everything is so little, and always come out looking so adorable! We decided to use Poly-fil Poly Beads to make this comfy-cozy bean bag chair that will fit any 18" doll! You can use any fabrics you want, and it's such a simple project for those who are new to sewing.
Wednesday, February 20, 2019

18" Doll Clothes Made Easy with the Cricut Maker

**I am SO sorry, but I didn't realize Cricut removed Simplicity patterns from their library until now! This pattern directly from Simplicity is similar to what I used. I plan to make some new printable patterns similar to this project that you will be able to be cut with the Cricut Maker.

Making 18" doll clothes couldn't be easier when you use the Cricut Maker!

18" Doll Clothes Made Easy with the Cricut Maker

As soon as my daughter got her 18" doll, there was an immediate need for her to have ALL the things. My mom supplied a full wardrobe for her doll, but not everyone is so lucky. Doll clothes can be expensive to buy and intimidating to make yourself (unless you're a pro at sewing).

Unless it's super basic, I'm not really the best at cutting out the tiny patterns perfectly. Did you know that there are Simplicity doll clothes patterns that can be cut with the Cricut Maker? Yep. Let's just say that life has just become a lot easier if you have someone in your life with a 18" doll that needs some new clothes!
Tuesday, April 14, 2015

Easy 18 Inch Doll Socks

Easy Doll Socks you can make for your 18 inch or AG Dolls at artsyfartsymama.com
Now that my daughter's 18 inch doll is all set with doll leggings, she now needs some socks! They are easy for anyone to make, especially if you have a child who wants to learn to sew! The socks take about 5 minutes to make, and can cost less than $1!! If your child has a friend with a doll, this would be a fun project for them to do together to end up with matching pairs of socks for each doll!

Easy Doll Socks for 18 inch or AG Dolls at artsyfartsymama.com

First, get a pair of adult crew socks. No ankle socks, no knee socks. Just the regular crew socks will do, and you'll only need one. I've been able to find all kinds of cute socks in clearance bins (especially holiday socks), and a ton at the dollar store. You can also use socks that have already been worn. This is a perfect way to use that sock with a missing match or one with a hole in the toe..

Lay the sock out flat, and cut straight across just above the heel. You can throw the foot section away. You won't need it anymore.

Easy Doll Socks for 18 inch or AG Dolls at artsyfartsymama.com

Turn the sock inside out and lay it flat. Sew the bottom of the sock closed. You can use a matching thread, or basic white or black work great as well. Once the bottom is sewed closed, fold the sock in half vertically. Unfold and mark the fold line with a marker or pins.

Next, sew on each side of the line about 1/8" inch or so. Now you should have two vertical lines sewn and still be able to see the marked center line.

Easy Doll Socks for 18 inch or AG Dolls at artsyfartsymama.com

Cut along the marked fold line, being careful not to cut through the lines you just sewed.

Once the sock has been cut, turn them right side out, and your socks are done!!

Easy Doll Socks for 18 inch or AG Dolls at artsyfartsymama.com

Try them on your doll, and they should fit like knee socks. They are thin enough that your doll can still wear shoes, and it's easy enough to make lots more socks in different colors and patterns. The fashion possibilities are endless!!

Thursday, October 27, 2011

DIY Scuba Diver Halloween Costume

This is my little miss in this year's costume! It turned out even better than we planned - and I want to make sure to thank my awesome husband for helping SO much with this project! He's the pro scuba diver {I'm certified, but nowhere near as cool as he is!}, so he made sure we had all the parts we needed, and did so much to make it look amazing!!

DIY Scuba Diver Halloween Costume at artsyfartsymama.com #Halloween

Supplies
Backpack/Leash/Harness {the animal ones would work fine, too}
Black long sleeved shirt
Black pants/leggings
Silver spray paint
Craft foam
Two 2-liter soda bottles
One 1-liter soda bottle
4-6 scouring pads
1 yard nylon webbing {pink, of course}
Black nylon webbing with plastic buckle {sports section of store}
Black cord keeper tube
Plastic zip ties
**Safety goggles

1. Cut the top section off of the 1-liter soda bottle. Spray paint the scouring pads, both 2-liter bottles, and the top of the 1-liter bottle with the silver paint. Let dry COMPLETELY.

2. Remove black nylon from the buckle and replace with the pink nylon {this step can be optional}. Adjust to fit around your child's waist to make the belt. We also attached pink webbing to the straps of the backpack/harness with safety pins to add more color.

3. Roll the scouring pad onto itself, and hot glue. Then attach the rolled pads onto the sides of the belt with hot glue to make the weights.

4. Use the zip ties to attach the 2-liter soda bottles to the backpack. {You can use one bottle instead of two, but we liked the look of two better.} It also helps to use the zip ties to attach the bottles together as well so they won't wiggle all over the place.

5. Cut two long pieces of the cord keeper tube and connect to the "tanks" by hot gluing the tubing to the outer side of each of the 2-liter bottles. Let dry/cool and then connect the other ends to the lid of the 1-liter bottle. You can also cut a hole in the lid of the 1-liter bottle to make a more believable regulator.

6. For fins, I just freehanded the shapes on the craft foam, cut a strip and hot glued it on the back. Then I just put the velcro from her shoes through the loop to keep them on her feet.

{With how much she ran around at the Halloween party, let's just say it's a good thing we had a whole sheet of the foam. The strips tore and the fins were pretty trashed. So I cut out another pair for her to use for trick-or-treating. Easy to make, so it's not a big deal.}

7. We just used some swim goggles and a pink headband - which is normally NOT recommended for scuba diving.... but it works for a costume! **We were actually going to use some safety goggles and then add some craft foam around the edge for the mask, but couldn't find any that would be small enough for her to wear.

Now all we need to do is put our shark fins on {yep, the parents are being sharks this year!}, attach the leash and we are a go for trick-or-treating! My daughter LOVES wearing her costume - she cries when we have to take the harness off!! Her costume was a hit at our family Halloween party, and the main reason we don't have more photos than this is because we couldn't get her to hold still long enough!! :)

Friday, October 17, 2014

Alice in Wonderland Costume

Alice in Wonderland Costume at artsyfartsymama.com #Halloween

My daughter decided around March this year that she wanted to be Alice in Wonderland for Halloween. I was sure she was going to change her mind since she thought about it so early, but I was wrong! She was determined to be Alice, even when all the popular Frozen costumes started coming out. I'm personally not a huge fan of purchased costumes mainly because they are expensive, and I haven't found one yet that is a good quality. Making it ourselves gives me the freedom to create a unique costume that will hopefully get more use than just one evening.

Friday, October 14, 2016

DIY Leather Bows

DIY Leather Bows at artsyfartsymama.com

I always love making new hair accessories for my daughter. These DIY Leather Bows look chic and are totally affordable. Plus, it helps that they are easy to make using the Cricut Explore machine!
Friday, October 18, 2013

No-Sew Cat Costume

No-Sew Cat Costume at artsyfartsymama.com #Halloween #costume #kidscostume #nosew

After I broke my leg, all plans for sewing a costume went out the window. Since I would be stuck on the couch, I looked at options for no-sew Halloween costumes and gave my daughter some choices. She loves kitties, so she finally decided on being a cat.
Friday, October 7, 2016

DIY Girly Marshmallow Man Costume

Terrorize the town with a DIY Girly Marshmallow Man Costume! I ain't afraid of no ghost!

DIY Girly Marshmallow Man Costume Tutorial at artsyfartsymama.com

My daughter is totally loving everything Ghostbusters right now. She loves the originals, so we took her to see the new Ghostbusters this summer and she absolutely LOVED it!! Some may knock the new movie, but it was amazing to see this science-loving, up-for-anything girl come out of the theater feeling empowered and ready to take on the world!

When I asked her what she was going to be for Halloween this year, I was sure she'd decide to be a Ghostbuster. She considered it, but then became adamant on being a "villain".  As we were looking through the costume store for ideas, she stopped dead in her tracks and exclaimed that she "finally decided on being the Stay Puft Marshmallow Man, but as a girl!" You got it!!

DIY Girly Marshmallow Man Costume Tutorial at artsyfartsymama.com

To make this Marshmallow Man costume more on the girly side, of course we had to incorporate a tutu! Tutus are incredibly easy to make:

1. Start by making a waistband. Measured around the waist and cut 1 inch wide elastic to an inch or two smaller than the waist measurement (the elastic stretches out a little during the process). Overlap the edges of the elastic and sew them together with a zig-zag stitch. You can also hand sew if you don't have a machine.

2. Grab some tulle! I used 3-4 rolls of tulle (6 inches wide, 30 yards). Measure your tulle into strips twice the length of your desired skirt. For example, our tutu is 8 inches long, so I cut tulle into 16 inch strips. The easiest way I've found to do this is cut a piece of cardboard 16 inches long. Wrap a roll of tulle around the cardboard. Place a rubber band around each end to hold the tulle in place. Cut each end with fabric scissors and now you've got two stacks of 16" long strips on both sides of the cardboard!

3. Add tulle to the skirt by folding two strips of tulle in half. This creates a loop on one end and two loose tails on the other. Place the folded tulle strips over the waistband so that only a few inches of the loop stick out over the top. Then fold the tail ends around the waistband and pull them through the loop. Pull the knot tight.

4. Keep adding doubled-up strips of tulle until the entire waistband is covered. Voila!

DIY Girly Marshmallow Man Costume Tutorial at artsyfartsymama.com

To break up the white of the outfit, I sewed a belt to go above the tutu. Cut two pieces of blue fabric 3 inches wide x waist measurement + 10". Sew them right sides together, flip them right side out, and iron the seams. Topstitch around the entire belt.

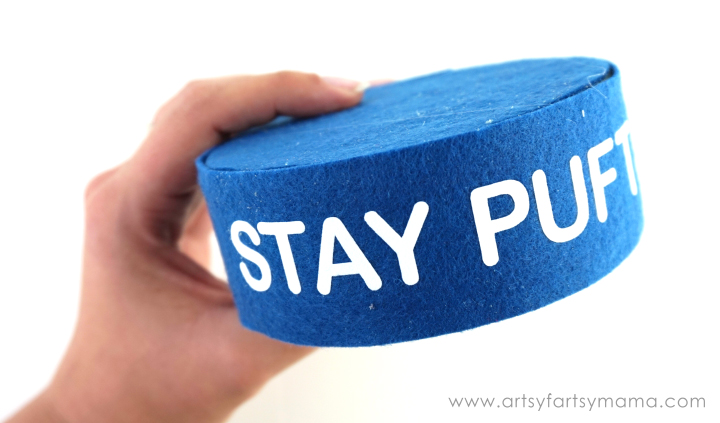
Next, I cut out the "Stay Puft" wording out of Stripflock Heat Transfer Vinyl on my Cricut Explore machine. I applied the vinyl to the belt, and to the band of the Marshmallow Man hat. Set the belt aside.

DIY Girly Marshmallow Man Costume Costume Tutorial at artsyfartsymama.com

To make the hat, you'll need a foam disc that measures about 4" x 2". Trace the disc onto some blue felt and cut out two circles. Next, cut a 2" strip of felt long enough to wrap around the side of the disc to become the hat band. I also cut out a few 1" circles and a 1" x 6" strip of red felt to place on the top of the hat.

DIY Girly Marshmallow Man Costume Tutorial at artsyfartsymama.com

For the "poof" of the hat, I first cut a 12" or so circle of white cotton fabric. Take a needle and thread and hand sew around the edge of the circle. Pull the thread tight to gather the circle and tie a knot to keep it together. To help it keep it's shape, I stuffed some tulle inside. You could also use a batting, cotton fill, or even a plastic bag!

DIY Girly Marshmallow Man Costume Tutorial at artsyfartsymama.com

Hot glue the felt circles onto the top and bottom of the disc. Let dry completely.

DIY Girly Marshmallow Man Costume Tutorial at artsyfartsymama.com

After the vinyl has been applied to the band, use some hot glue to attach it to the disc. Now the hat is ready to be assembled!

DIY Girly Marshmallow Man Costume Tutorial at artsyfartsymama.com

Add a bunch of hot glue to the top of the disc. Center the poof open-side down and hold it in place until the glue dries. Fold one end of the red felt strip in half and cut a triangle from the end. Next, add a drop of glue to the top center of the poof and place the straight edge of the red strip on top. Glue a stack a few 1" circles together, then glue it onto the top of the hat (on top of the red strip).

You can now add the hat to a hair clip or glue it onto a headband!

DIY Girly Marshmallow Man Costume Tutorial at artsyfartsymama.com

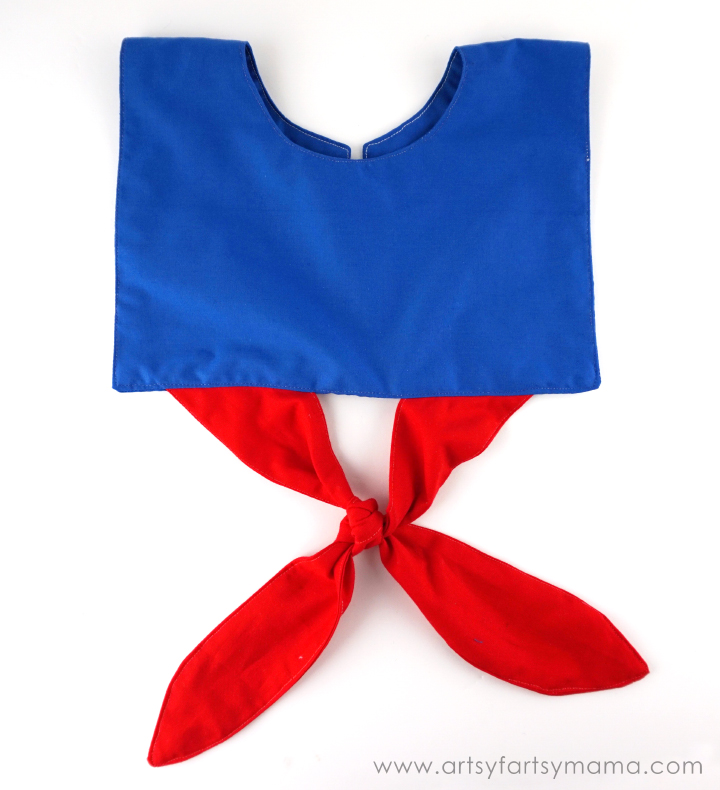
Last, but not least, is putting the collar together. Measure your child's chest to figure out how wide you want the collar to be, and also measure down from the shoulder to see how long it should go. Mine measured 7 inches wide, and 6 inches long. Double the measurement of inches long and now you've got your rectangle measurement! Cut two pieces of blue fabric to this size.

Next, I drew about a 4-5 inch circle in the center of the rectangle. Fold the fabric in half, and cut a straight line to the circle, then cut out the entire circle. The cut line will be the back, and the circle is the part that will go around the neck.

DIY Girly Marshmallow Man Costume Tutorial at artsyfartsymama.com

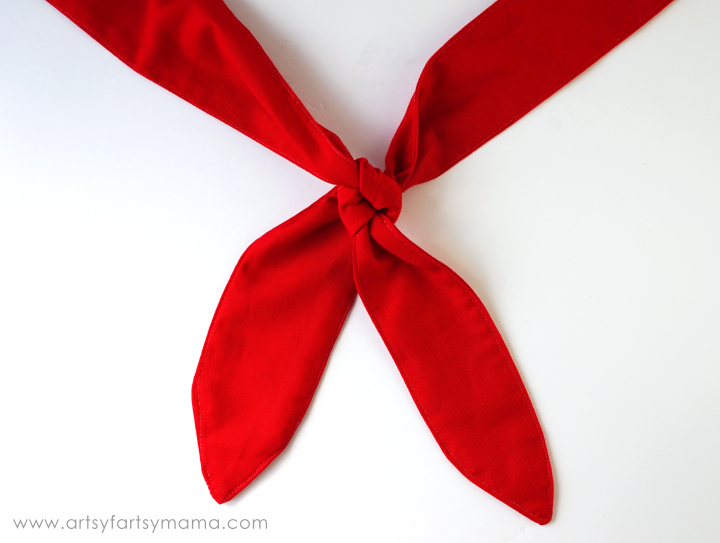
The Marshmallow Man also has a cute little red knot under the collar. So I just cut two 3 inch wide strips of red fabric and sewed them together. Instead of squared edges, I just freehanded a pointed edge. Sew them together and topstitch. Tie the strips together in a square knot.

DIY Girly Marshmallow Man Costume Costume Tutorial at artsyfartsymama.com

Place the knotted strips in between the "front" side of the collar with the untied edges sticking out. Pin all the edges in place and sew around the entire collar leaving a 4-5" opening so you can flip it right side out. Keep the extra length of the red strips just in case you need to adjust anything.

DIY Girly Marshmallow Man Costume Costume Tutorial at artsyfartsymama.com

Once you flip the collar, check that the knot is laying in the right place. If so, cut the extra red strips, flip right side out, and topstitch. If you need to adjust the knot, you'll need to unpick the seams and fix it before topstitching.

DIY Girly Marshmallow Man Costume Costume Tutorial at artsyfartsymama.com

The finishing touch is the white line going around the collar. You could tack on some ribbon, but I decided to use some white heat transfer vinyl instead. Measure where you want the line to be and draw it up in Cricut Design Space. Cut the vinyl and apply with an iron. Let it cool, and peel off the carrier sheet.

To keep the collar closed in the back, add on some velcro, buttons, or even just use a safety pin!

DIY Girly Marshmallow Man Costume Tutorial at artsyfartsymama.com

Throw on some white leggings, a white shirt (long or short-sleeved), and the costume is ready to go! In colder weather, you could also wear some white sweats. Isn't this costume adorable?! My little Ghostbuster wannabe is in LOVE and can't wait for all of our upcoming Halloween parties!!

DIY Girly Marshmallow Man Costume Tutorial at artsyfartsymama.com

She might look sweet, but don't let her fool you! Who you gonna call?!

Who's your favorite villain (any) or Ghostbusters character?
What are you/your kids going to be for Halloween this year?