
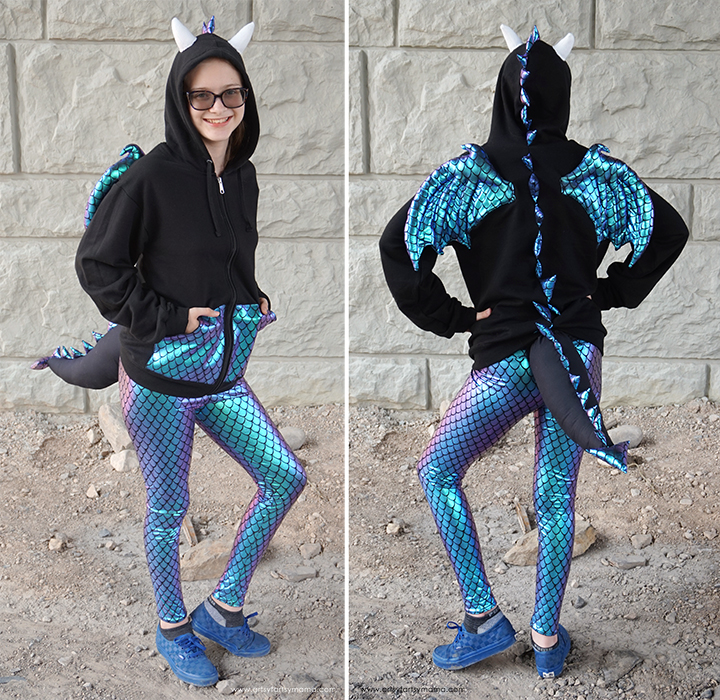
Have an adventure this Halloween with your own Dragon Hoodie Costume!
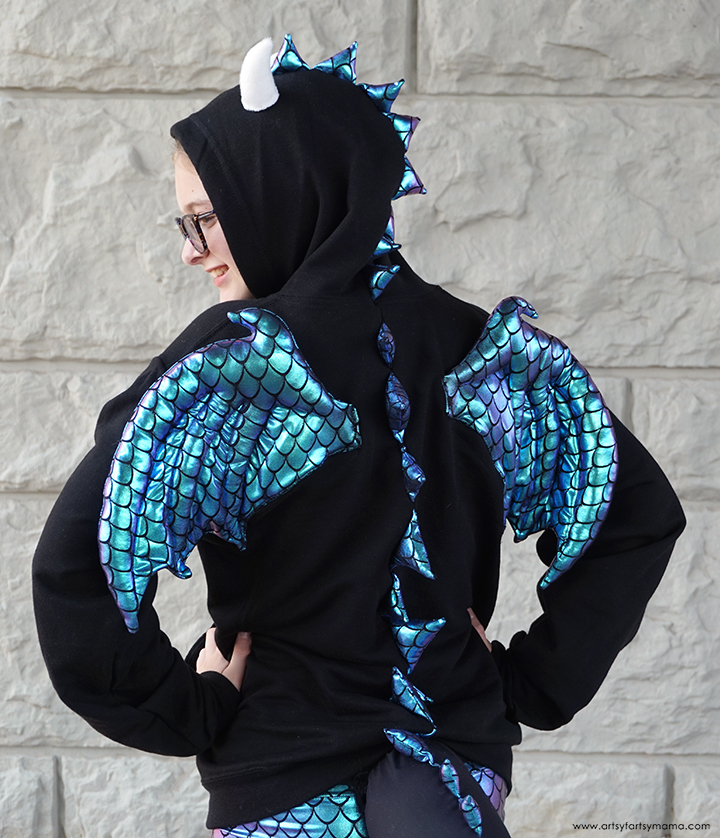
One of my favorite things about Halloween season is deciding what kind of Halloween costume to make for my daughter every year. I've been making her costumes since she was a baby, and I'm so excited to share what we've decided on for this year. With a little help from Fairfield World, we were able to put this Dragon Hoodie Costume together, and I couldn't be more thrilled with it. Not only is it an eye-catching costume, but it's also comfortable (which is important) and the main outfit can be worn again after Halloween!
The costume can be made for human beings of any size, so I am only sharing pattern pieces* for some of the costume, but not the entire thing. I'm also not sharing yardage for fabric, because you can easily adjust any parts of the costume to fit your favorite potential dragon!
*Pattern pieces are for personal use only


Peel off the adhesive backing, and use an EasyPress Mini to stick the fabric to the pockets. Be sure to follow the packaging instructions! Since pockets are used a lot, I topstitched all the way around the pockets to make sure that the fabric didn't start to peel up.


Cut two rectangles about 6" x 40" (doesn't have to be perfect) out of the same black fabric as the tail. Sew the two rectangles together, flip it right-side out, and then topstitch all the way around. Add some black velcro to each end of the belt so that it's easy to close. I added quite a bit so that there will be room to grow.

Dragon Leggings
The matching dragon leggings are easiest part of the costume, thanks to my easy to sew leggings tutorial! With this trick, you can easily create a pattern from ANY of your child's current leggings or jeans that fit to sew a brand new pair of leggings using any fabric you'd like!
Even though these leggings were made with scale fabric to match the costume perfectly, they will be just fine to wear any day of the year!!
Dragon Spikes
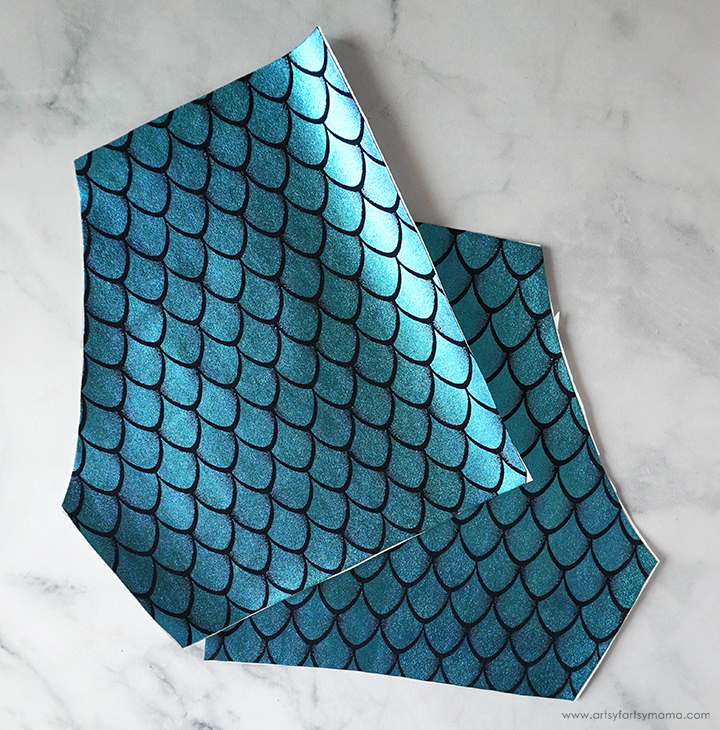
Use the spike pattern template (personal use only) to cut out a bunch of pairs of spikes. For our costume, I cut enough scale fabric to make 16 small spikes, and 6 large spikes. Lay the triangles right-sides together and sew the two side seams together. Once they've all been sewn, flip the triangles right-side out and press them flat.
Fill all of the spikes a little over halfway with Poly-Fil. Poly-Fil is used for stuffed animals and all kinds of other crafts, and will help give the spikes some 3D shape, as well as help them to stand up off of the hoodie when worn.
Use a seam ripper to open up the seam in the hood. I left about 4 inches together on the front of the hood so that the spikes would start a little farther down.
Next, mark a line down the center of the back of the hoodie using chalk or a marker. Use a rotary cutter to cut a straight line down the center of the hoodie, but don't cut through the seam between the back and the hood or through the bottom seam .
Gather enough small spikes for the hood (in my case, 8). Sew the bottom of one of the spikes closed, but keep the end of the spike in the sewing machine with the needle still through it. Lift up the foot, and place the next spike right up next to it and sew through the next spike. Repeat until all of the spikes are closed up and connected.
Repeat the process for the back of the hoodie. I sewed 11 spikes together for the back, alternating between large and small spikes.
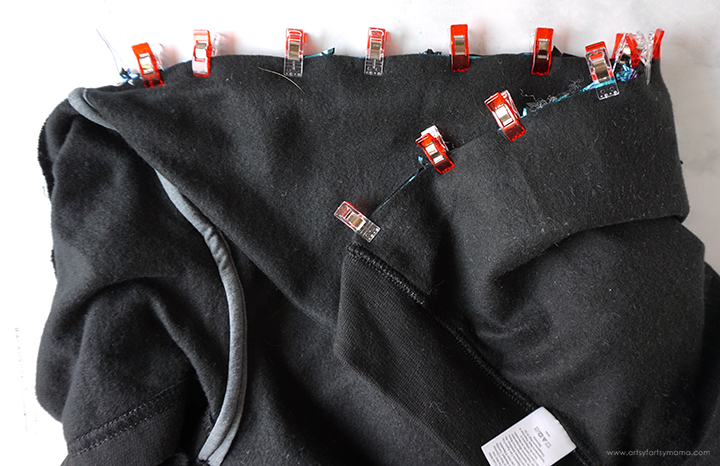
Turn the hoodie inside out. Carefully line the first spike in between the cut fabric in the back of the hoodie and clip or pin it in place. Line the next spike up, clip it in place, and repeat until you get to the other end of the opening. Use a zig-zag stitch to sew up the entire back of the hoodie, making sure to sew the ends of the spikes in.
Repeat the clipping and sewing process for the hood.
When you turn the hoodie right-side out, inspect the scale fabric spikes and make sure all of the ends have been sewn in. If you find any mistakes, turn it inside-out and re-sew the area. Once everything has been secured, try it on and admire your work!! It's so fun to see the project starting to come to life!
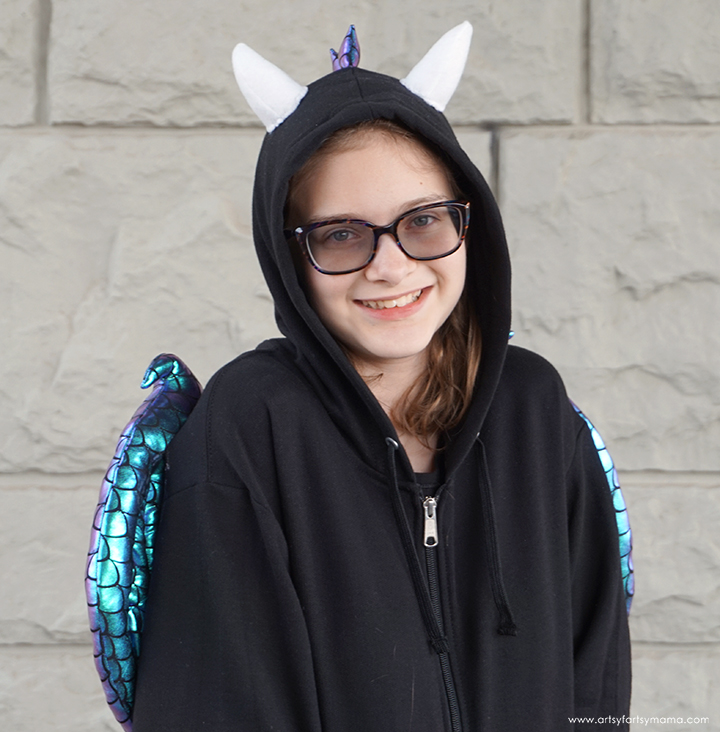
Dragon Horns
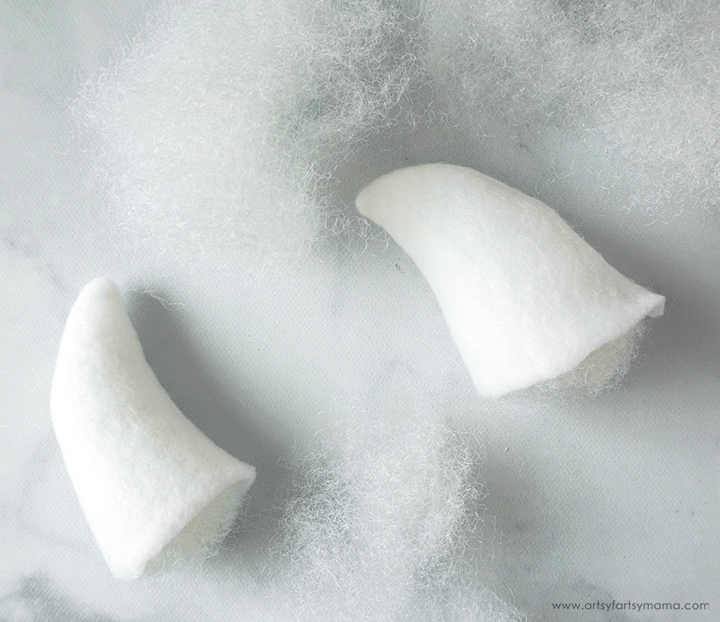
Cut out 4 horn pieces using the horn pattern template (personal use only) out of white fabric (I used fleece fabric). Sew two pieces together on the sides only, leaving the bottom open to create one horn. Turn the horns right-side out and fill with some Poly-Fil to bulk them up.
Stand the horns on top of a scrap of fabric (any kind, I used the same as the horns), and trace the bottom, which will be a circle onto the fabric. Cut the circle out. Add a little bit of fabric adhesive around the inside of the bottom edge of the horns, and then line the circle edges up with the bottom edges. Use pins or sewing clips to hold the seams in place until the glue dries.
Have your child put the hood on, and figure out where you want the horns to be placed. Add a little bit of fabric adhesive to the bottom of the horns, press them down onto the hood and hold in place for a minute or two. You can also carefully pin them down if needed. Carefully remove the hood.
Using a needle and white thread, hand sew around the base of the horns. The stitches don't have to be perfect - just do the best you can. The hand sewing plus the adhesive will make sure that these horns don't go anywhere!
Dragon Wings
The trickiest part of the costume is probably the wings, and in reality, they really aren't that tricky. Use the wing template pattern (for personal use only) to cut out four wing pieces from the scale fabric, and two pieces of batting with the same template.
Lay the two pieces of fabric right-sides together with the piece of batting on top. Sew all the way around the wing, leaving the small straight edge on the side open for turning. Carefully turn the wings right-side out, and press the seams so that it lies flat.
Trace the dotted lines from the pattern onto the wing (I used a Sharpie) and then top stitch over the markings. Repeat for the other wing.
To add some extra definition to the wings, I added stuffing to the upper openings in the wing. Use a little bit of Poly-Fil at a time, and a chopstick or stuffing tool to work the Poly-Fil into the wing (see image above). This is actually the part that took the longest, but I filled the wings up while watching a movie and it made the time go by a lot faster!
Lay the hoodie face-down and decide where you want the wings to be. If necessary, try the hoodie on and make marks with a safety pin or marker. Pin the wing in place, fold the opening of the wing together, and sew the wing onto the back of the hoodie just on that opened edge.
With the wing only being held in one place, it will be floppy to say the least. However, I didn't want to add any more stitches to the wing or try to fit all of that into my machine. Instead, I added some fabric adhesive to the upper area of the wing (not the top) and to the "flat" areas up until the arm seam. Stick some pins through the wing to hold it in place until the glue sets.
The fabric adhesive actually holds very well, but if you are worried about it, you can tack the wings down in any troublesome areas.
I really like that the wings still have a little bit of movement since the ends by the arm aren't being held down! I also love how the puffiness added to the wings make them really stand out and give them that realistic dragon feel.
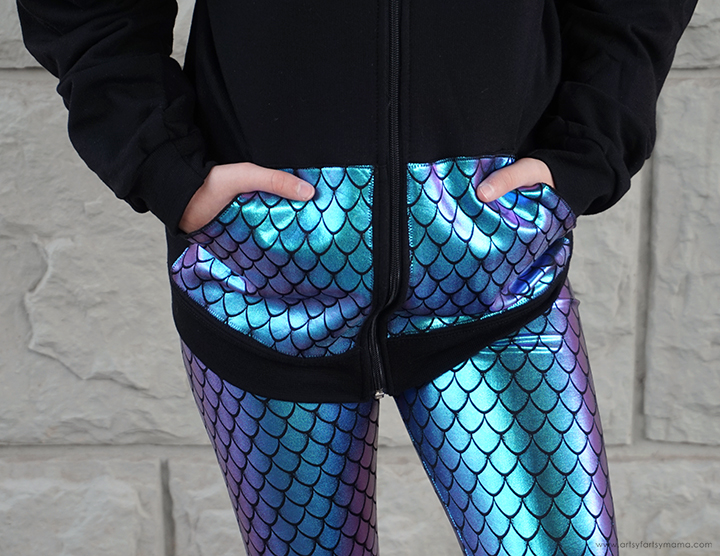
Dragon Pockets
With all of that dragon magic happening on the back of the hoodie, it made the front of the hoodie seem a little bare. To add a bit of dragon sparkle, I traced one of the front pockets to make a pattern, and then cut two out of the scale fabric - make sure to flip the pattern for the other one of them!
Next, apply some HeatnBond Lite to the back of the scale fabric to make it easier to attach the fabric to the pockets. This stuff makes appliques and attaching fabric to your projects a breeze! If you don't use HeatnBond, make sure that the fabric bonding adhesive you do use is sewable and machine washable.
Dragon Tail
Last, but certainly not least is the dragon tail! This is not attached to the hoodie or the pants, but is it's own item that can be removed for sitting in the classroom, or riding in the car. You can use my dragon tail pattern (for personal use only), or draw out your own shape for a tail. Trace the pattern onto black fabric and cut two pieces.
You will also need enough triangles for about 8 small spikes and two pieces for the large spike at the end of the tail cut out of the scale fabric. Stuff the small spikes with Poly-Fil and sew together the same way as the back and hood part of the hoodie.
First, sew the large spike for the end of the tail together, leaving a small opening at the bottom center of the spike. Stuff the piece fully with Poly-Fil and set it aside.
Next, sew the bottom half of the tail together and around the end of the tail. Line the ends of the small spikes and the edge of the top of the tail together and use sewing clips to hold the edges in place. Sew the top of the tail together, making sure to attach the spikes well. Leave the larger end open.
Fill the tail generously with Poly-Fil (this is a great job for the kids!) until you get the firmness you want. I wanted to make sure that the tail would stick out on its own, so I filled it pretty well. Cut a circle (like the horns) to fit the opening of the tail and sew the edges together. It isn't necessarily "pretty", but it does the job!
Fold the belt in half and find the center. Line the top edge of the belt and the top of the tail together and pin in place. Sew the belt onto the edge of the tail using your machine or by hand, making sure to REALLY get the two held together well since it will definitely be put to the test!!
Dragon Costume Reveal
Once you put all of the pieces on, the costume is complete! This is such a fun costume that is perfect for every age and will definitely make a statement. I also love that the leggings and hoodie can be worn long after Halloween is over, and that all that work isn't just for one night of ghoulish fun.
One of my daughter's favorite parts of the costume is how the tail bounces around so realistically as she walks around, and that the scale fabric wings peek out over her shoulders.
THIS. This face is the real reason I love making unique Halloween costumes for my daughter every year. She loves getting creative with me to come up with cool costume ideas (we usually start planning around April), and I just love seeing her smile once the project comes to life!
As always, I would love to hear what you think of this Dragon Hoodie Costume. If you make one for your own family, I would love to see it! Leave me a comment, or tag a photo on Facebook, Twitter, or Instagram! #AFMcrafts
Don't forget to Pin, Like, and Share!


This is the CUTEST, Lindsay! You are so very talented!
ReplyDeleteThis is awesome! And I really like that it's built onto a pre-made hoodie to save a little time.
ReplyDeleteAlexandra
OnRockwoodLane.com
Looks like you had lots of fun making this!
ReplyDelete