
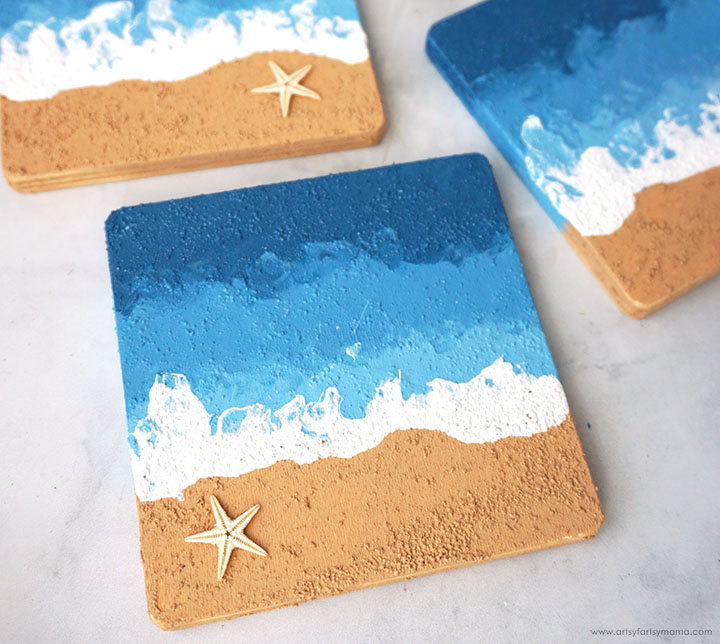
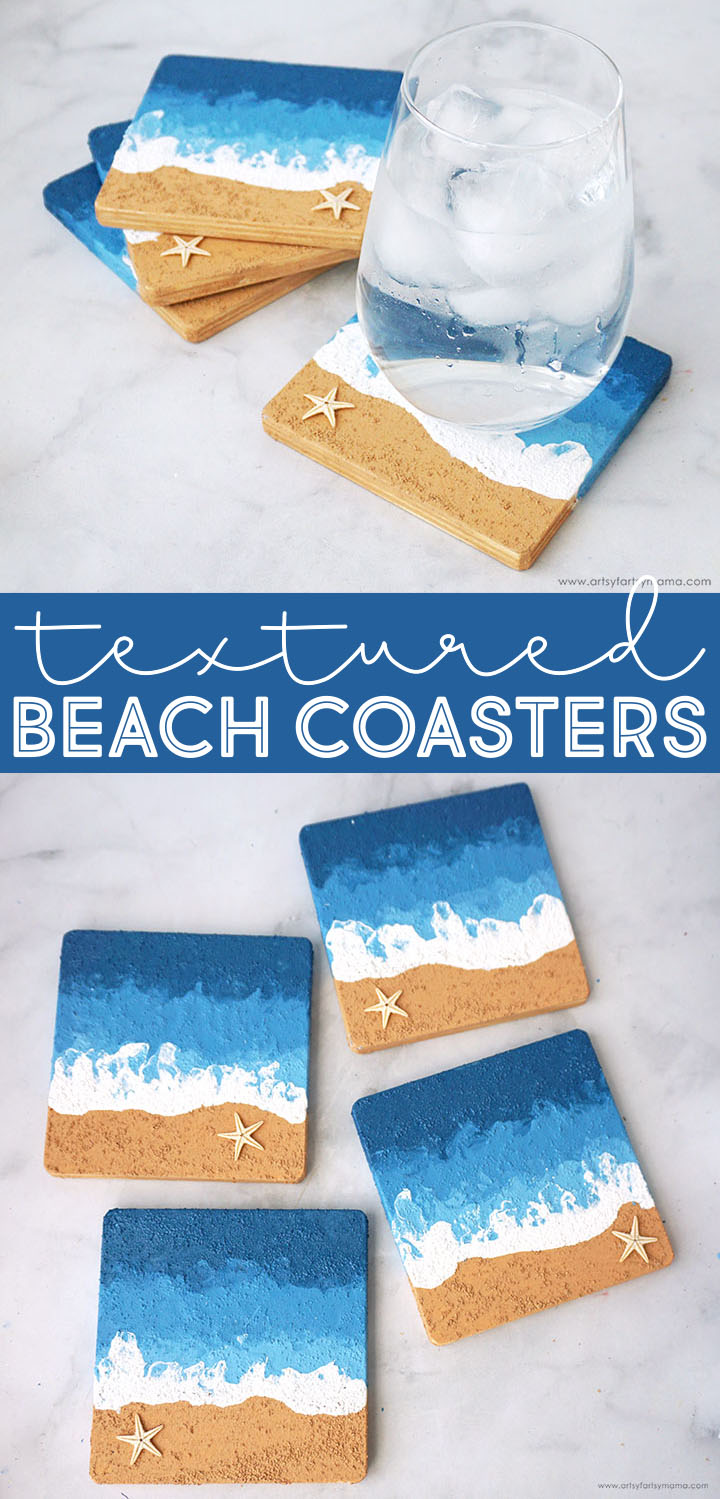
Add a touch of the beach to your coffee table with this eye-catching set of Textured Beach Coasters!

I might live in the mountains, but I absolutely long for the beach! To bring a bit of the beach into my own home, I used FolkArt Texture Mediums to create a stunning set of Textured Beach Coasters. These coasters are quite simple to make, and would be a fun crafternoon idea. Once finished, these coasters will add a pop of beachy magic to a coffee table, and would also be a great gift idea for a fellow beach fanatic.

To make your own Textured Beach Coasters, you will need these supplies:
*Save 15% on Plaid supplies when you shop with code LINDSAY123
Coaster Sealant/Topcoat:

Use sandpaper to make the edges of the wood coasters as smooth as possible. Paint a thick layer of Sand Texture Medium along the bottom third of the coasters. The paint has a sand-like texture that can be applied to the coasters with either a paint brush or even a palette knife.
Set the coasters aside while you work on prepping the next layer.

The Tintable Texture Medium is just that - another textured medium that can be tinted with any color of acrylic paint! The next step is making the darkest of the ocean three layers. To do this, combine Tintable Texture Medium, dark blue acrylic paint, and a teal metallic acrylic paint in a small mixing cup. Stir the mixture together until all three paints have been evenly combined.

Use a brush or palette knife to cover the top third of each coaster with a thick coat of the blue-tinted mixture

Add a small drop of white acrylic paint to the blue mixture (mix up some more, if necessary) and stir until combined. You should have a new blue mixture that is a shade or two lighter than the original. Apply a thick layer of the mixture to the coasters, just below the dark blue area. Use a finger, brush or palette knife to lightly blend the edges of the blue areas together.

For a more even texture, you can apply a second coat to each layer - especially the sand.


Just for an extra beach element, I added a tiny starfish to each coaster using a small amount of strong adhesive.


I am enamored by these textured mediums, and love how this beach art turned out on both the canvas and the coasters! I'd love to hear what you think about this project, and I would love to see your creations! Share them on Instagram, Facebook, or leave a comment/photo on the project pin on Pinterest! #AFMCrafts
Lastly, apply a thin line of the Snow Texture Medium* along the border of the sand and sea. This is going to be the sea foam!
*This can also be done with the Tintable Texture Medium and white paint.
Now, sea foam isn't just a solid line of white. It's messy and blends in with the edge of the ocean. To get this look you can blow through a straw, or you can use this quick trick: a compressed air duster! This will blow air with just enough power, and you can control the movement with your hand.
Aim the straw at the white paint, and press the trigger about halfway. You don't want to go FULL power with the airflow - that's a bit too strong. Start at one end and blow the white paint over the lightest blue layer (it's okay if it goes farther) until you get to the other end. Spray more air over any areas, as necessary. Remember that this is an organic scene, so it doesn't have to be perfect!
Allow the coasters to dry completely. Because everything was applied in thick layers, I let my coasters dry overnight, and came back to a stunning set of beach coasters - each one a unique work of art.
To keep your coasters protected, I highly recommend sealing the coasters before use. You can spray the coasters with a few coats of clear sealant, or cover the tops with a layer of resin.
Working with resin is actually very easy, especially if you are adding a simple topcoat to a project like this one! If you're new to resin, definitely check out Resin 101: Getting Started with Resin.
SAFETY FIRST: Before getting started, wear disposable gloves, protect your workspace, and be sure to work in a well-ventilated area!
Prepare 5ml of KHKD Resin resin (per coaster) according to package directions. Pour in equal parts resin and hardener to a clean mixing cup. Slowly stir the resin together with a stir stick for two minutes. If the resin looks cloudy or has any streaks running through it, you need to keep stirring it until it becomes clear.
Use the stir stick to add some resin to the top of the coaster, then gently bring the resin near the edges. To prevent the resin from spilling over the sides, you need to carefully bring the resin to *just* the edge. If you see any drips going down the side, wipe it away immediately.
If you tilt your head or angle yourself to see the light reflecting on the surface of the resin, you will be able to see any "bald spots" or areas that aren't covered in the resin. Use the stir stick to fill in any of these areas.
Add resin to the coaster until entire top is covered, but do NOT overfill. Too much resin will eventually spill over the edges. Let the resin sit for a few minutes, then spritz with 91% alcohol to remove any surface bubbles.
Repeat this process for the rest of the coasters. Leave the resin to cure in an undisturbed, well ventilated area for 12-24 hours (depending on humidity, it could be longer).
These Textured Beach Coasters are so simple to make, and will definitely be a statement piece of decor on your coffee table. I love how they turned out and think they would also make such a great gift for fellow beach fanatics or for those who need some fresh decor for a beach house.
Just for fun, I repeated the techniques used to make the coasters on a wood canvas. Instead of one little starfish, I added three instead. Since this is a piece of artwork and isn't going to get used in any way (like a coaster), I opted not to cover this in resin (though you definitely could).
Looking for more ocean craft inspiration?
Check out this collection of OVER 100 creative ocean-themed craft ideas!!
Don't forget to Pin, Like, and Share!


