
Turn a photo of your pet into a custom reusable stencil to create hipster screen printed art!
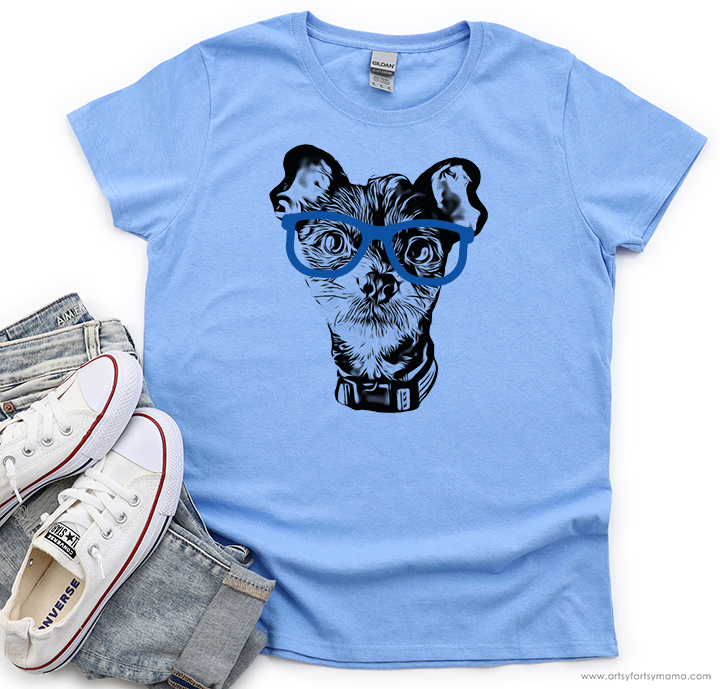
I've always been drawn to all of that funny "hipster" animal art - you know, the animals in glasses? I decided to make some of that type of art myself, but using Ikonart Stencil Kit. To make it even more unique, I made a custom stencil of my dog to be the hairy little hipster on display! It was so easy to do, and can be used on a shirt (like I did), canvases for wall art, and so much more! I absolutely love how this project turned out, and have been so excited to show you how I did it!
New to making reusable stencils? Here's how to Get Started with Ikonart!

To make your own Custom Hipster Pet Stencil, you will need these supplies:
*Save 15% on Ikonart supplies when you shop with code AFM15
To make a stencil of your pet, you need to first start with a photo. I would recommend following along this helpful tutorial from Ikonart to easily turn a photo of your pet into a custom stencil.
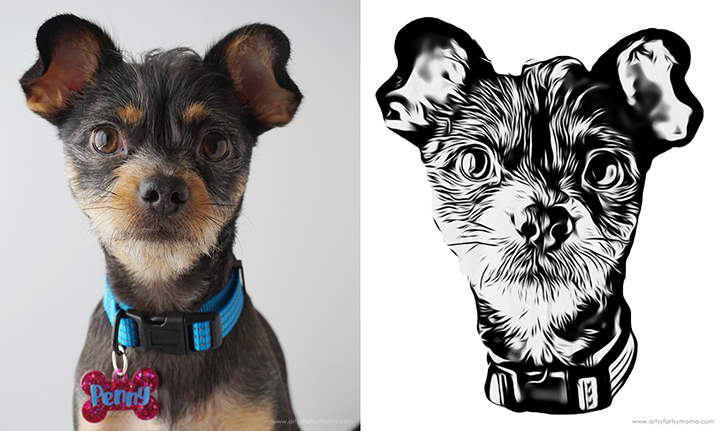
I was able to transform this adorable photo of my dog, Penny, into a stencil by following the tutorial! I used both Photoshop and the BeFunky Inkify filters to get my final image.
Some helpful tips:
- Up the contrast in the photo, but try to keep some of the small details
- You may need to save the image throughout the process and re-upload multiple times to get the look you want.
- You can get "gray" areas with stencils (like the inside of Penny's ears). Smaller details need to be made black or white.
- Play around with it, and have fun!
On your computer, size your final pet stencil image to fit your project (shirt, canvas, etc). If you want to add a "hipster" effect, add a silhouette of black glasses to fit your pet's face. Place the glasses below the image of your pet. Print the designs as dark as possible on either inkjet or laser Ikonart Printer Film.

The next step in the process is to expose the stencil film. For this project, you need to use the purple Ikonart Textile Film instead of the blue Ikonart Stencil Film. The purple film works just like the blue film, but it's stickier and a little more stiff, which makes it perfect for using on fabric and other textured or difficult surfaces.
Set up the exposure stand with UV LED Light by following the directions included in the kit. The Textile Film is light sensitive, so be careful to keep it out of sunlight and bright lights before exposure. Cut a piece of the film the same size as the design print.
Lay the piece of film down on the base of the stand with the textured side facing UP. Place the printed design on top of the stencil film, making sure it's right-side up. This means that if there are words in your design, you should be able to read them.
Lastly, place the clear exposure sheet (found in the stencil film pack) on top and press it down well to seal the design tight against the stencil film. Turn the exposure light on and expose the film for 30-35 seconds.
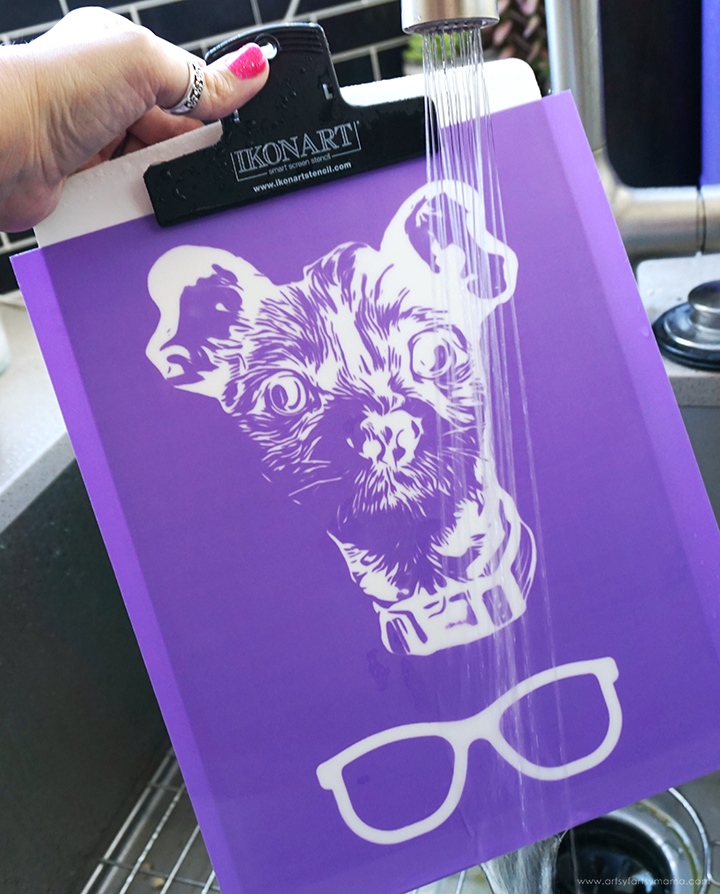
The final step in the stencil-making process is to washout, or rinse, the stencil. Clip the exposed stencil film to the Ikonart clipboard with the shiny side (carrier sheet) touching the clipboard. Use the kitchen sink sprayer to rinse the stencil film with warm water until the design shows through and becomes completely clear. The washout process shouldn't take more than 3 minutes.
Gently blot excess water off the the stencil, and hang or lay flat to dry for about 45 minutes. When the stencil is dry, you shouldn't see any water spots or discoloration. Once the stencil is completely dried, place the it back on the exposure stand and expose it again for at least 2 minutes without the clear cover sheet. This extra exposure will increase the durability of the stencil so you can get as much use out of it as possible.
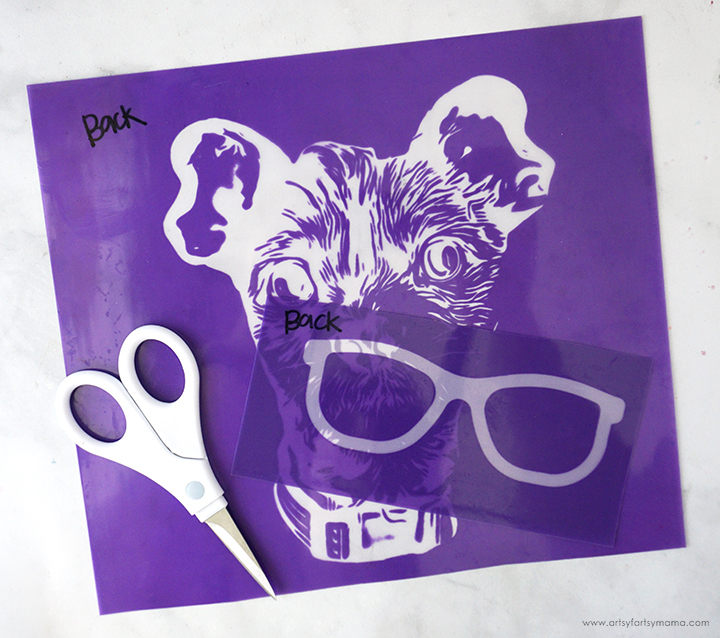
Once dry, use scissors to carefully cut the stencils apart. Be sure to leave a good amount of space around the stencil designs!! Next, use a permanent marker and write "back" on the carrier sheet (shiny side) on the back of the stencil. This helps later when you put the carrier sheet and the stencil back together when you are done using it.

Using an adhesive textile mat helps make screen printing so much easier. The mat holds the fabric in place, and helps to block the paint or ink from bleeding through to the back. For adult hoodies, shirts, and larger fabric projects, a full or a half-sized mat works perfectly.
Remove the carrier sheet from the front of the mat, and slide it into the shirt with the adhesive facing up. Make sure the fabric isn't stretched out and that there aren't any wrinkles. Press it down well against the mat, and use a lint roller to remove any debris from the front.
Center the stencil on the front of the shirt. Press the stencil down well against the fabric, making sure that it's completely flat. Apply a thin line of black Speedball Fabric Ink along the edge of the stencil, and then use the squeegee to lightly pull the paint across. Keep dragging the paint over the stencil until it has been completely covered. Scrape away the excess paint and put it back into the bottle.
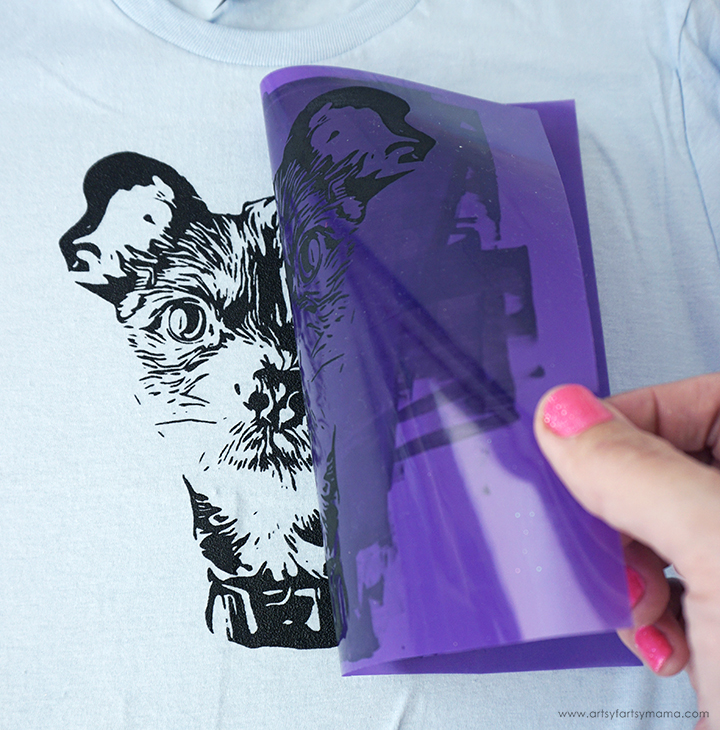
Carefully lift the stencil at one side and pull it up about halfway. If you see any areas that need more coverage, lay the stencil back down and go over it again with a little more fabric paint/fabric ink and squeegee. Lift the stencil again and remove it completely once you are satisfied with the coverage.
STENCIL WASHING:
Once the stencil is removed, wash the paint away immediately. First, get the clipboard wet so your stencil doesn't stick to it. Place the stencil on the clipboard with the textured side up, and lightly rub the stencil under cold running water to remove all the paint. Do not rub or scrub the adhesive side of the stencil, and NEVER use anything other than water to wash the stencils. To prevent the stencil from breaking down, don't ever leave the stencils to soak.
Remove the stencil from the clipboard and lay it down with the adhesive side up. While the stencil is still wet, place the carrier sheet onto the stencil so that the word “BACK” is readable. Hang or lay the stencil flat to dry completely.

Quick Tip:
To help the paint dry faster on fabric projects, get out your hair dryer and go over it for a few minutes using low heat. It works great and saves you so much time!!

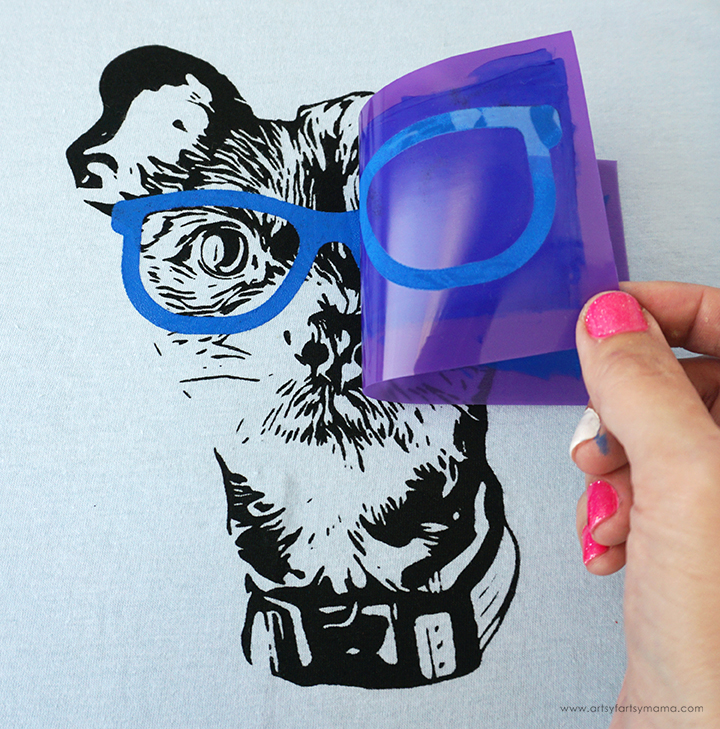
To make Penny's image a little more whimsical, I decided to add some simple glasses to make Penny into a little hairy hipster!
Make sure the ink from the pet stencil is dry so that the glasses stencil doesn't stick to it. If the stencil sticks to anything with moisture, it can ruin your project and/or stencil. Center the glasses on the face of the pet, and then press the stencil into place.

I used blue fabric ink instead of black to make these glasses really pop. Apply a little line of ink along the edge of the stencil, and drag the squeegee across with even pressure. Keep scraping the paint over the stencil until it has been completely covered. Put the excess paint back into the bottle.
Follow the instructions above to wash the stencil out completely.


Let the fabric paint dry for at least 24 hours, and then heat-set the paint using an iron or EasyPress. The shirt is completely washable, and the design won't peel or wrinkle like HTV.
Isn't this the cutest thing you've ever seen? I LOVE that I was able to take a photo of my pet, turn it into a usable stencil, and created this custom "Hipster Pet" shirt!! Ikonart makes it easy to bring my creative ideas to life, and this one is extra special to me!
I'd love to hear what you think about this project, or if you want to know more about reusable stencils. If you've made your own stenciled projects, I would love to see your creations! Share them on Instagram, Facebook, or leave a comment/photo on the project pin on Pinterest! #AFMCrafts
Looking for more pet craft inspiration?
Check out this collection of OVER 100 creative pet craft ideas!!
Don't forget to Pin, Like, and Share!


