
This handmade Thankful Sign is great for Thanksgiving or year-round decor!!

I love creating decor that is perfect for specific times of the year, but also look like something that could be kept on display all year long. This Thankful Sign kit is just that, and I love how it turned out. It was such a fun afternoon project, and is one that could be made by anyone of any crafting skill level. If you are someone who wants to be crafty, but just doesn't know where to get started, I definitely recommend checking out the Farmhouse Style Kit Club for more projects just like this!

This kit came from Annie's Farmhouse Style Kit Club, but is unfortunately no longer available to purchase. To make your own version of this Thankful sign, you will need these supplies:
- 11x14 Wood Frame or thrifted wood frame and 11x14 canvas board
- 5x7 Wood Blank
- 1" Painters Tape
- Acrylic Paint - Black and White
- Paint Tray
- Cosmetic Sponges or Paint Sponges
- Paint Brush
- Adhesive Vinyl - "Thankful" quote or phrase
- Ruler
- Pencil

Turn the canvas board horizontally. Use a ruler to make marks at 5" and 6" on both top and bottom edges of the board. Center a line of tape on the marks and press the tape down well. Turn the board vertical. Rip off a smaller piece of tape and line the top edge with the bottom edge of the longer piece you just placed.
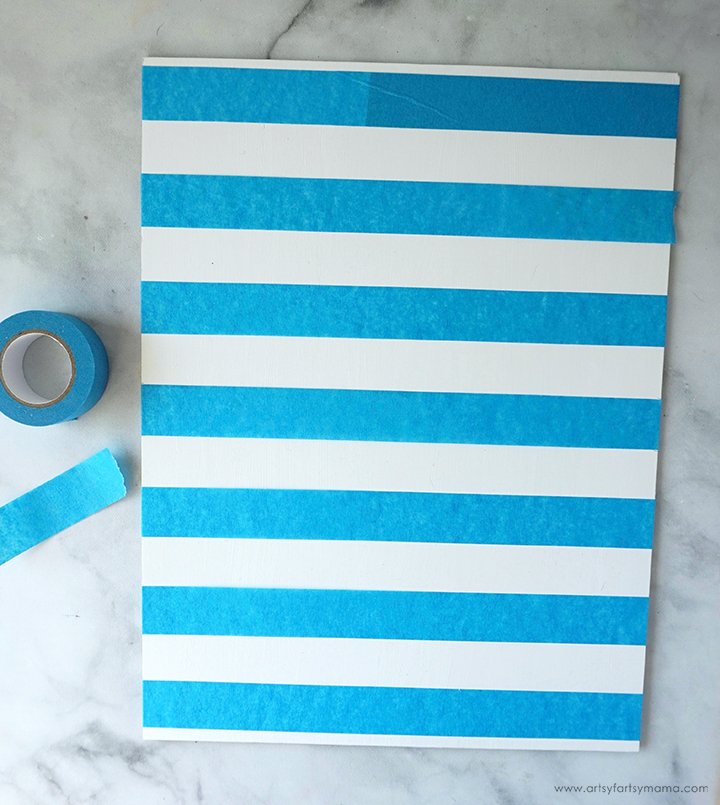
Line another longer piece of tape up with the bottom of the small piece and press it down onto the board. Repeat the lining up of the small piece and placing a new line on until the entire board is covered in lines of tape.

Mix up a light shade of gray on a paint tray using white acrylic paint and a small amount of black. Use a cosmetic sponge or a paint sponge to lightly dab paint onto the board. To prevent bleeding under the tape, apply the paint in VERY light coats, and let each coat dry before applying another*.
Paint can get tacky as it dries, and if you try to paint on top while it's tacky, the paint can peel up and make a mess of your project.

Peel the lines of tape away immediately while the paint is still wet. If you see any bleeds, don't panic and don't try to fix it right now. You'll see why soon!

When the paint has completely dried, turn the board horizontally. Make marks on both sides at 4.5" and 5.5". Center a line of tape on the marks, just like you did before. Press the tape down well.
Add a little more black paint to the mixture already on the paint tray and mix it together well for a slightly darker shade of gray.

Use a clean sponge to apply light coats of the new mixture of paint to the board. Make sure to paint VERY light coats, and to let each coat dry completely before adding a new one.
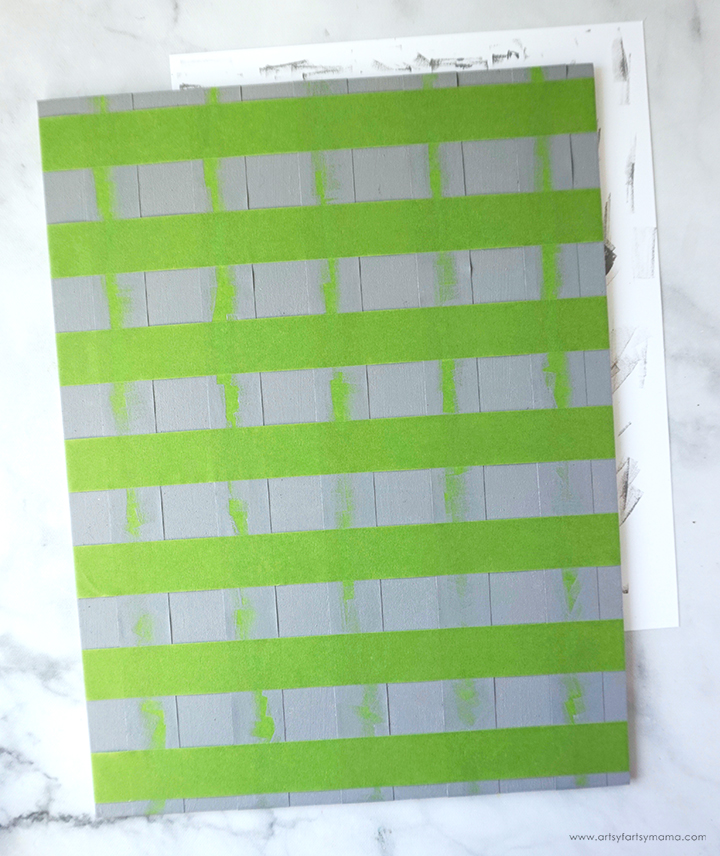
DO NOT peel the tape up this time! Wait until the paint is dry and turn the board vertical again. Place new lines of tape where the very first ones were put on. If you can't see where the tape lines were, you can measure again and make marks on the long sides at 5" and 6". Press the tape down well.

Add some black paint (no white at all) to a clean paint tray. Use a clean sponge to apply light coats of black paint to all of the open areas of the board. Once you are done with the last coat, peel all of the tape away from the board.

If your frame isn't already black, paint it with a couple of coats and let it dry completely. Place the painted board into the frame. I love how the buffalo plaid looks with the black frame!! Set this frame aside while you work on the next part of the project.

Cover the wood blank with a couple of coats of white paint and set it aside. Cut your "Thankful" quote or phrase out of adhesive vinyl using your Cricut (or other cutting machine). Weed the vinyl, and cover the design with transfer tape.

Peel the vinyl backing away, leaving the vinyl stuck to the transfer tape. If the vinyl is coming up with the backing, lay the backing down and use a scraper tool to press the vinyl down again.


Turn the board over and stick 3-5 pieces of double-sided foam adhesive on the back.

Peel the adhesive liner away place the board on the front of the sign. Use a ruler to make sure that it's centered! Once it's in place, press it down to make sure it's stuck on well.
Now the sign is complete and ready to be put on display! It's the perfect decor for not only fall and Thanksgiving, but could be hanging up all year long as a reminder to be thankful. I love how it's got that farmhouse look, but could actually go with almost any style of decor.
As always, I would love to see your creations! Share your creations on Instagram, Facebook, or leave a comment/photo on the project pin on Pinterest! #AFMCrafts
Don't forget to Pin, Like, and Share!


