
Create some crochet magic with a set of Harry Potter Wand Crochet Hooks using polymer clay!
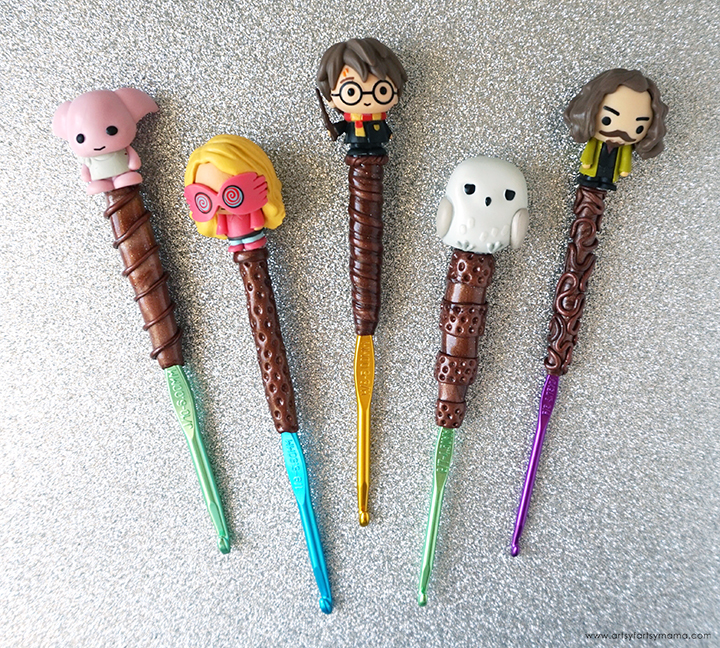
Do you crochet? I don't, but my sister does! When she asked me to make her some Harry Potter crochet hooks for her to use, I couldn't have been more excited for the challenge! I love using polymer clay, so needless to say, I had a blast transforming these crochet hooks into something magical. I don't even crochet, and now I'm pretty sure that I need to make a set for myself... These are so much fun for muggles who love to crochet, or to gift to a crocheting Harry Potter fan!

To make your own set of Harry Potter Crochet Hooks, you will need these supplies:

You can use one brown bar of Sculpey Clay, or you can use a mixture of brown bars for a marbled/wood look. I used four different brown colors, including glitter and metallics: hazelnut, jewelry gold, rose gold glitter, and bronze.
Too marble clays, take off about 1/4 of each bar. Split the color in half, and roll them into "snakes" measuring about 6" long (doesn't have to be perfect). Line the different colored rolls of clay vertically in a random order.

Use an acrylic roller to make them into one large piece. Fold the clay in half (in either direction) and roll the clay out flat again. Do this a few more times until the clay has a marbled look that you are happy with. If you fold/roll too much, you will get one unique color - which is also a very fun idea!
I like the streaks of color throughout my clay mixture, plus it also has glitter and metallic shimmer spread throughout!

Tear off a piece of the clay slab - you can use a clay cutting tool or literally tear a piece off. Wrap the clay around the crochet hook just above where the size is on the handle. Use your fingers or a clay tool to blend the clay seam together in the back.
Since there is a pencil topper at the end of the hook, place the pencil topper on top to see where the clay needs to end. If it's up too high, you can gently cut it away or push it down a little to fit. Adjust and blend as necessary. I also recommend blending the clay down into the handle at the bottom, or rounding it out for a smooth edge right above the hook size.

The next step is where the *magic* happens! Get creative with textures, shapes, and patterns to create a unique wand for each crochet hook. A helpful tip: Use a small cup or a piece of styrofoam to hold each of the finished hooks into as you work on the other wands. This way the clay doesn't get flattened out on the back as it sits on the table.
Blue: simple indents were made with the end of a smaller hook all the way around the clay and then I added a small border to the top.
Yellow: this one was made with a thicker piece of clay than the first, and then twisted around the hook a few times to get this look. The top border was two small snakes twisted together and wrapped around.
Green: I loved the look of marble on the green hook, so I gently wrapped a thin snake around the clay so that it gave it that "wand" look, but let the base of the clay show through.
Purple: this one was the thinnest of the set, so I wanted to add a little something extra to give it some thickness and texture. I rolled out a long snake of clay, and then laid it down in a random pattern all the way around the hook.
Green: this one was made by adding four bands evenly around the clay, and then making indents around the bands with the end of a smaller hook.

Carefully lay the crochet hook on a baking sheet lined with foil or parchment paper. I definitely recommend keeping a designated pan just for clay projects.
Bake the wands according to package directions. For Sculpey, it's usually 275º for 15 minutes (1/4" thick). Let the wands cool completely before handling.
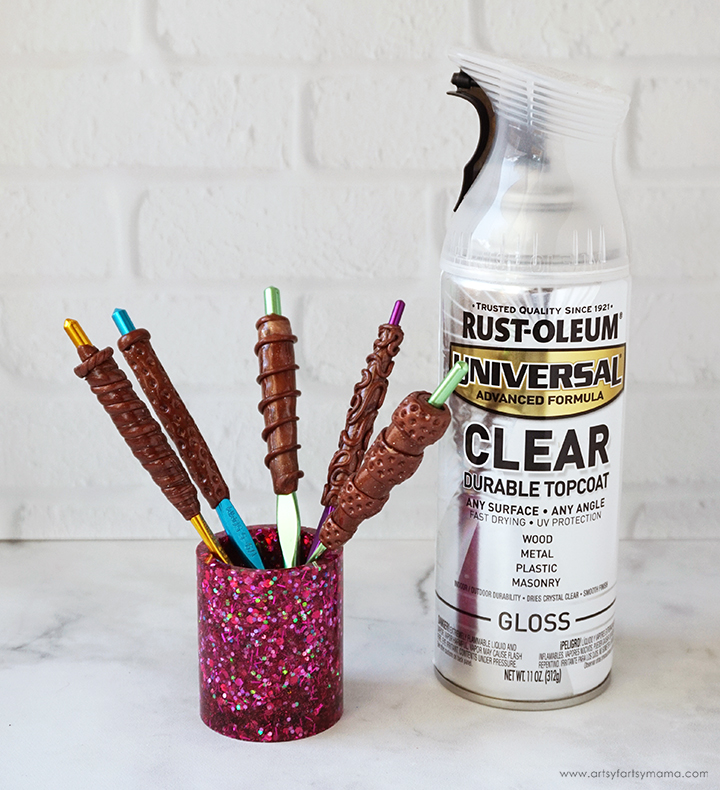
If you don't want to spray paint, you can use a paint brush to apply Sculpey Glaze to the clay on each one of the hooks. There are different finishes of glaze to get the look you want, it's easy to use, and dries quickly!


Repeat the process for each of the crochet hooks and don't touch them until the adhesive inside is supposed to have dried (check the packaging). Now the wands are ready to create magical crochet creations!
Once the sealant is completely dried, it's time to add the Harry Potter characters to the tops of the crochet hooks! Grab your favorite strong craft adhesive. Carefully add a little bit of the adhesive into the opening of the pencil topper. Because this adhesive usually takes hours to fully dry, here is my little trick: super glue! Add a little bit of glue inside and just around the opening of the pencil topper.
Place the character on top of the crochet hook, and hold it down tight against the end of the clay. The super glue will make an immediate bond to keep the pencil topper in place, giving the stronger adhesive inside time to set without you holding it the entire time.


I'm a crocheter and really love this idea! So cute!
ReplyDeleteSuch a SUPER CUTE idea, Lindsay! Thanks for sharing at the Creative Crafts Linky Party! We will be featuring this project on Wedensday!
ReplyDelete