
Display a stunning beach sunset on your coffee table with this set of coasters using colorful resin!

There's nothing quite like a sunset, am I right? I always found the most beautiful sunsets near the ocean, with the palm trees silhouetted against the vibrant colors in the sky. Because I live nowhere near the ocean, I wanted to try to capture a sunset in some resin. These Sunset Coasters were such a fun project for me to make, and they make me smile every time I see them on my coffee table. I hope you love these coasters as much as I do!
New to resin? Be sure to check out Resin 101: Getting Started with Resin!

To make a set of Sunset Coasters, you will need these supplies:
- EasyCast Clear Casting Epoxy
- Measuring Cups
- Stirring Sticks
- Disposable Gloves
- Silicone Nail Brush
- Round Silicone Mold
- Printable Palm Tree Silhouettes (for personal use only)
- Mica Powders - pink, orange, yellow, blue, purple
- Castin' Craft Opaque Pigment - white
- White Iridescent Glitter
*Save 10% on resin supplies when you shop ETI with code AFM

If you print using an inkjet printer, you will need to spray a coat of Envirotex Spray Sealer over the printed images to prevent the ink from bleeding into the resin. Let the sealer dry completely before moving onto the next step.

Add equal parts resin and hardener to the mixing cup. Each mold cavity will need 1 ounce of resin for this step, so I mixed up 3 total ounces. Stir the resin mixture together with a stir stick for two minutes, making sure to scrape the bottom and sides of the mixing cup. After 2 minutes, pour the resin into a clean mixing cup and stir the resin again for another minute or two with a clean stir stick.
If the resin mixture is still cloudy, you will need to keep stirring until it becomes clear. To keep the bubbles down to a minimum, don’t stir too fast, and then give the resin a minute or two to “rest” after mixing to let any bubbles rise to the top.
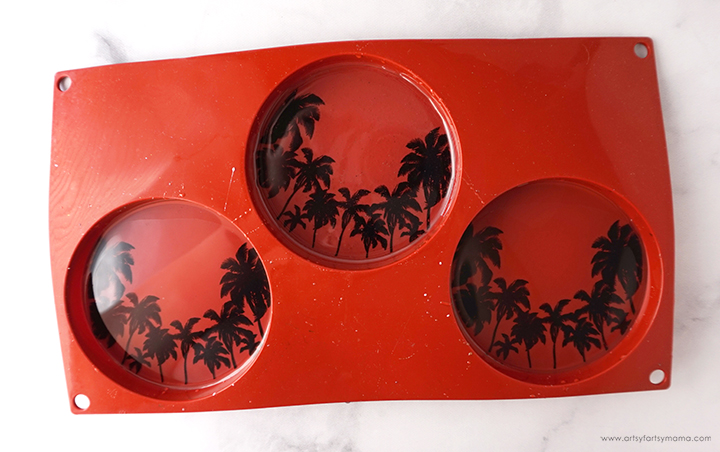
Place the print into the resin. Use a clean stir stick or a resin brush to carefully press it down into the mold until it is completely submerged. Lightly drag the stir stick from the center to the outer edge to bring any bubbles stuck underneath the transparency film to the surface.
Pop any bubbles that rise to the top using a heat gun or by blowing through a straw. Leave the resin to cure in an undisturbed area for at least 8 hours. DO NOT REMOVE THE COASTERS FROM THE MOLD.


At this point, the resin should not be tacky. Gently dip the end of the brush into the yellow mica powder and brush it right onto the resin, starting at the bottom edge (along the tree line). I found it best to move the brush in little circles to get the best coverage. Try to make the powder as even as possible.
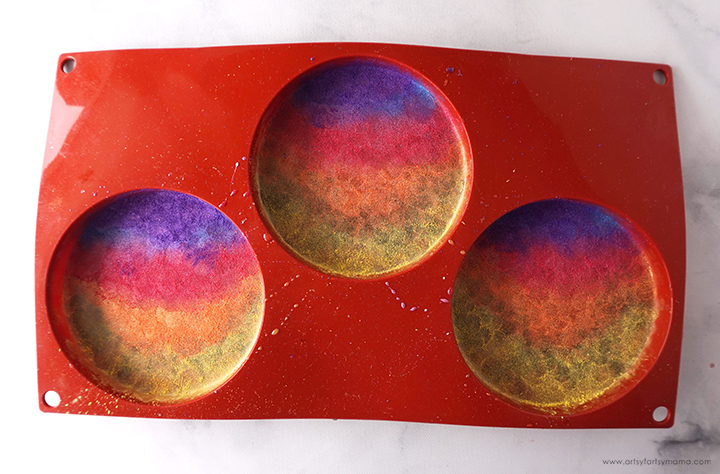


Gather some mica powders in your favorite sunset shades. I love when sunsets have a rainbow of colors fading from yellow to purple, so I used some powders in pink, orange, yellow, blue, and purple. You will also need a silicone resin brush or a small makeup/nail brush.
Repeat the process for each of the colors, orange, pink, to purple/blue. For best results, clean the brush out after each color. I usually rub it around on a paper towel, and that works pretty well! Don't worry about any excess powder in the coasters.
Mix up another 3 ounces of resin the same way as before. Add in a little bit of white Castin' Craft Opaque Pigment and stir well with a stir stick to combine. Stir in a generous amount of iridescent glitter to the resin mixture for some added sparkle.
Pour 1 ounce of resin into each of the coaster molds. Let the resin sit for a few minutes, then use a straw, heat gun, or spritz with 91% alcohol to remove any air bubbles that rise to the top. As a kind of fun surprise, any excess mica powder also rises to the top, which looks pretty cool!
Leave the resin to cure in an undisturbed, well ventilated area for 24 hours. You will know that the resin is completely cured when it is no longer tacky to the touch.
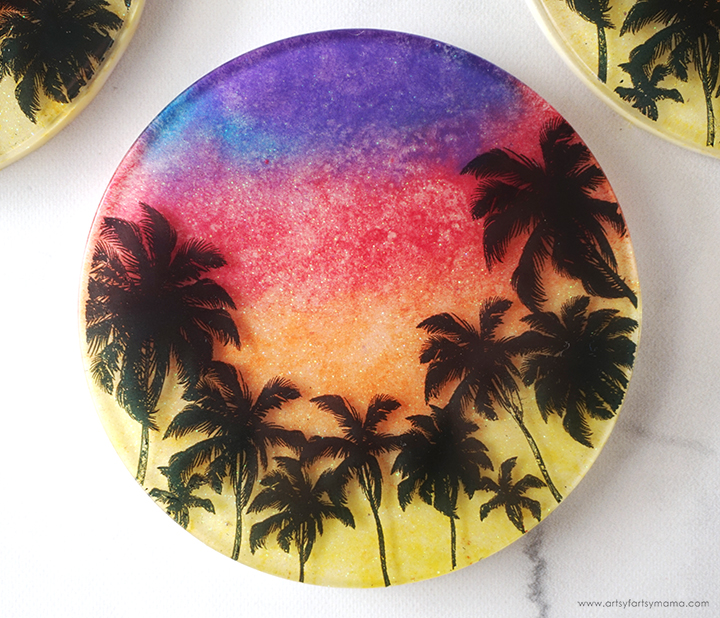
Next is the most exciting step!! Carefully remove the coasters from the mold and admire your amazing work. I absolutely love the bright pops of color and how the glitter peeks through! I also think it’s fun how these coasters are an eye-catching set, but each one individually is so unique. If you have any rough edges, you can trim it away with scissors or sand them down, if necessary.
Hopefully you can see the glitter peeking through the color better here in this image. It's stunning in person, and I couldn't be more excited about it!!
Before I got to the powder and glitter idea, I tried a lot of different techniques to get a successful resin sunset that I liked. The reason I tell you this is because sometimes a resin project will NOT turn out the way you expect, which can be frustrating and discouraging. If it's a project you are passionate about, don't give up, keep trying new techniques, and learn from each resin pour (fail or not).
I would love to hear what you think about this set of Resin Sunset Coasters! As always, if you make any of these projects for yourself, I'd love to see your creations! Tag me on Instagram and Facebook, or leave a comment/photo on the project pin on Pinterest!
Don't forget to Pin, Like, and Share!


I love these coaster. You make it look so easy. Thank you for sharing.
ReplyDeleteThese are really gorgeous! I haven't had much luck with resin in the past. Despite my efforts to get equal parts, my projects turned out rubbery and malleable, rather than sturdy and smooth. I got it right the very last try, but then I was over it - haha! Need to give it another shot because I really love projects like this! So easy to customize.
ReplyDeleteAlexandra
EyeLoveKnots.com
OnRockwoodLane.com
Always LOVE your resin projects Lindsay! We will be featuring your project this week on the Creative Crafts Linky Party. Thanks for joining in the FUN! Creatively, Beth
ReplyDelete