
Keep your phone safely on display with a glittery Galaxy Resin Phone Stand!

I'll be the first to admit that I might use my phone a little too much sometimes, so I can vouch for having a good phone stand around! There are a ton of options out there when it comes to phone stands, but I was so excited to try making my own custom stand using resin and my favorite craft supply, glitter! Only second to anything glitter is my fascination of everything galaxy-themed, so it only made sense to combine the two to make this glittery Galaxy Resin Phone Stand that I absolutely LOVE. Depending on the colors of resin and glitters you use, this handmade phone stand can be customized for anyone in your family or to even give as a gift!
New to resin? Be sure to check out Resin 101: Getting Started with Resin!

To make this Galaxy Resin Phone Stand, you will need these supplies:
- EasyCast Clear Casting Epoxy
- Measuring Cups
- Stirring Sticks
- Disposable Gloves
- Silicone Phone Stand Mold
- Glitter - galaxy-inspired color scheme
*Save 10% on resin supplies when you shop ETI with code AFM

Instead of adding pigments, I decided to use a mix of chunky glitters to bring color to the phone stand. The larger resin mixture is Recollections "Cosmic" (found at Michaels). If you can't find this, you can easily recreate it with a mixture of both fine and chunky black, silver, blue, and star glitters.
To bring in some other galaxy-inspired colors, I used a holographic silver and purple glitters, and a bright pink and blue tinsel glitter for a little bit of an extra texture.

Prepare the EasyCast Clear Casting Epoxy according to package directions. Be sure to prepare your workspace to protect from spills, and work in a well-ventilated area. It's also important to wear proper PPE, and disposable gloves.
For this project, I needed 2 oz of resin. Add equal parts resin and hardener to the mixing cup (1 oz of each). Stir the resin mixture together with a stir stick for two minutes, making sure to scrape the bottom and sides of the mixing cup. Pour the resin into a clean mixing cup and stir the resin again for another minute or two with a clean stir stick. If the resin mixture has "ethereal" streaks still going through it, you need to keep mixing until it becomes clear.
For this project, I needed 2 oz of resin. Add equal parts resin and hardener to the mixing cup (1 oz of each). Stir the resin mixture together with a stir stick for two minutes, making sure to scrape the bottom and sides of the mixing cup. Pour the resin into a clean mixing cup and stir the resin again for another minute or two with a clean stir stick. If the resin mixture has "ethereal" streaks still going through it, you need to keep mixing until it becomes clear.
Add a generous amount of glitter to the resin. Stir well until completely combined. Carefully lift your cup of resin to see if you want to add any other colors or styles of glitter to the mixture. Have fun, and get creative!

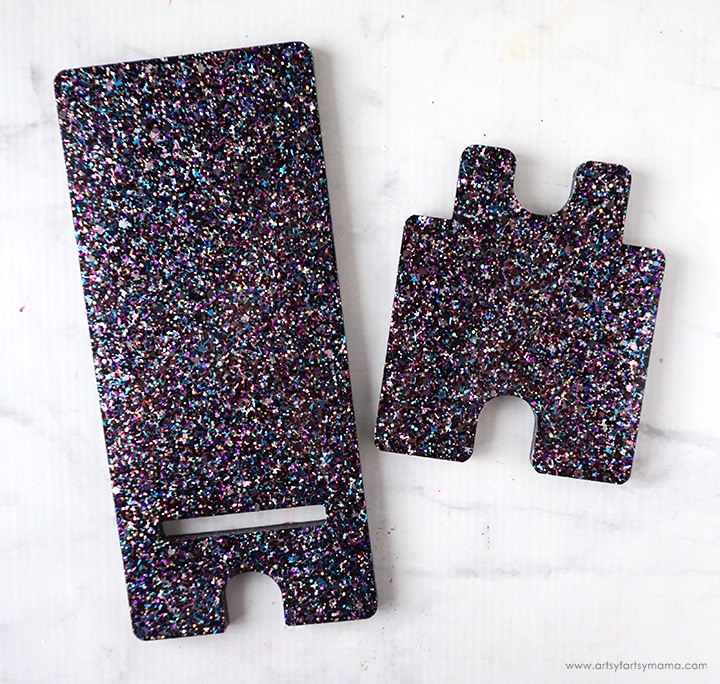
The phone stand silicone mold comes in two parts: one long, vertical piece, and a smaller puzzle piece-shaped piece. Make sure that the molds is clean and free of debris. I recommend cleaning and preparing your molds with Mold Release & Conditioner spray to lengthen the life of silicone molds.

Slowly pour the resin into the mold pieces, and fill them up to the top. If you accidentally over-pour, don't panic. It's easier to clean it up once it's cured than when it's still wet. Pop any bubbles that rise to the top using a heat gun, by blowing through a straw, or lightly spritz the surface of the resin with 91% alcohol to remove surface bubbles.
Leave the resin to cure in an undisturbed, well ventilated area for 24 hours. You will know that the resin is completely cured when it is no longer tacky to the touch.
While most projects are ready for use right out of the mold, this one is a bit different. The resin is technically "cured" to the touch in 24 hours, but it actually takes resin multiple days or even WEEKS to fully cure. Since this project will be holding extra weight, you need to let these pieces set for a while longer to become stronger.
I recommend letting the resin pieces sit in a flat, warm, undisturbed place for at least a week. If the pieces seem flexible at all, then give the pieces more time to cure. Unfortunately, if it's been a long time and they are still flexible, it could have been a mixing issue and you may need to start over.

Look at that brilliant sparkle!! I love it SO much!! Fit the pieces together by sliding the small piece (the end with the corners notched out) through the back of the larger piece. The phone stand should stand at a slight angle, without bending. If it starts to bend, immediately take it apart and go back to curing.
If you look at the reviews on this mold, the most common complaint is that the resin is bending when the phone is placed on it. Mixing the resin correctly and letting the resin fully cure is actually the solution to this problem - the problem is NOT the mold.

Place your phone onto the stand, horizontally OR vertically! The little arch at the bottom of the stand also allows you to charge your phone while it's on the stand, which I think is pretty convenient. This stand is great to use while working through a recipe in the kitchen, watching videos, or just storing it there for charging. If you're not into the galaxy theme, there are SO many options to personalize this phone stand using resin.
I would love to hear what you think about this resin phone stand! As always, if you make these projects for yourself, I'd love to see your creations! Tag me on Instagram and Facebook, or leave a comment/photo on the project pin on Pinterest!
Don't forget to Pin, Like, and Share!


Okay, so that is like so dang cool.
ReplyDelete