
Use 3 simple household ingredients to make adorable Clay Valentine Magnets!

If you're looking for something fun to do with the kids on Valentine's Day, you're in luck! These Clay Valentine Magnets are a lot of fun to make and are incredibly easy for kids of all ages. Even better - you only need 3 ingredients (that you most likely already have on-hand) to make them!! These magnets will be fun decor, or can be given as a gift to everyone you love on Valentine's Day!


3 Ingredient Salt Dough
1/2 cup plain/all purpose flour (do not use self rising flour)
1/4 cup salt
1/4 cup water
Bake at 200º for 2-3 hours. The clay can also be air-dried, but the pieces need to be put somewhere warm and dry for at least 3 days.

Roll the dough out to about 1/4" thick. Use heart-shaped cookie cutters or create heart shapes using your hands.


Use some strong adhesive to attach magnets to the back of the hearts. Be sure to let the glue dry completely before using the magnets!! No one wants a broken heart... ba-dum-tss!

Now you can use these adorable Valentine magnets to hang up your favorite pieces of art! They are also a fun way to decorate your fridge or locker. As always, I would love to see your creations! Leave me a comment, or tag a photo on Facebook, Twitter, or Instagram! #AFMcrafts
Place the hearts onto a baking sheet. I like to use this pie tin lined with foil for my non-food craft projects. If you want to turn any of the hearts into jewelry, poke a hole near the top using a toothpick or skewer.
Bake the dough at 200º for 2-3 hours. This seems like a really long time, but the clay needs to dry out completely for a successful project, so baking at a low temperature for a longer amount of time is optimal. The clay can also be air-dried, but the pieces need to be put somewhere warm and dry for at least 3 days.
While the clay is baking, collect your decorating supplies. I grabbed a variety of acrylic paints, Mod Podge, glitters, and paint brushes.
Once the clay hearts have completely cooled, it's time to make them all your own! Grab a paint brush, lay down something to protect your workspace, and get creative with acrylic paints. The paints go on beautifully, and you will most likely only need one coat.
Add polka dots, stripes, or whatever suits your Valentine-loving heart. I'm loving this splattered look, and definitely recommend working outside or using a large cup to do the splattering to reduce the mess.
Set the painted hearts aside to dry (which shouldn't take long). Even though the paint is durable, I would add a coat of Mod Podge or Mod Podge Ultra for extra protection.
Another fun and simple decorating option is glitter. I know, I know... kids + glitter = HUGE mess. This method is not so bad as far as messes go, and the kids will love it.
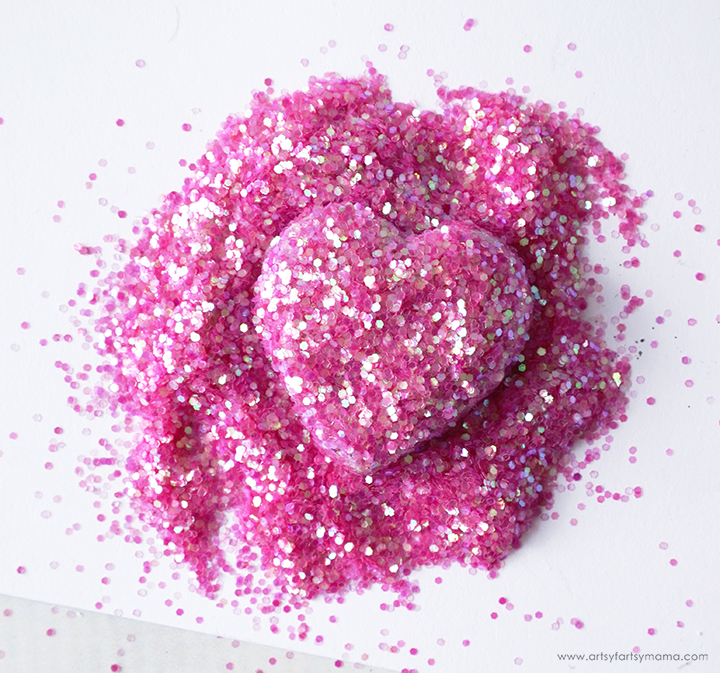
Place the clay on a blank sheet of paper. Cover the front and sides of the clay heart with Mod Podge. Any kind will do! I used Mega Glitter Mod Podge for extra sparkle.
Pour your favorite Valentine glitter over the clay heart while the Mod Podge is still wet. Gently tap the glitter on top to press it into the Mod Podge. Let the heart sit in the glitter pile for a few minutes to let the Mod Podge dry, and then carefully move it to a new piece of paper. Bend the paper in the center to funnel the excess glitter back into the container.
Paint some Mod Podge or spray Mod Podge Ultra over the hearts to seal in the glitter. This will help prevent the amount of "glitter shedding" every time you touch the magnets later. Let the hearts dry completely.
The clay hearts kind of looked like sugar cookies after they were baked, so I embraced the natural beauty! All you need to do is add some acrylic paint "icing" to the center of the heart. Let the paint dry completely.
Next, add a thin layer of glossy Mod Podge or Mod Podge Ultra over top to add some shine. This is also a great time to add some chunky glitter or faux sprinkles on top of the wet Mod Podge to bring the cookie to life!
Don't forget to Pin, Like, and Share!


These are so dang cute.
ReplyDeleteThese clay Valentine magnets are so cute!!!
ReplyDelete