
Make an adorable Polymer Clay Valentine Cupcake Charm that looks good enough to eat!

I needed a little cheer in my life, so I've started some Valentine crafting! This Valentine Cupcake Charm was just what I needed, and was so much fun to make out of polymer clay, and think you will have fun making it, too. Even if you are new to working with clay, this is a pretty simple project. Once finished, this adorable charm can be used for jewelry, a keychain, or even as-is to put on display!

This clay Valentine Cupcake Charm craft is part of Creative Crafts: Valentine Edition! Creative Crafts is a series where some of your favorite crafters come together to create crafts around a specific theme! Be sure to check each of the host blogs all week for more Valentine craft ideas!

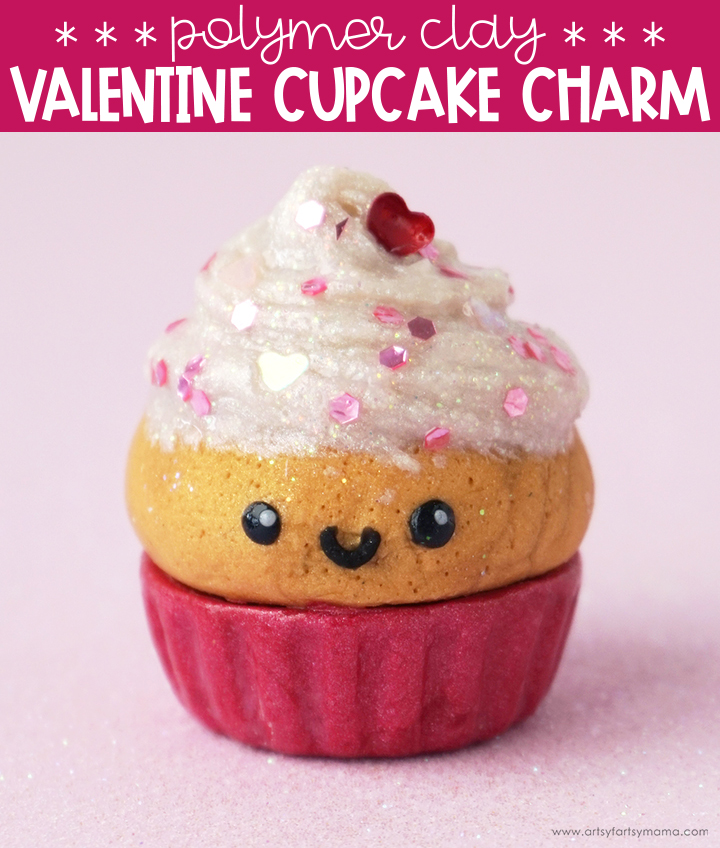
Make a 3/4" ball of magenta pearl Sculpey Clay. Make sure to knead it well and get it into a smooth, pliable texture.

Flatten the top and bottom of the ball of clay and shape it into a kind of "Reese's" cup shape. Use the end of a paint brush or clay tool to make indents around the entire edge.

Make a 1/2"-3/4" ball of jewelry gold Sculpey Clay, making sure to knead it well and get it into a smooth, pliable texture.

Flatten the bottom of the ball of clay, and shape it into a half sphere to fit on top of the magenta base piece. It's just fine if the sphere isn't perfect - most cupcakes aren't!! Just get it into the general shape.
Carefully lift the top of the cupcake off of the base, and add a little bit of Bake & Bond (a bakeable clay adhesive) to the top of the base. This will ensure that the pieces stay together long after the piece is baked.


In a small, disposable mixing cup, combine the ball of clay and some clear Liquid Sculpey. Use a wooden craft stick to cut the clay into smaller pieces and to squish it together with the liquid. Add a little more liquid to the mixture until it becomes a similar texture to frosting.

Use the stick to "frost" the top of the cupcake with the white clay. Get creative and make the frosting look however you want! I went for the traditional "swirl" look. If you aren't sure how to frost a cupcake, I recommend looking up some tutorials for ideas on technique.


Roll out TINY pieces of black Sculpey Clay - I am talking like the size of a miniature bead or a sprinkle. Poke small holes into the cupcake where you want the eyes to be placed. Use your fingertip or the end of a toothpick to place the clay pieces over the holes. Gently tap them flat with your fingertip. For the highlights, you can use even smaller balls of the white clay, or use white microbeads to save you some effort.
Roll out a TINY "U" shape for the mouth. Apply it between the eyes using a toothpick or your fingertips.

Bake the clay according to package directions. Let the piece cool completely before handling.

After polymer clay is baked, it usually has a matte finish. To add a bit of shine, I used some Sculpey Gloss Glaze. Use a small paint brush to apply the glaze in thin coats over the frosting, eyes, and the cupcake wrapper areas and let it dry completely.
Even though the eye pin was baked into the project, it can still be pulled back out. To keep it from slipping, carefully pull the eye pin out and add a little bit of super glue to the end. Place it back into the hole in the charm, and it should be good to go once the glue dries!

Add a jump ring to the eye pin, and thread a chain through the ring to use the charm on a necklace. This would be a fun piece of jewelry to wear year round (but especially on Valentine's Day), or to make as a gift for a friend! I would love to hear what you think, and what types of clay creations you would like to try making!
Don't forget to Pin, Like, and Share!


Lindsay this is absolutely Adorable, thank you so much for being part of the Creative Crafts Valentine's Edition! ~ Ann
ReplyDelete