
Show off your Hogwarts pride with this Hogwarts House Coaster Set!
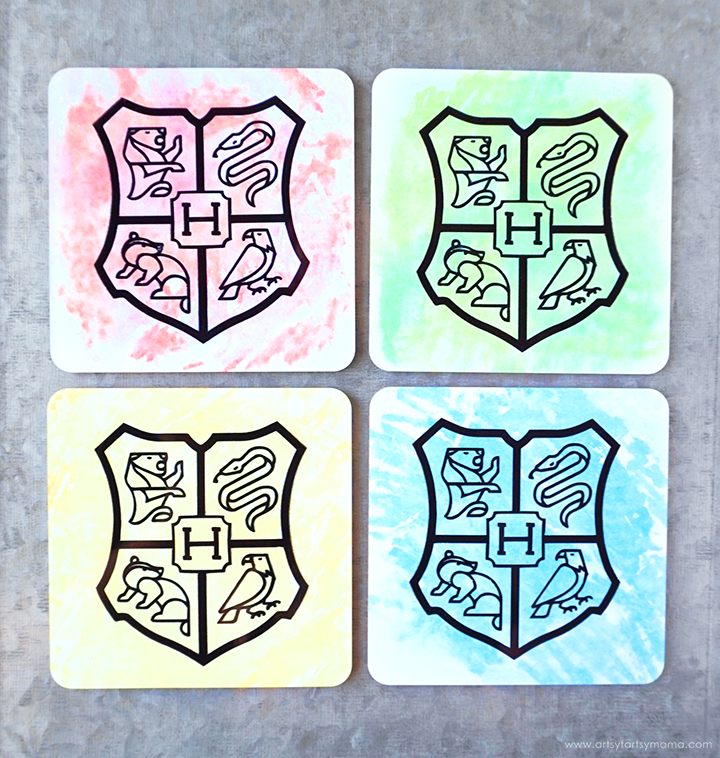
Harry Potter's birthday is coming up, so I think it's necessary to share some Harry Potter-inspired crafts! These Hogwarts house coasters are the perfect place to rest your goblet while showing off your Hogwarts pride. Using my Cricut and a few little tricks, this coaster set is easy to make for your home decor and would also make a great gift idea for fellow Harry Potter fans.

To make these Hogwarts House Coasters, you will need to start with these supplies:

Use a pencil to lightly trace a coaster onto a sheet of copy paper. Place a plastic sandwich bag over the paper and make random scribbles using various shades of red Infusible Ink Markers. Move the paper out from underneath, and then lightly mist the plastic bag with a spray bottle filled with water.

Gently lay the paper face-down on top of the bag and press lightly. The ink will transfer to the paper easily, and will give a watercolor effect! If you spray too much water, the transfer will look more like the left side... which won't work very well because there isn't much ink to infuse!
If you want to add more color, you can transfer more ink for a gorgeous, layered watercolor look and a bolder outcome. Just make sure that the paper is dry before transferring another layer.
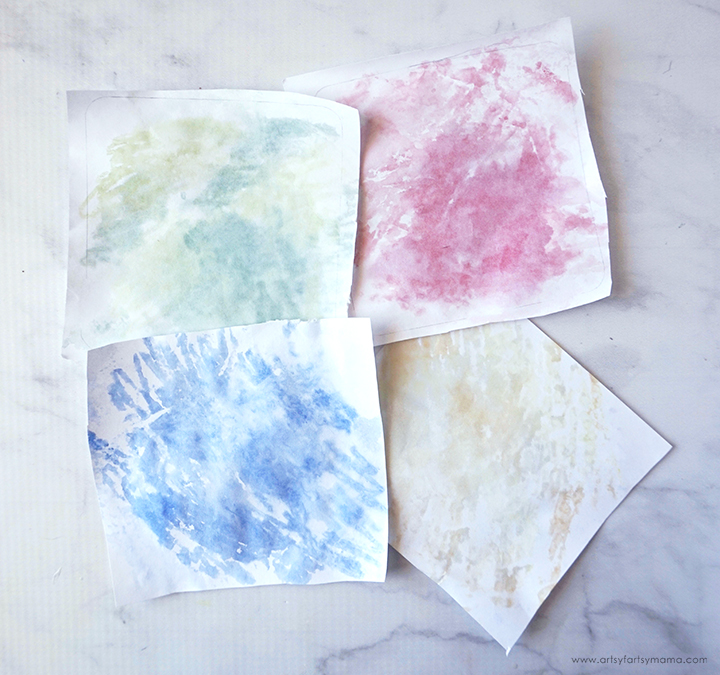
Repeat the ink transferring process for coaster templates in green, blue, and yellow. Once the papers are dried and you are satisfied with the look, trim the templates about 1/4" larger than the pencil marks. MAKE SURE that the paper is dry, and then you can erase the pencil marks. If the paper is even a little bit damp, the paper may tear.

Wipe the coaster well with a lint-free cloth. Lay the paper face-down on top of the coaster. Wrap the edges around tightly and hold the edges in place with heat resistant tape on the back of the coaster.
Lay down the EasyPress Mat on your workspace, then place a piece of cardstock down to protect your mat. Place the coaster face-down on the cardstock and put another sheet of cardstock on top.

Now for some Infusible Ink MAGIC! Refer to the heat guide to get the specific time and temperature settings for your EasyPress. Gently lay the EasyPress down over the coaster and press the green Cricut icon to start the timer.
Once the timer beeps, carefully remove the EasyPress. Let the coasters cool COMPLETELY before attempting to touch or move it!! They will be VERY hot!

Once the coasters have cooled, remove the tape and paper to reveal the coasters! The color will be more vibrant than the paper, and I love how they look like they've been watercolored!!
Set the coasters aside while we work on the next step of Harry Potter magic...

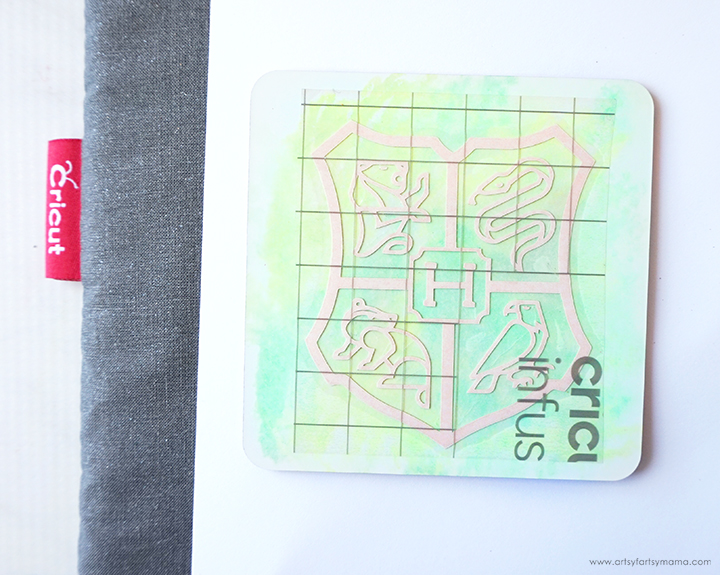
Open the Hogwarts Crest SVG (personal use only) in Design Space. Size the image to fit on a 3.5" x 3.5" coaster. Once you are happy with the size, click the green "Make It" button in the top right corner.

Like with iron-on vinyl, Infusible Ink projects need to be mirrored before being cut. Since there are four coasters in this set, you also need to change the amount of project copies from 1 to 4 in the dropdown menu. After you click "Apply", the crests will arrange themselves on the mat.

You can cut Infusible Ink transfer sheets with any of the Cricut machines. I chose to use my Cricut Joy for this project, because it is the perfect size for coasters! You will also need some black Infusible Ink Transfer Sheets, a LightGrip Mat (blue), and weeding tools - all specially made to use with the Cricut Joy.

Use your weeding tools to carefully remove all of the parts of the design that don't belong. Because you can accidentally leave fingerprints or remove some of the Infusible Ink by rubbing the sheets, I wait to remove the outer edge while I weed away the inner part of the design. This keeps my fingers off of the design, and any ink that rubs off is from a piece that will be removed once everything else has been weeded out.
Wipe the coasters well with a lint-free cloth. Place the Infusible Ink transfer sheet face-down on the coaster and press it down well. Hold it in place with heat resistant tape, if necessary.
Lay the EasyPress Mat down on your workspace, and place a piece of cardstock down to protect your mat. Place the coaster face-up this time on the cardstock and lay a piece of butcher paper on top. Gently lay the EasyPress down over the coaster and press the green Cricut icon to start the timer.
Once the timer beeps, carefully remove the EasyPress. Let the coasters cool COMPLETELY before attempting to touch or move it!! They will be VERY hot!
*Refer to the heat guide to get the specific time and temperature settings for your EasyPress.

Remove the Infusible Ink sheets from your coasters. Use tweezers to remove smaller pieces, if necessary. To keep your coasters looking their best, wash with warm water and glass cleaner. Do not use steel wool, colored cleansing agents, or scrubbing pads!
What do you think of these faux watercolor Hogwarts House Coasters? I am absolutely in THRILLED with how they turned out. I also love that I can incorporate some creative Harry Potter decor that I can can look at every day on my coffee table!
If you make Hogwarts house coasters or any other Harry Potter-inspired crafts, leave me a comment and let me know, or tag a photo on Facebook, Twitter, or Instagram! #AFMcrafts
Which Hogwarts House do you belong to?

Today is the first day of Creative Crafts: Harry Potter Edition! I am excited to be teaming up with some of my favorite crafters to share even more Harry Potter projects for you to try! Be sure to click the links below to check them all out.

Harry Potter Sorting Hat Favors from Me & My Inklings
Harry Potter Felt Banner from Makeable Crafts
Crocheted Hedwig with Removable Scarf from 5 Little Monsters
Harry Potter Wizard Wands from Ann Butler Designs
Harry Potter Felt Bookmark from Creatively Beth
Luna Lovegood Shirt from The Quiet Grove
Harry Potter Snow Globe Card from Crafting Cheerfully
Come back tomorrow for even MORE Harry Potter projects!
Don't forget to Pin, Like, and Share to see more projects like this!


I love these coasters, Lindsay! They look super easy!
ReplyDeleteThese are so creative and perfect for anytime decor!!
ReplyDelete