
These DIY Buffalo Check Painted Coasters are not only easy to make, but are the perfect handmade gift!

My sister-in-law is all about that buffalo check life, so I wanted to try my hand at painting some coasters for her as a Christmas gift. The process actually is pretty simple, and I love how they turned out! Whether you are a beginner or an advanced painter, I think you will really enjoy making a set of Buffalo Check Coasters for yourself or as a gift!
I'm excited to be a Plaid Creator this year, and to share the best Plaid products with all of you! This post contains affiliate links for your convenience. As always, I only share products that I use myself and truly recommend!

To make your own set of DIY Buffalo Check Coasters, you'll need these supplies:
- Unfinished Wooden Coasters
- FolkArt Multi-Surface Paint, Cardinal Red, Licorice, Wicker White
- Paint Palette
- 1/2" Painters Tape
- Nylon Brushes
- Spouncer, 1/2"
- Mod Podge Ultra

Lightly sand the edges of the wooden coasters, if needed. Paint each one with a coat of FolkArt Multi-Surface Paint in Cardinal Red. I painted two coats, but you can add more if needed. Let the paint dry completely.
The trick to making a buffalo check pattern is all about the tape! For this size of coaster, I would recommend a tape that is about 1/2" wide. You can use a painters tape or do as I did and use a stickier washi tape! You just need something that is going to stop the paint from seeping under, but not so sticky that it pulls the paint off from underneath.
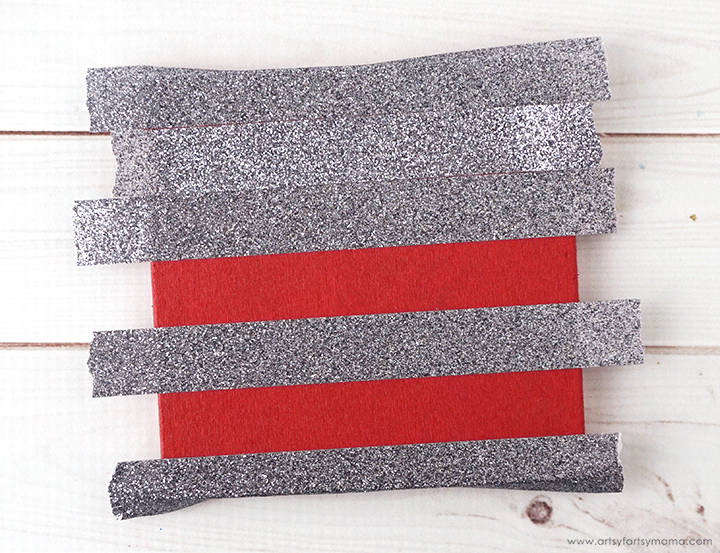
Tear a piece of tape slightly wider than the coaster and stick it a little bit above the top edge of the coaster and press it down well. Tear another piece of tape and butt the top edge right next to the top piece. This piece of tape works a spacer so that the stripes will be even.
Place another piece of tape right below the spacer with the edges touching. Remove the spacer tape and place it below the newest piece. Repeat until you have stripes of tape on the entire coaster and press them all down well. Set the spacer piece aside to use again later.

Before I get started on the painting tutorial, I need to make this announcement: I'm here to make the mistakes first so you don't have to!! You'll see what I mean as you read the instructions, but I wanted to let you know.
In the paint palette, we need 3 colors: a slightly darker red than the original Cardinal Red FolkArt Multi-Surface Paint, another a little darker than that, and some Licorice (black) paint. To make the shades of red, all you need to do is mix in a little bit of black paint. As you can see above, the color I mixed ended up WAY too dark, but I didn't realize it until it was already painted on. So, the trick I learned is: Less is more when it comes to mixing paints.
For the first shade of mixed red: Pour some red paint into one well and some black into a separate well. Dip the non-brush end of a paintbrush into the black paint, and then stir that little drop into the red and mix well. You could maybe do this a second time, but no more than that. This is all you need for the first shade of red paint!
Get some of this red mixture (in this case, darker) on the tip of the spouncer. Dab it a few times on an empty part of the palette or on a paper towel to remove some of the excess paint. If you have too much paint on the spouncer, it is likely that the paint will bleed underneath the tape. Dab the spouncer over the coaster between the lines of tape. It is better to paint multiple light coats instead of one heavy one.

Immediately and carefully remove the tape from the coaster. I wouldn't recommend reusing the tape because you could accidentally smear some of the paint from off of the top. Let the paint dry completely. If you painted thin coats, it shouldn't take long.

Turn the coaster 90º and place tape lines the same way as before. Make sure to press the tape down well to prevent any paint bleeds.
*This is when I figured out how to mix up a much lighter shade of red. Honestly, it won't really matter which order you paint the red shades, as long as you don't do the same ones each time.

Lightly dip the spouncer into the other shade of red (in this case, lighter). Remember to dab it a few times on an empty part of the palette or on a paper towel to remove some of the excess paint. Dab the spouncer over the coaster between the lines of tape. Just a reminder that it is better to paint multiple light coats instead of one heavy one.
This time, DO NOT REMOVE THE TAPE! Leave it in place!
This time, DO NOT REMOVE THE TAPE! Leave it in place!

Turn the coaster another 90º so that it's the same as the first step. Add tape back on to where the lines were originally. I skipped using the spacer tape and used the edges of my original lines to carefully line up the tape. Press the edges down well.
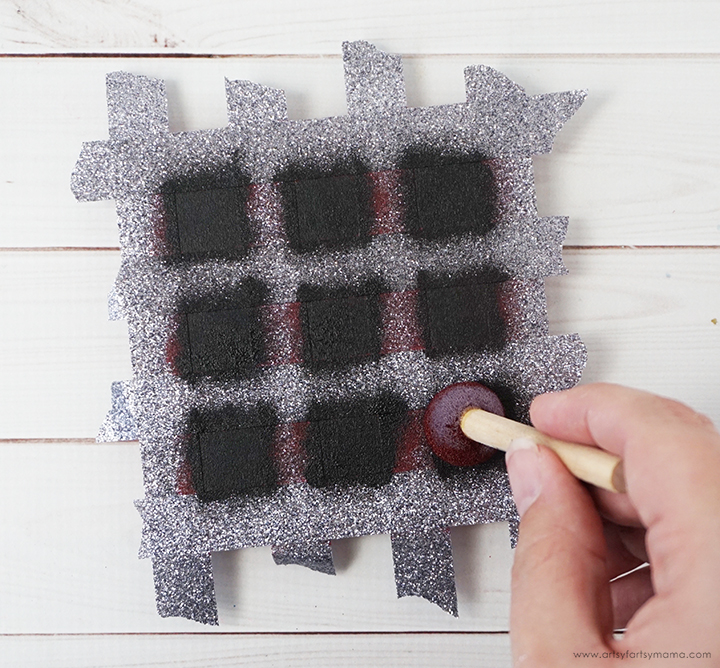
Dip the spouncer into the black paint and cover the open squares in light coats, just as before.

Then, immediately (and carefully) pull the tape up to reveal your freshly painted buffalo check pattern! Let the paint dry completely.
*I am a perfectionist, and I wasn't completely happy that the lines ended up a little wonky. Don't panic if this happens to you, too. There is hope, and I've got some options on how to fix it:
1. Sand it down and start again.
2. Use a paint brush and manually straighten out some of the lines.
3. Distress!! See below...

When the paint is completely dry, get some fine sandpaper and distress the coasters! Sand the edges, sand the paint (but not too much) to get a worn, rugged look. To be honest, I am LOVING these now!!

I tried another set doing the buffalo check pattern in white instead of red. I am loving this set, too. Mix up your grays the same way as the reds - pour some white paint into a well in the palette, then add a dot of black using the end of a paint brush. Paint the coasters using the same steps for this look.
*Instead of placing the last strips of tape over top of the other ones, I tried something different to get these much straighter lines. Pull the step 2 pieces of tape up halfway. This gives you a MUCH better look at where lay down the new strips of tape! It worked SO much better than when I did the red coasters. Just scroll up and look at the difference between the two!!

Since coasters are usually meant to hold beverages, you will need to seal the surface to make it waterproof. I poured on a thin layer of Mod Podge Ultra on top and spread it to the edges with a brush. You can choose from matte or gloss to get the finish you want.
This new Mod Podge Ultra formula self-levels without leaving a stickiness behind once it dries, which is just what you need for a project like this. Let the coasters dry in an undisturbed area for 4-24 hours to completely dry.

Once the coasters are dried, they are ready to use. I love how different they look even though they are the same pattern.
Which color is your favorite? Do you prefer the distressed or the sharp look better?

The Yeti mugs from my Outdoors Gift Idea match perfectly with the coasters and I think they would be so fun to pair together for an outdoors enthusiast! I just love how the colors all coordinate and look so rustic together!

To gift the coasters, stack them up and tie them together with a decorative ribbon. These coasters are a creative way to add a pop of color to your home, and are an awesome handmade gift. I am in love with how these turned out, and am now searching the house for anything else we can give a buffalo check makeover to!
Do you make handmade gifts for the holidays?
Don't forget to Pin, Like, and Share!


Good job! Those are really cute! You are very talented.
ReplyDeleteI love these coasters. Thank you for sharing.
ReplyDelete