
Resin Petri Dish Coasters are like a work of art on your coffee table!

I have loved learning to work more with resin lately, and fell in love with this "petri dish" look. It's been on my list of things to try for quite a while, and I'm so glad I finally did it! These Resin Petri Dish Coasters are so much fun to make, and look amazing. If you are wanting to make something with resin, I definitely recommend giving this project a try!
New to resin? Be sure to check out Resin 101: Getting Started with Resin!

To make these Resin Petri Dish Coasters, you will need these supplies:
- EasyCast Clear Casting Epoxy
- Measuring Cups
- Stirring Sticks
- Disposable Gloves
- Silicone Hexagon Coaster Mold
- Alcohol Inks
*Save 10% on resin supplies when you shop ETI with code AFM

Prepare the Envirotex Lite Pour-On Resin. Wear disposable gloves and pour in equal parts of resin and hardener*. Stir it together for two minutes with a stir stick, making sure to scrape the bottom and the sides of the cup. Pour the resin into a second mixing cup, and stir for another minute with a clean stir stick.
*I mixed up 4 oz each of resin and hardener, and had extra resin for some other projects. To make the 3 coasters only, I would recommend mixing up about 5 oz total instead.

Lay something down to protect your work surface, like newspaper or a silicone mat. Pour resin into each of the molds, being careful not to overfill. Let them sit for a minute, then use a straw or lighter to remove any air bubbles that come to the top.

Choose your favorite colors of alcohol inks, and add ink right on top of the uncured resin, one drop at a time. Be careful not to add too much ink or combine colors that can become muddy (red/green, blue/orange, etc). Alcohol inks will stain your hands and surfaces, so be sure to protect your workspace and wear gloves.

White alcohol ink is the secret ingredient. It is heavier than the colored inks, so it pushes through the resin for this awesome effect. Add one drop of white to the center of the colored ink drops.

Add another drop of ink over the white, and repeat the ink-dropping a couple of times only. The ink will spread out as you go. As tempting as it is, try not to add too much ink. It can affect the way the resin cures and can muddy up your coasters.

Once you are done adding ink, let the resin cure in an even, undisturbed area for 12-24 hours.


Another thing I love about this technique is looking through the sides of the coaster. The dripped ink looks SO cool!


Lay something down to protect your work surface, like newspaper or a silicone mat. Pour resin into each of the molds, being careful not to overfill. Let them sit for a minute, then use a straw or lighter to remove any air bubbles that come to the top.
Choose your favorite colors of alcohol inks, and add ink right on top of the uncured resin, one drop at a time. Be careful not to add too much ink or combine colors that can become muddy (red/green, blue/orange, etc). Alcohol inks will stain your hands and surfaces, so be sure to protect your workspace and wear gloves.
White alcohol ink is the secret ingredient. It is heavier than the colored inks, so it pushes through the resin for this awesome effect. Add one drop of white to the center of the colored ink drops.
Once you are done adding ink, let the resin cure in an even, undisturbed area for 12-24 hours.
You'll know that the resin is cured when it is no longer tacky. Carefully remove the coasters from the mold and admire your work. I love how every coaster turns out a little bit differently!
Another thing I love about this technique is looking through the sides of the coaster. The dripped ink looks SO cool!
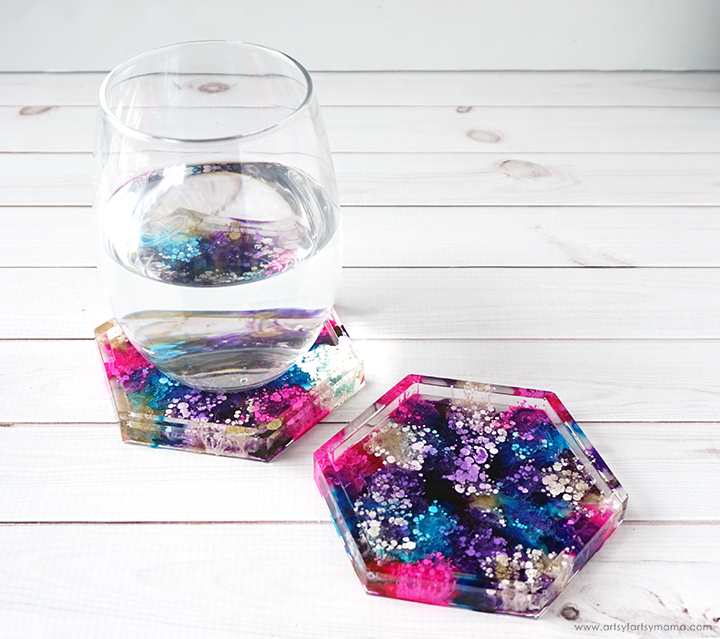
Here's a close-up of the coaster using pink, purple, blue, and gold inks. The details are seriously amazing!
I also tried to use pink, yellow, and blue to see what kind of rainbow effect I could get. I really like how it turned out!
Resin is a great medium for coasters because it's waterproof. These coasters will make a great conversation piece on your coffee table, or as a unique gift idea for friends and family! They are addicting to make, and I'm looking forward to trying more color combinations.
Don't forget to Like, Pin, and Share:
What do you think of these Resin Petri Dish Coasters?


