
Make your own DIY Galaxy Coasters that are out of this world!

Space and galaxy patterns are all the rage right now, and I am definitely supporting it! My daughter and I made an awesome pair of Galaxy Shoes for her to wear everywhere she goes, and she absolutely loves them. This weekend I was inspired to create these DIY Galaxy Coasters, and I am so excited about them! One thing that will never be in style are watermarks on your table, and here is a solution that is out of this world!!

To make your own set of DIY Galaxy Coasters, you'll need these supplies:
- Unfinished Wooden Coasters
- FolkArt Multi-Surface Paint
- FolkArt Dragonfly Glaze
- FolkArt Glitterific Paint, silver
- Mod Podge Ultra
- Nylon Brushes
- Spouncers, 3/4" and 1/4"

Lightly sand the edges of the wooden coasters, if needed. Paint each one with a coat of FolkArt Multi-Surface Paint in Licorice (black). I only needed to apply one coat, but you can add more if needed. Let the paint dry completely.

FolkArt Dragonfly Glaze is a new paint that adds an iridescent finish in a variety of colors. It works best went painted over dark colors to add a shimmery look to your project. Use a 3/4" spouncer to cover small, random areas of the coaster with the Violet/Blue/Green Dragonfly Glaze.

Clean the spouncer and then add in areas of Red/Violet/Blue Dragonfly Glaze.

Clean the spouncer (again), and then fill in all of the empty areas with Gold/Red/Violet Dragonfly Glaze. It's okay if the colors overlap a little.

Set the coasters aside to dry. You'll notice that the paint had a white look when painted on, but it clears up as it dries. Look how the Dragonfly Glaze colors look when the light hits the coasters!! Dreamy, right?!


Glitterific is the perfect way to add glitter to your projects without making a huge mess. The paint has multiple sizes of glitter suspended in a clear base to keep the glitter contained and looking amazing on your projects. Paint on a layer of silver Glitterific to the top of the coasters to add some stars to the galaxy. Let the paint dry completely.

Since coasters are usually meant to hold beverages, you will need to seal the surface to make it waterproof. I poured on a thin layer of Mod Podge Ultra on top and spread it to the edges with a brush.
This new Mod Podge Ultra formula self-levels without leaving a stickiness behind once it dries, which is just what you need for a project like this. Let the coasters dry in an undisturbed area for 4-24 hours to completely dry.

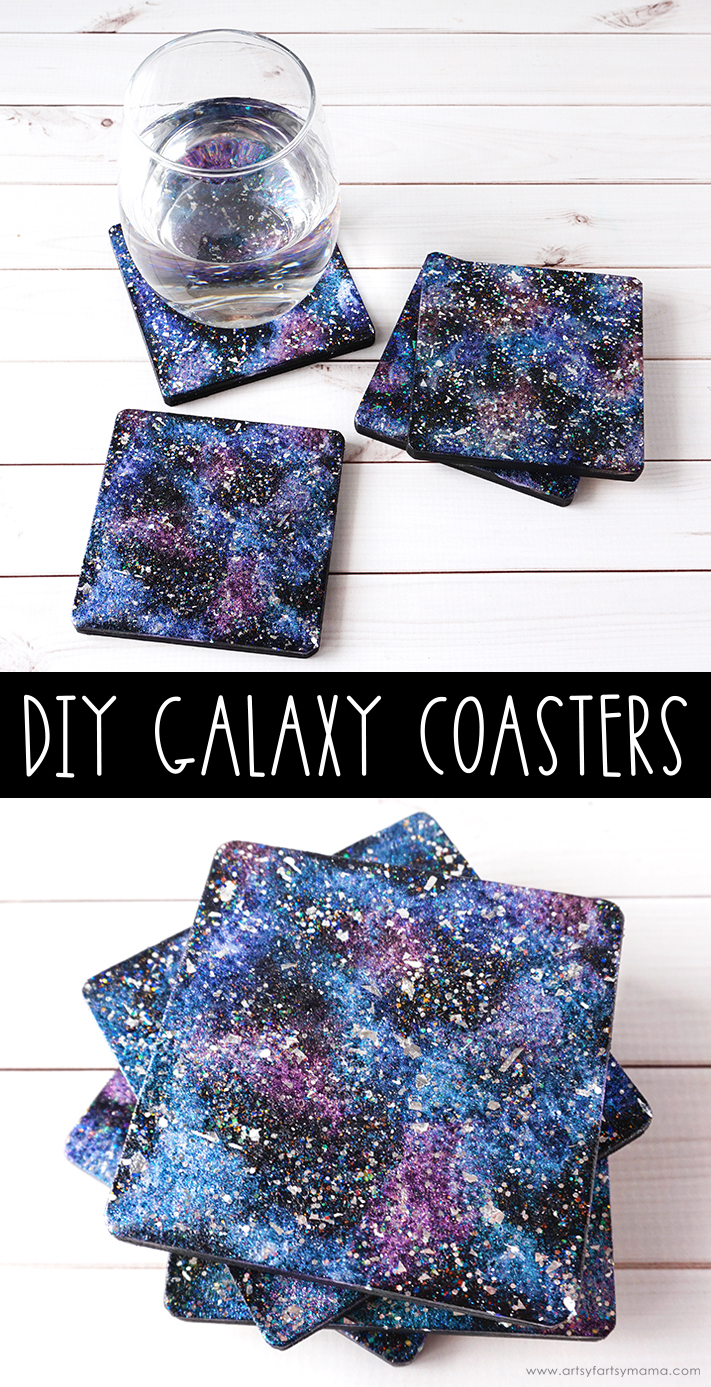
Once the coasters are dry, they are ready to use! These coasters are a fun way to add decor to your home or to give as an awesome custom gift. I am in love with how these turned out, and am now searching the house for anything else we can give a galaxy makeover to.
Pin this project to save it for later:


These are amazing I'm totally making tbese with my girls
ReplyDeleteI LOVE these! Would the paint and modgepodge hold up on tile?
ReplyDeleteHI! this is her Sister. you can ABSOLUTELY do these on tiles. I've done a few and they work out great. Just make sure you get the modge podge that is waterproof so it doesn't get sticky if your drink drips!
DeleteI love these coasters. Can you do the same on ceramic tiles?
ReplyDeleteThanks.
HI! this is her Sister. you can ABSOLUTELY do these on tiles. I've done a few and they work out great. Just make sure you get the modge podge that is waterproof so it doesn't get sticky if your drink drips!
DeleteHI! this is her Sister. you can ABSOLUTELY do these on tiles. I've done a few and they work out great. Just make sure you get the modge podge that is waterproof so it doesn't get sticky if your drink drips!
ReplyDeleteThese look like so much fun! Question - how long does it take for the paint to dry from one step to the next? Thank you!
ReplyDelete