
Make a DIY Embroidery Wall Hanging for your workspace using the Cricut!
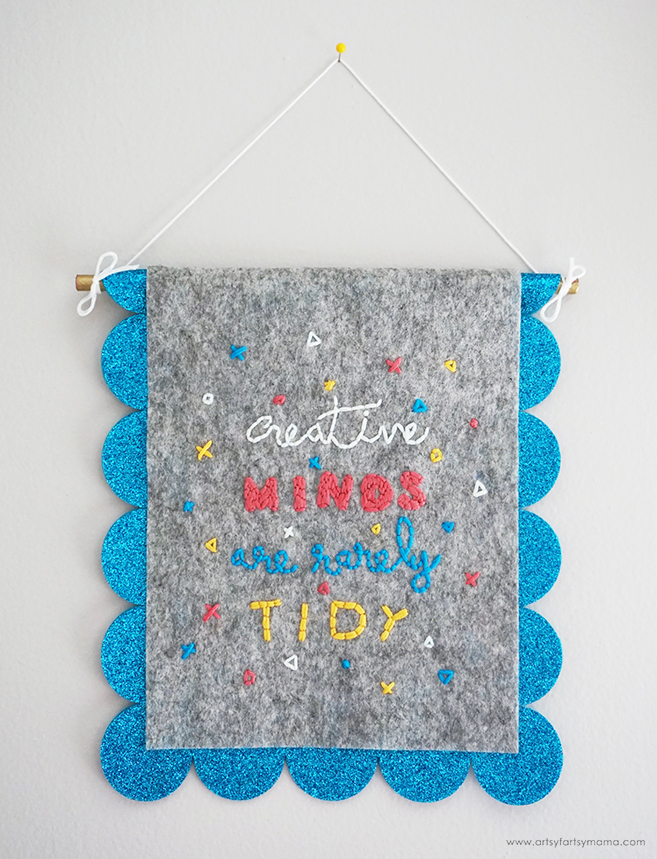
I am slowly getting my craft room under control, and I wanted to create some decor to hang on the wall. This DIY Embroidery Wall Hanging is such a fun project, made easier using the Cricut Maker machine! This is something anyone can make to add a splash of color and personality to their workspace or craft room.
*Before you get started on this project, learn everything there is to know about the Cricut Rotary Blade!
To make your own DIY Embroidery Wall Hanging, you'll need these supplies:
- Cricut Maker machine
- Cricut Rotary Blade
- Embroidery Wall Hanging Design Space Project
- 12x12 Cricut FabricGrip Mat (Pink)
- Cricut Felt
- Cricut Glitter Iron-On Vinyl
- Washable Fabric Pen
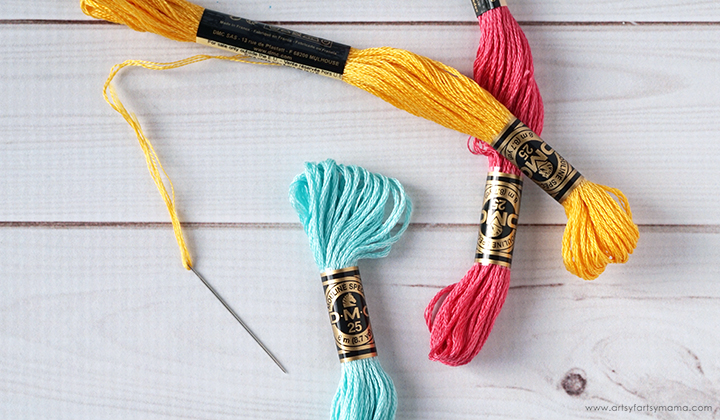
- Embroidery Floss
- Embroidery Needle
- 5" Embroidery Hoop
- Scissors
- Paper Straw or Wooden Dowel
- Gold Paint
- Cricut EasyPress 2, 6" x 7"
- Cricut EasyPress Mat, 8" x 10"

Open the Embroidery Wall Hanging Project in Design Space. If you want to make it exactly how it is shown here in the tutorial, you can click "Make It" to take you directly to the cutting process. If you'd like to make adjustments, you need to click "Customize". Once in the canvas, you can easily make edits to colors and image sizes.

Place a sheet of light gray* Cricut Felt on the pink Cricut FabricGrip Mat. This mat is specially designed to cut fabrics using the the Rotary Blade. It holds the fabrics securely, but will easily release. You'll also need the Cricut Rotary Blade and a Washable Fabric Pen.
*If you are a beginner at embroidery, I recommend using white felt instead.

When you click "Make It', you'll be taken to the cutting mats screen. Before cutting, make sure to change the material settings to "Felt". Place the Rotary Blade tool and the Washable Fabric Pen into clamps A and B, then load the mat into the machine, and press "Go". The Cricut Maker will cut the felt and draw the embroidery pattern in one step!
Remove the Washable Fabric Pen, and then cut a piece of blue/aqua felt and some blue Glitter Iron-On Vinyl.

The Rotary Blade is such a fantastic tool to cut felt. I mean, look at that perfectly clean scallop cut on the blue felt! When I removed the felt from the mat, there wasn't any felt residue left on the mat afterwards, which was a wonderful surprise.
It's a little hard to see in this image, but the Washable Fabric Pen also did a great job drawing the embroidery design onto the felt.

The Cricut EasyPress 2 (6" x 7") is the perfect size for this project. Lay the blue felt on the Cricut EasyPress Mat (8" x 10") and heat up the EasyPress. Adjust the heat and time setting* to 270º for 30 seconds. Once the light turns green and the machine beeps, it's ready to use.
*Each kind of iron-on vinyl has a different heat/time setting for different materials, so be sure to check the recommended EasyPress settings for best results.

Carefully set the EasyPress over the vinyl and press the green "C" button. Hold firmly in place while the timer counts down. Peel the carrier sheet away while the vinyl is still warm. I love how sparkly it is, and the glitter won't flake off all over the place!
*If you are new to embroidery, there are a ton of great beginner tutorials on YouTube.


Line a thin layer of fabric glue or strong craft glue around the edges on the back of the embroidered piece of felt. Lay it down on the center of the blue, glittered piece and press it into place. Let the glue dry completely.


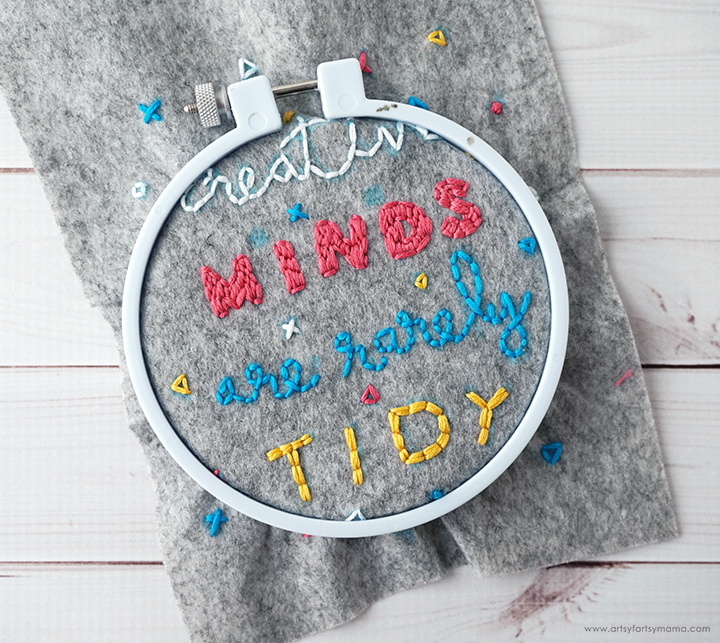
Place the felt into the Embroidery Hoop. Make sure it's snug, but not too tight so that it doesn't stretch the felt. Use the pen tracing as a guide to sew the pattern with Embroidery Floss. I used a back stitch on the entire design.
For the word "Mind", I outlined the letter first, then filled them in with a bunch of back stitches. For the word "Tidy", I just did two lines of back stitching on each letter. I like how it ended up giving each line a little bit of a different look.
Once you're done with the embroidery, run the felt under cold water to remove the Washable Fabric Pen ink from the felt. You shouldn't need any soap or anything. To help it dry quicker, fold a hand towel in half and lay the felt in between. Press the towel to help remove the excess water, then lay the felt down flat to finish drying.
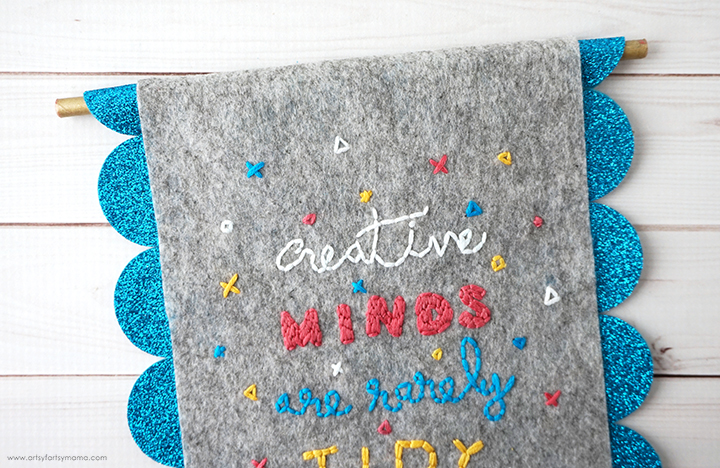
For the embroidery to hang on the wall, you'll need a dowel of some kind. You could use a wooden dowel, but I wanted to try this clever trick from Crafting in the Rain: spray paint the ends of a paper straw instead! Genius.
Grab the glue gun and put a line across the top on the back of the blue felt. Fold the top of the felt over the straw and hold in place until the glue has set.
I cut a length of white embroidery floss, and tied to both ends into bows onto the straw. Now you can hang your new DIY Embroidery Wall Hanging anywhere in your home.
I decided to hang my DIY Embroidery Wall Hanging in my craft room, where my creative mind is quite literally rarely tidy! I had a ton of fun creating this project, and hope to make more in the future with the help of my Cricut!
This is a sponsored conversation written by me on behalf of Cricut. The opinions and text are all mine.
What would your DIY Embroidery Wall Hanging say?
This is a sponsored conversation written by me on behalf of Cricut. The opinions and text are all mine.


