

Aren't these Halloween Charms the cutest?! With just a few supplies, some imagination, and a bit of patience, you can create charms to wear on a necklace, bracelet, or earrings. No matter your sculpting level, these charms are a lot of fun to make and really aren't that difficult at all.
I'm always excited to team up with the Craft Lightning group of bloggers to create projects that take 15 minutes or less! This month's theme is Halloween, so be sure to click the image above so you can see all the projects that have been made to inspire you to create some awesome Halloween projects!!

To make these adorable Halloween charms, you'll need some clay to work with. I've tried lots of different kinds, but so far this Premo! Sculpey clay set has been my favorite. You can find it at almost any craft store. I like it because it's smooth/easy to blend, the colors are vibrant (and stay that way), and the baking comes out perfect (for me) every time.
I also recommend grabbing some clay tools like a knife and something that you can poke small holes with. You can totally use kitchen tools or other things found around the house, but just keep in mind that whatever you use with clay should never be used again with food! Now that we've got that covered, let's get to the tutorials!!
How to make a Candy Corn Charm

To make the candy corn, you'll obviously need some white, orange, and yellow clays. Warm the clay up one color at a time in the palms of your hands and knead until the clay is easy to work with. Roll into a 1/2" ball. Lightly flatten the balls down to about 1/4" thick and keep the edges rounded.
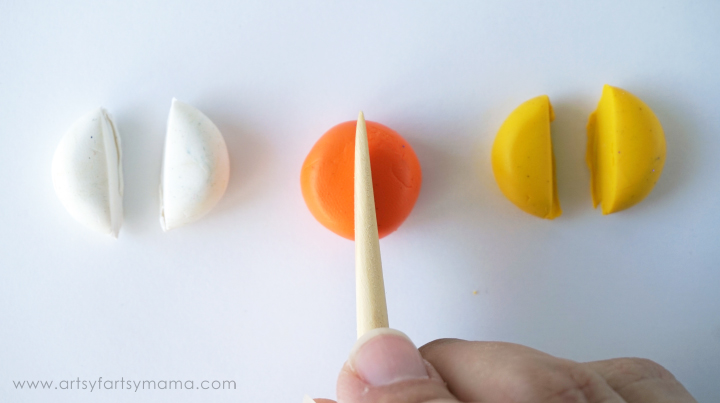
Using a knife (NOT one you plan to use with food), cut each ball in half. You'll be able to make two candy corns out of these pieces, which is great for earrings or matching charms for you and a friend!

One of each color will fit together to create the candy corn shape. Start with the orange piece and form it into a rounded rectangle. Keep the straight edge of the yellow piece facing up, then shape the rounded side to a rectangle as well. Face the straight edge of the white piece down, and form the other side into a rounded triangle. All pieces should stay about the same width and 1/4" thick.

Press the pieces together and form the candy corn. You can smooth out fingerprints by lightly rubbing your finger over the clay. You can be done at this point, but I decided to add a little extra to my candy corns.
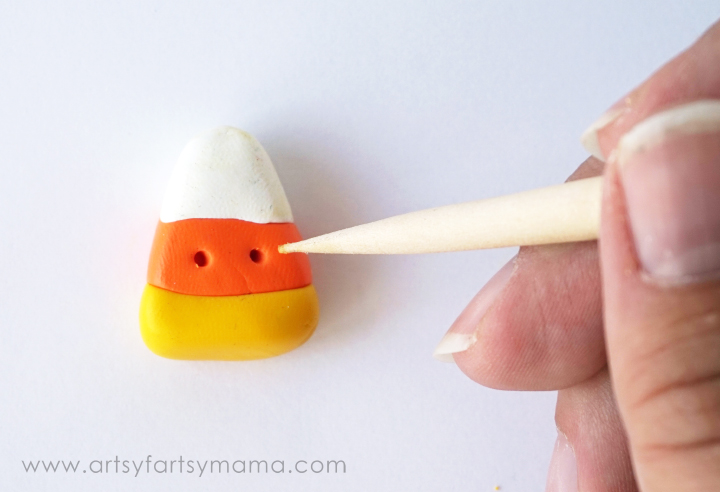
I used a clay tool to poke a couple of holes where the eyes will go. Easy enough, right?

Grab a tiny amount of black clay and roll out a little smile, and two eyes. Place the eyes over the holes and lightly press them in. Add a smirk, and the hardest part of the candy corn is done!

To be able to connect the charm to your jewelry, you'll need an eyepin. Cut the eyepin down to about 1-1 1/2 inches long with some jewelry wire cutters. Carefully push the eyepin down through the top of the candy corn.

When the charm is finished, you need to bake it for it to harden. Bake according to packaging directions. Once the charms have cooled completely, I like to paint on a coat or two of polyurethane varnish to give the charms a more glossy look and extra protection.
How to make a Frankenstein Charm

To make the Frankenstein charm, you'll need clays in a bright green, black, and silver. You'll also need an eyepin cut to 1-1/12 inches long. Since there are more pieces to the Frankenstein, I like to make everything first, then put it together.
Green:
Head
Ears
Silver:
Neck Bolts
Black:
Eyes
Mouth
Stitches - roll a thin "snake", then roll two smaller and thinner "snakes" to create the stitches
Hair - grab a small chunk of clay, then roll it out flat. You want the edges to look ragged, so feel free to cut it up if it needs a little more.

Form the head by rolling a ball, then flattening it to about 1/4" thick. Next, roll a small ball (about 1/2" or so) and flatten it a little. Cut it in half to form the ears. Place the flat side of the ears on either side of the head and blend them in along the edges along the back edge so they stick well.

Use a pointed tool and create two holes below each ear. Create two neck bolts by rolling a thick "snake", then shape one end to a point and the other rounded so it looks like a screw. Press the pointed end of the bolt into the holes under the ears.

Next, place the hair piece over the head at the top of the ears. Make sure he has some forehead! Smooth the hair out along the back of the head and remove any air bubbles. I also added a couple of small pieces to the top of the head to make a cowlick.

Once the hair is done, you can push in the eyepin. Then poke two holes for the eyes and push the eyes in to place. Add his little smile by rolling a thin, small "snake" and shaping into a smirk. To create the stitches, roll a thin "snake", then roll two smaller and thinner "snakes". Place the stitches anywhere on his face.
Bake the Frankenstein charm and let cool. Paint on a polyurethane varnish and let dry completely before adding it to jewelry.
How to make a Pumpkin Charm

The Pumpkin Charm is really easy to make. Roll a ball, then flatten it to 1/4" thick. Make a dent in the top center to make the shape more "pumpkin-y". Using the pointed tool, poke a larger hole in the top and poke two eye holes on the face. Roll out the eyes and mouth and press them into place.

Using a bright green clay, roll out a really thin "snake". Then, twist it slowly to make a little curl to create the vine of the pumpkin. Roll out a little ball, then shape it to look like the stem. Press the end of the stem and vine into the hole in the top of the pumpkin. Push the eyepin into the top of the pumpkin behind the stem, but make sure it's sticking up above it so that when it's attached to jewelry it won't break the stem off.

Bake the charm, then paint on a coat or two of polyurethane varnish. Make sure it the varnish is dried completely before adding it to jewelry.
I just love these little charms and think they will be so fun to make as gifts for friends, teachers, and family to wear during this Halloween season. I would love to see if you make some for yourself using this tutorial. Tag me on social media (@artsyfartsymama) if you do so I can see!
Which charm is your favorite?


These are totally darling! YAY for Sculpey!!!! (And for you!)
ReplyDeleteSquee!! These are so stinking adorable!!
ReplyDelete