
This post is sponsored by Hasbro. All opinions and ideas are my own.


My daughter LOVES all things My Little Pony. Loves. It. This love of MLP also includes the Equestria Girls, which if you haven't heard, are the My Little Pony characters in a parallel world where the ponies are humans.
The latest in My Little Pony products are the MLP Equestria Girls Minis Slumber Party sets, so we decided to throw our own slumber party here at home where we made our own DIY My Little Pony Eye Mask!

We played with the My Little Pony Equestria Girls Minis Applejack Slumber Party Games Set at our slumber party, and it is so much fun! By combining the other character sets you can create a complete slumber party. The sets are all available at most major toy retailers nationwide and on HasbroToyShop.com.

This slumber party set includes a poseable Applejack mini-doll along with an adorable puppy figure, a cool chair and fluffy pillow for the doll, a big screen TV (with a screen that flips around), video game accessories and board game to set the scene for game time.

Applejack loves her pony friends as you can tell from her framed picture of Applejack, Pinkie Pie, and Fluttershy to put on the shelf, and also has a hot pink laptop to video chat with Pinkie Pie that opens and closes! There's also some pizza to share, which has one separate piece (currently in Applejack's hand), and the remaining pizza can be closed in the pizza box.

Now, here's how you can make a My Little Pony Eye Mask for your own slumber party! You can create a pony mask to look like your favorite character, or mix things up and create your own pony look!
Supplies:
My Little Pony Eye Mask pattern
Cut 2 colored cotton or flannel fabric
Cut one Warm & Natural cotton batting
±12 inches 5/8" elastic

1. Place the fabric pieces right sides together, then lay them on top of the batting piece.
2. Measure around your child's head to get the exact measurement for the elastic, and add 1/2" inch.
3. Place the elastic in between the two pieces of fabric (where the dots are on the pattern) and pin in place. Make sure the elastic isn't twisted!
4. Sew around the eye mask with a 1/4" seam allowance, leaving 3-4 inches open at the top.
5. Cut small slits all around the curves and around the ears, being careful not to cut through the thread.
6. Flip the eye mask right side out and iron. Try the eye mask on to make sure it fits. If you need to adjust the elastic, now is the time to do it while you can still flip the mask inside out.
7. Top stitch all around the mask and make sure to have the open edges folded in so they get sewn closed.
*Don't look to close at my imperfect topstitching, but the above image shows how the eye mask should look at this point.

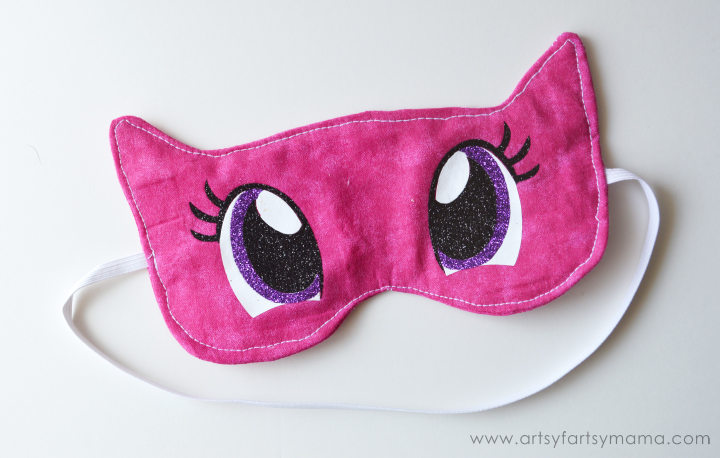
To really make the mask look like a My Little Pony, you'll need to add some eyes. You can choose to embroider, cut some felt, or even draw eyes on. I used my Cricut Explore, iron-on vinyl and glitter iron-on vinyl to create sparkling eyes.
You'll need to cut the different parts of the eyes in different layers, so keep that in mind when choosing your vinyls! You can iron on the layers one piece at a time, or if you are feeling adventurous you can place them all by hand on the black vinyl liner like I did and iron it all at once.
- Set your iron to the cotton/linen setting with the steam OFF.
- Lightly preheat the area with the iron for 10-15 seconds. This really does help!
- Place your image, liner side UP onto the area. If you don't place the liner side up, the vinyl will stick to your press cloth.
- Carefully lay a press cloth or dishtowel over the design.
- Apply medium pressure with the iron for 25-30 seconds.
- Flip the mask over and apply medium pressure with the iron to the back for an additional 25-30 seconds.
- If you have any parts that didn't stick for some reason or if edges are flipping up, re-iron the pieces or loose edges with the iron tip for 10 seconds.
- Let cool and remove liner. If you try to remove the liner before it cools, you risk burning your fingers or peeling the vinyl up.

Download Free Printable My Little Pony Eye Mask Pattern
Download My Little Pony Eyes SVG Cut File (upload this file in Design Space to use on your Cricut Explore machine)
Some things you should know before downloading:
*Artsy-Fartsy Mama printables are for PERSONAL USE ONLY.
*You may NOT modify, re-sell, or claim the design as your own.
*Please do not remove the credits/watermarks.
*If you share this on the internet, credit must be given to Artsy-Fartsy Mama & linked back to this post.
Which My Little Pony character would you create into an eye mask?


I can't wait to try this for my granddaughter. She is so big into My Little Pony, Rainbow Dash I think it's name is.
ReplyDelete