

Want to know how to do it? All you need is nail polish and craft glitter. Yep, that's ALL. You can use any color of polish, or even clear. I recommend using a thicker topcoat if using clear, but regular clear nail polish works great, too.

First, place foot on a paper plate or cardstock. Paint the big toe with nail polish. Paint it on kind of thick.

Pour glitter on big toe and let sit. Paint the rest of the toes while the glitter sits on the big toe.

Pour glitter over the rest of the toes. Let sit for a couple of minutes then tap toes to get most of the glitter off. Making sure to wait long enough so the paint is dry, I recommend using a makeup brush to brush the rest of the glitter off your foot and toes. Pour glitter on plate or cardstock back into the container to use again another time!

Wait a few more minutes and then cover nails with a clear topcoat polish. Then you're done!
If using clear polish as a base instead of color, you can keep layering the polish & glitter to cover the nail (polish, glitter, polish, glitter, polish). You can add more layers if using colored polish as your base, too, just add glitter over topcoat and repeat the process. Just make sure to end with topcoat to seal glitter.
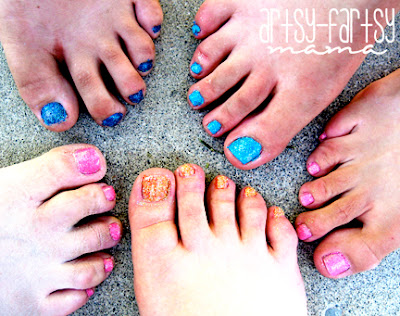
The paint should last a few weeks, depending on your quality of polish. The possibilities are endless!!


This would be so fun to do with my girls! Thanks for sharing. :) Love your blog!!
ReplyDeleteOh what FUN! Especially for someone like me, who hasn't gotten a pedicure since a cruise I was on ten years ago -- I kid you not! I'm one of those who slaps on the polish just so my feet look less than imperfect in summer.
ReplyDeleteoh, meant to add, following you from the thursday blog hop!
ReplyDeleteCool, but why not just use glitter polish?
ReplyDeleteGreat idea!! I have been experimenting with my fingernails lately, I need to try this for my toes! :)
ReplyDeleteHow fun! I'll have to try this!
ReplyDeletevery cute! Thanks for linking up to this week's Catch a Glimpse party.
ReplyDeleteI am so in love with your glitter toe tutorial thank you so much for sharing girl! I gotta do this. Have you gotten a hold of myldstemple from the giveaway? I hope you love your prize!
ReplyDeleteOh that is fun - have to try that!
ReplyDeleteFun! New follower from DIC.
ReplyDeleteThanks for the tutorial!
ReplyDeleteVERY NICE! I am your newest follower! COme follow me?
ReplyDelete{www.hannahhandmade.blogspot.com}
We did this too and my daughter loved it! So cute!!!
ReplyDeleteWhohoo summer toes. Thanks for this great and easy way to make mine look better! We appreciate you linking up with us today, you rock!!
ReplyDeleteBritney
www.jandmseyecandy.blogspot.com
I love this!!!! I did pedicures at this place in Lindon Utah & the glitter toes that we did were way complicated. I love how simple this is! Good thing I am now a new follower!
ReplyDeleteSo fun! The girls and I need an at home spa day!
ReplyDeleteThat is so cute, my daughter will love this! I'm visiting from Its so very Cheri.
ReplyDeleteI'm totally doing this with my little ones tomorrow! They're going to LOVE IT!!
ReplyDeletevisiting from "Its so very Cheri" blog hop Nice feet there,... twinkle toes
ReplyDeleteHa! What a fun idea! And it would be fun to create them too - though it would have to be done outside I think!!
ReplyDeleteThanks for linking to a Round Tuit!
Hope you have a great week!
Jill @ Creating my way to Success
http://www.jembellish.blogspot.com/
Thanks for the tutorial! I need to go get some craft glitter! Visiting from Homemaker on a Dime!
ReplyDeletewww.modernwivelyhood.blogspot.com
Very sparkly! I just wonder how long it takes to get all that glitter off!
ReplyDeleteVery cute, I need to give myself a pedi.
ReplyDeleteThanks for linking to Bacon Time, hope to see you this week too.
Love it~ super cute and so easy idea! Thanks for sharing it at FNF this week! :)
ReplyDeleteVery cute!
ReplyDeleteAmy@
SassyScarlett.blogspot.com
Seriously groovy! I have just started a massage course so only my toes get painted now so I am going jazz them like this to make up for missing my lovely long painted fingernails!
ReplyDeleteVery cute idea!!
ReplyDeleteThank you so much for sharing this @ {nifty thrifty sunday} last week!
I can't wait to see more from you this weekend!
xoxo,
Vanessa
Really awesome design. Thanks for sharing the post.
ReplyDeleteMartha
glitter toes
This blog looks great.It is very informative and interesting. Thanks for sharing.
ReplyDeleteElizabeth
glitter toes
Is there a reason why you painted your big toenail so sloppily in the second picture? Do you clean it off with nail polish remover later?
ReplyDelete