
Make Father's Day tee-riffic with a handmade Golf Ball Box made with xTool!
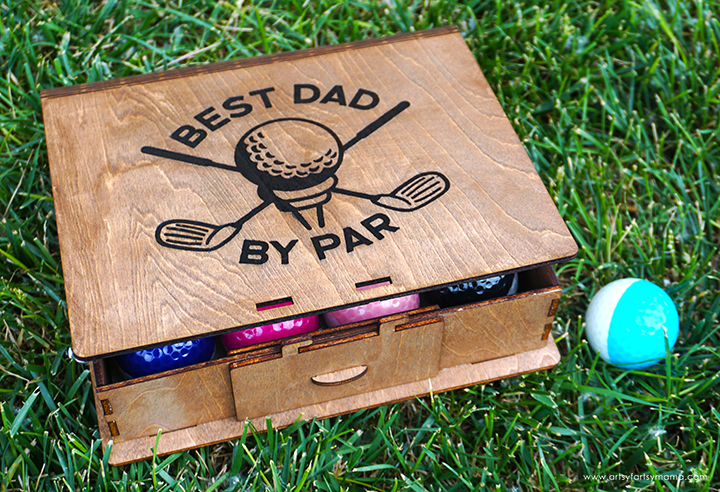
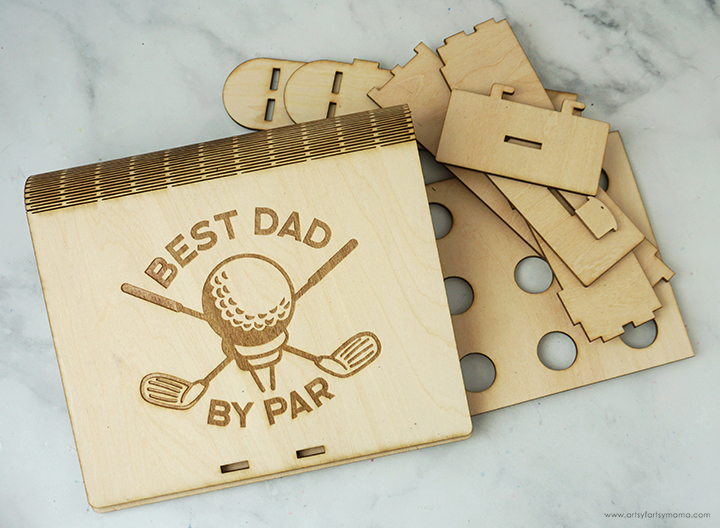
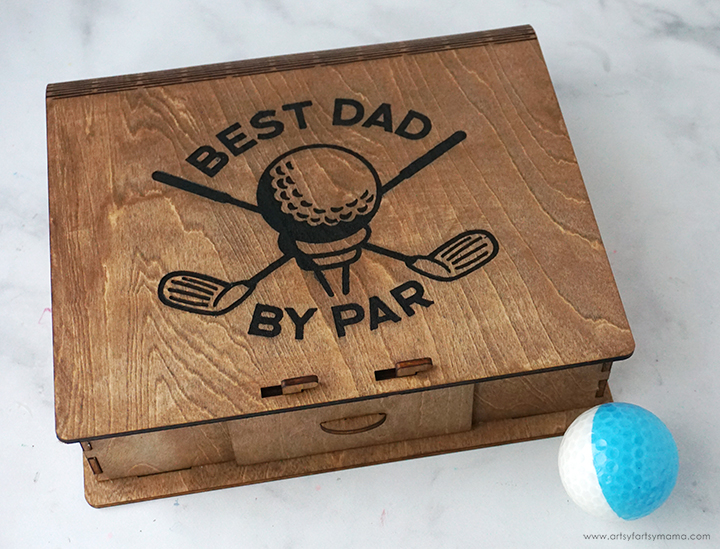
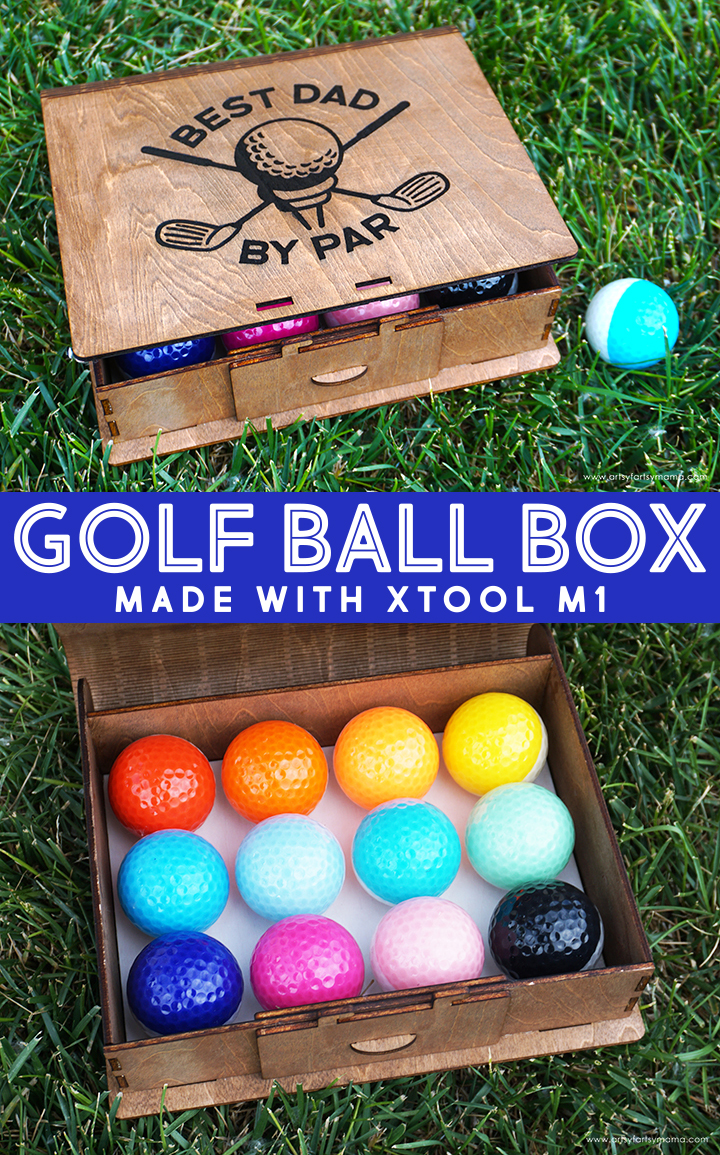
It's almost Father's Day, so I've been working hard on getting some gifts started for my dad, husband, and father-in-law! My dad ha recently taken up golfing, so I decided to thank him for being the "Best Dad by Par" by making a custom box to store some shiny new golf balls in! This project is easy to make using the xTool M1 laser machine, and it's such a fun gift idea for golf dads. I'm even sharing the punny "Best Dad by Par" design so that you can make one of these golf ball boxes for the dad in your life!

To make your own Father's Day Golf Ball Box, you will need these supplies:
- xTool M1
- 2 12"x18" Basswood
- Golf Ball Box Laser Cut File
- "Best Dad by Par" Design (for personal use only)
- Brown Acrylic Paint or Stain
- Paint Brush
- Black Acrylic Marker
- Clear Sealant
- Adhesive
Printables and cut files from Artsy-Fartsy Mama are for personal use only. You may use these files for personal projects, but you may not sell them. If you'd like to share this project digitally, share a link to this post/website only. Do not share a direct link to the file.
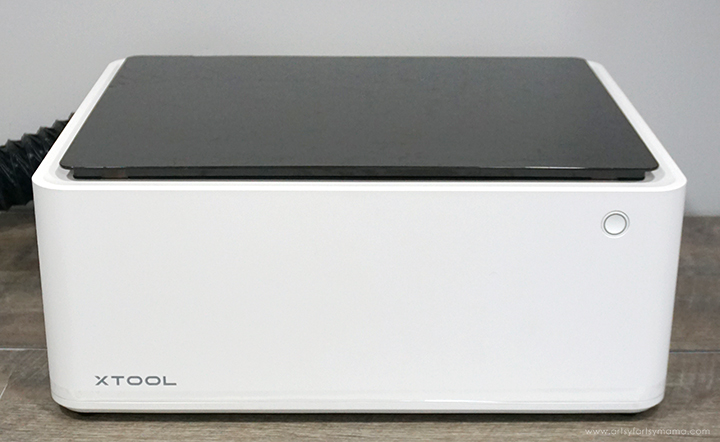
There are SO many projects you can make using the xTool M1 laser cutting machine, and it's actually very easy to use! Once you have one of these, the hardest thing you'll have to do is decide what to make first. If you want to learn more about how this incredible machine works, be sure to check out my complete xTool review.
Place your piece of wood* into the xTool M1 machine, on top of the triangular prisms. When you close the lid, the image of the inside of the machine should show on your screen. If it doesn't, click "Refresh" in the top right (green) section of the menu and it should show up.
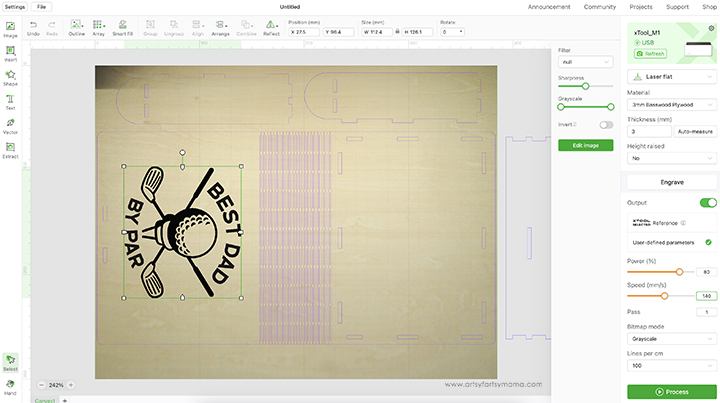
Select the material type from the drop-down menu on the right side of the screen. I used the pre-loaded settings for "3mm Basswood Plywood" material. Make sure that you also select "Triangular Prism" from the "Height Raised" drop-down menu. By selecting the material before you get started, it will automatically adjust settings for cutting and engraving your project.
Upload the golf box and "Best Dad by Par" designs into xTool Creative Space. Arrange as many parts of the box design as you can to fit on the material and move the rest off of the cutting preview. Center the cover design on the top of the box. Select all of the box design pieces, and click on the "Cut" option in the right menu bar. As long as you have the material selected, the cut settings will adjust automatically. Anything set to "Cut" will change to have a purple outline.
When you upload a PNG, like the "Best Dad by Par" design, it will only give you the option to engrave the design. Change the engrave settings to 80/140/1 to get a good, dark engraving in the wood.
*You will need two 12"x18" pieces of wood for this project.
After this first cut is done, don't forget to put in a new piece of wood to cut the rest of the project pieces!

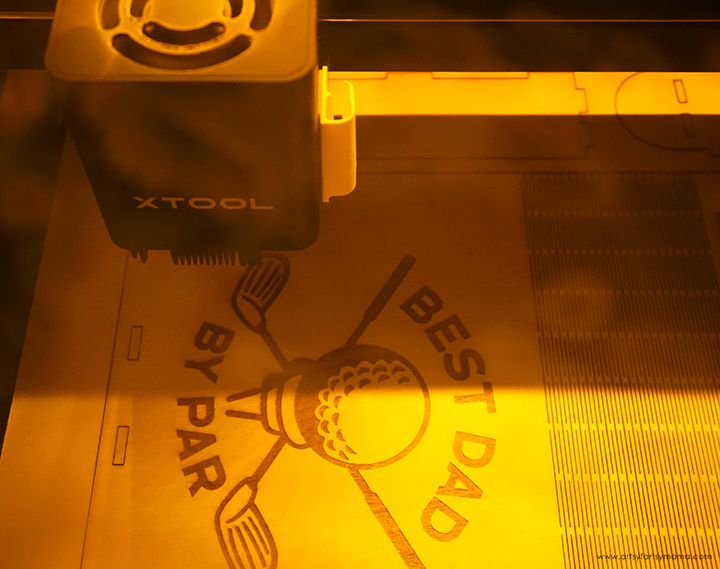
Once the cutting and engraving process is complete, you can remove the pieces from the machine. Before doing anything more with the project, I would recommend cleaning the soot away around the edges of the wood using a Magic Eraser or baby wipe to prevent making marks all over your hands.
The top and bottom piece of the box is actually one piece, with strange-looking lines down the center. These kinds of lines are called a "living hinge", and are an incredible way to make single cuts of wood become flexible!
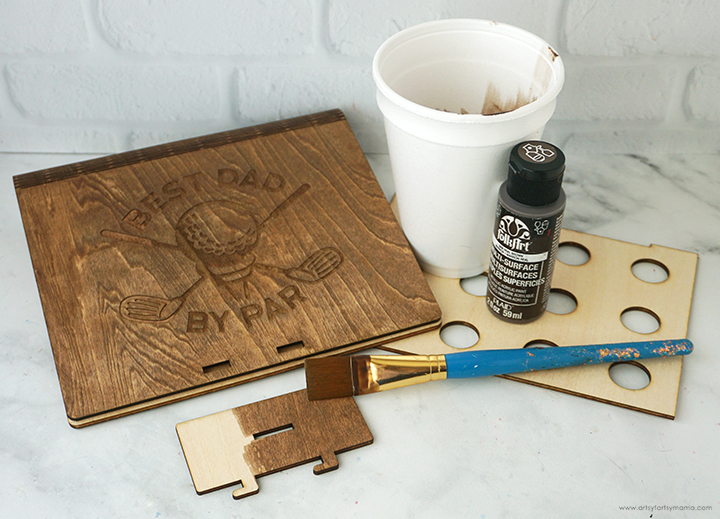
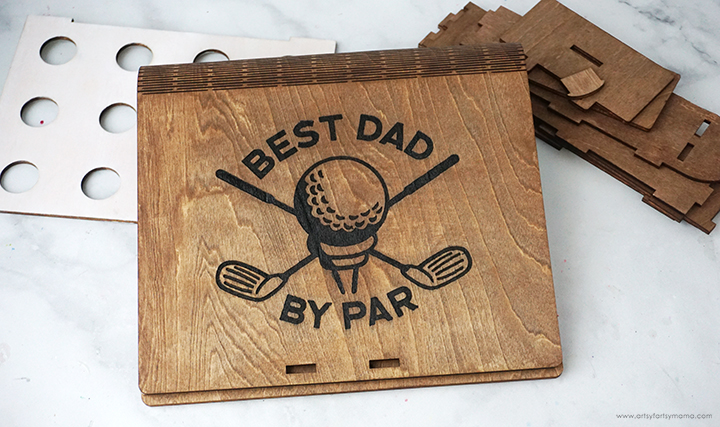
I loved the wood grain in this piece, but wanted to darken it. This can be done using stain or brown acrylic paint. Using paint alone will cover the wood, but if you mix the paint with a little bit of water it will cover like a stain!
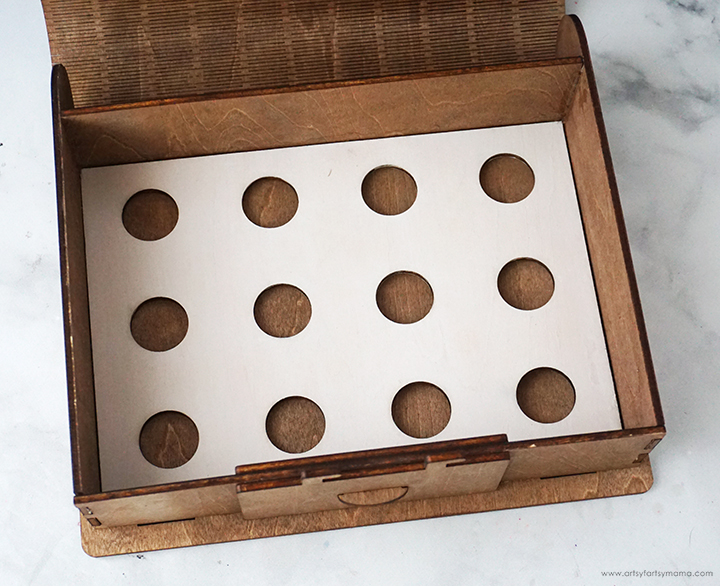
Use a paint brush to apply a thin, even coat of watered-down paint over all of the pieces (both sides). For a darker pigment, add another coat of paint once the first coat has dried completely. For the piece with the 12 circles cut out of it (as seen on the right in the image above), I used a watered-down white paint instead of the brown.
Next, color in the engraved design to really make it pop! This can be done with paint and a small detail brush, but I felt like I had a lot more control by using a black acrylic marker. Simply color in the engraving, and be careful to not go outside the edges. If you feel like the color needs to be darker, you can go over the area again with a second coat.
Now that everything has been painted, I would recommend giving all of the pieces (both sides) a coat of clear sealant to protect the wood and to keep the box looking good as new for longer. The sealant could also be applied once the box is assembled, but I thought it was easier to do it at this point instead.
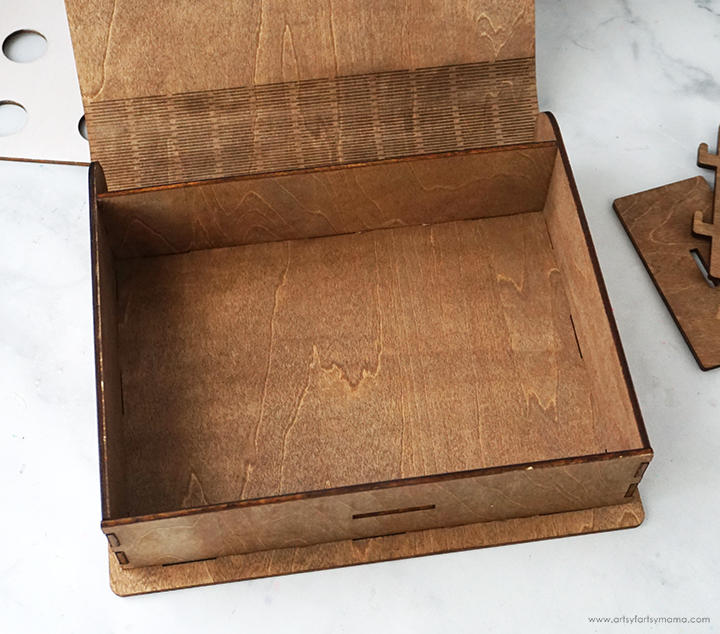
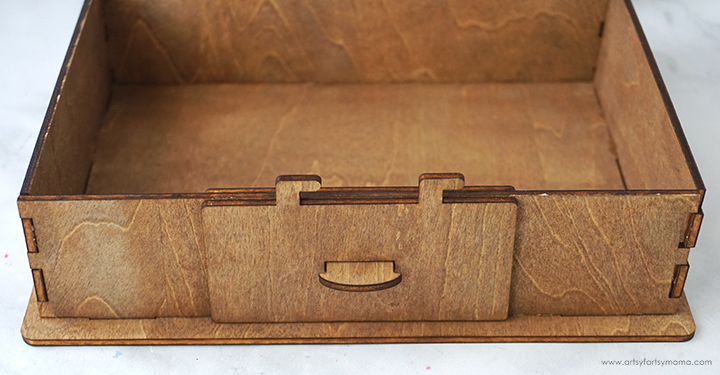
To assemble the box, first lay the "cover" face-down, so that the engraving is down on your workspace. Next, get the four longer pieces to create the sides of the box. Two of the pieces will have a rounded end. Those will go on the sides of the box. One of the two other pieces will have a thin rectangle out of the center, and this piece will go in the front.
Add a little bit of adhesive between each of the notches cut out of each end of the box pieces. Fit the four pieces together, two at a time to create a square. Hold the corners together and let the adhesive set. Next, add a little bit of adhesive on the bottom edges, between the notches, and then place the pieces into the bottom of the box/cover. I would recommend laying something heavy (like a book) on top and let the adhesive dry completely.
Next, the two smaller rectangle pieces need to be placed on the front side of the box. Both pieces have a small rectangle cutout in the center that need to be lined up with the cutout on the front side of the box. Apply some adhesive to one side of the "plain" rectangle piece, and place it on the inside side of the front of the box. Make sure the top edges are aligned.
Add some adhesive to the back side of the other piece and place it on the front of the box, with the notches at the top. Apply a little bit of adhesive to the "key", and stick it through the opening/cutout in the front of the box.
Lastly, apply some adhesive to the bottom side of the piece with the 12 circle cutouts. Place it inside the box and let the adhesive dry.
Now you can bring the top of the box up and over, and can now close it by sliding the notches/tabs through the two cutouts in the top. However, before you close it up, there's one more important step!
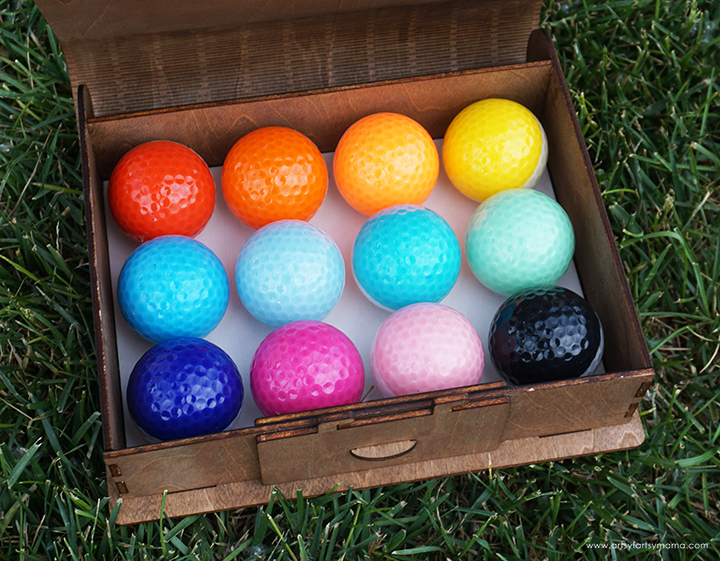
To finish up this handmade gift, place 12 golf balls into the box. The circle cutouts keep the balls in place. Once full, close the box up and wrap it up for dad! I am beyond thrilled with this Father's Day Golf Ball Box, and would love to hear what you think. As always, if you make any of these projects for yourself, I'd love to see your creations! Tag me on Instagram and Facebook, or leave a comment/photo on the project pin on Pinterest!
Don't forget to Pin, Like, and Share!


I like the painted golf balls! What a great year round gift, and so easy to change up.
ReplyDeleteAlexandra
OnRockwoodLane.com
EyeLoveKnots.com