
Preserve a special family recipe on a Handwritten Recipe Cutting Board to pass from generation to generation!
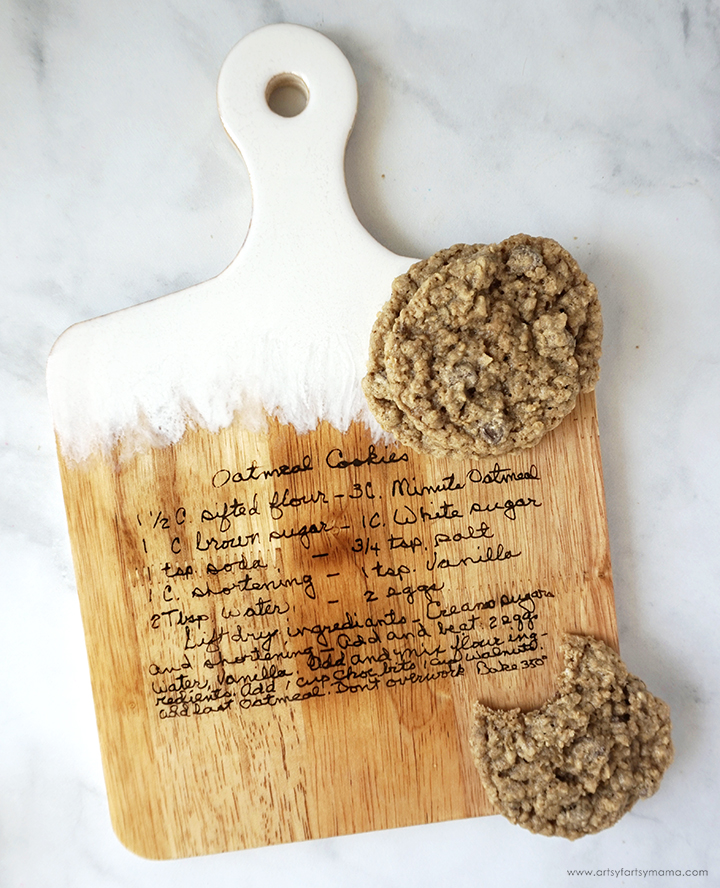
One of the first treats I ever tried from my mother-in-law was her oatmeal cookies. These are some of the best cookies I've ever had, and they are legendary in my husband's family. I've been wanting to transfer a handwritten vintage recipe onto a cutting board for years now, and I was lucky enough to get my mother-in-law's permission to try it out with the original oatmeal cookie recipe written in her mother's handwriting. My Ikonart Stencil Kit helped to make this project a success, and I have been so excited to show you how easy it is so you to try one for yourself. Not only does this make a special heirloom, but it would be such a unique gift idea for your family members!
To make your own Handwritten Recipe Cutting Board, you will need these supplies:
- Ikonart Custom Stencil Kit
- Photocopy of Handwritten Recipe
- Unfinished Wood Cutting Board
- Sandpaper
- Torch Paste
- Squeegee
- Heat Gun
*Save 15% on Ikonart supplies when you shop with code AFM15

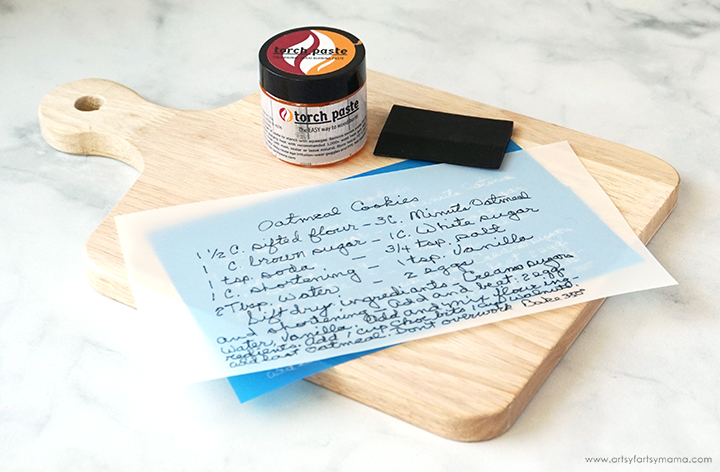
To make a stencil, you need to start with a printed design. Since my image is a handwritten recipe instead of a digital design, I started with a photo of the recipe card. Next, I followed this helpful tutorial from Ikonart on how to turn a photo into a stencil to capture just the handwriting from the photo to use as my stencil. Size the recipe image to fit your board, and print the image as dark as possible on either inkjet or laser Ikonart Printer Film.
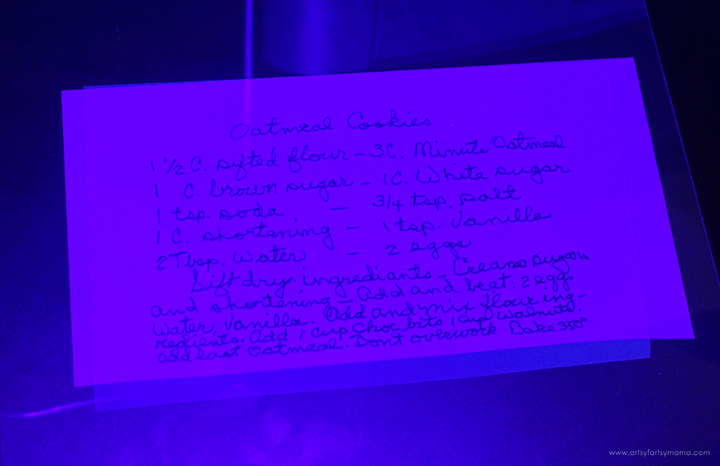
The next step in the process is exposing the stencil film. Set up the exposure stand with UV LED Light by following the directions included in the kit. Ikonart Stencil Film is light sensitive, so be careful to keep it out of sunlight and bright lights before exposure. Cut a piece of the film the same size as the design print.
Lay the piece of film down on the base of the stand with the textured side facing up. Place the printed design on top of the stencil film, making sure it's right-side up - meaning that you should be able to read the words of the recipe.
Lastly, place the clear exposure sheet (found in the stencil film pack) on top and press it down well to seal the design tight against the stencil film. Turn the exposure light on and expose the film for 35 seconds.
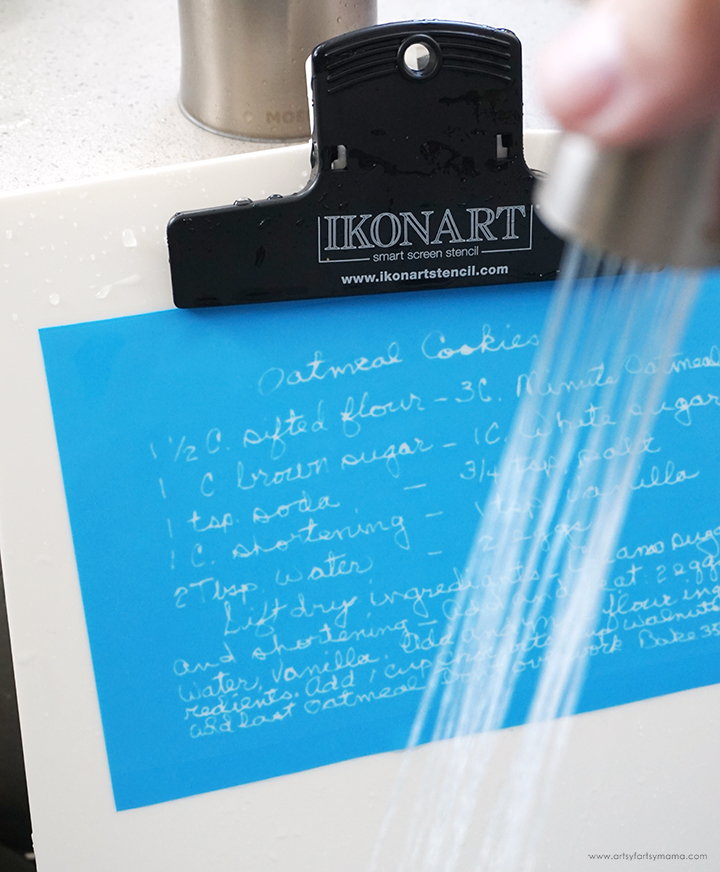
The final step in the stencil-making process is to washout, or rinse the stencil. Clip the exposed stencil film to the Ikonart clipboard with the shiny side (carrier sheet) touching the clipboard. Use the kitchen sink sprayer to rinse the stencil film with warm water until the design shows through and becomes completely clear. The washout process shouldn't take more than 3 minutes.
Gently blot excess water off the from of the stencil, and hang or lay flat to dry for about 45 minutes. When the stencil is dry, you shouldn't see any water spots or discoloration.

Once the stencil is dried, place the it back on the exposure stand and expose it again for at least 2 minutes without the clear cover sheet. This extra exposure will harden the blue emulsion on the stencil, increasing the durability of the stencil so you can get as much use out of it as possible.
Use a permanent marker and write "back" on the carrier sheet (shiny side) on the back of the stencil. This will help you to put the carrier sheet back on the stencil correctly after you are done using it.

Ikonart stencils work best on wood that is smooth. Go over the cutting board with 220 grit sandpaper and wipe it clean afterward with a damp cloth to remove any dust.
Place the stencil down on the board, and use a ruler to make sure the words are straight. Once the stencil is in place, rub it down to make sure it's stuck on well.
Wood burning by hand can be a lot of fun, but I know I would not be able to replicate this delicate handwriting manually. With the help of Torch Paste, you can wood burn practically any design with a professional finish!
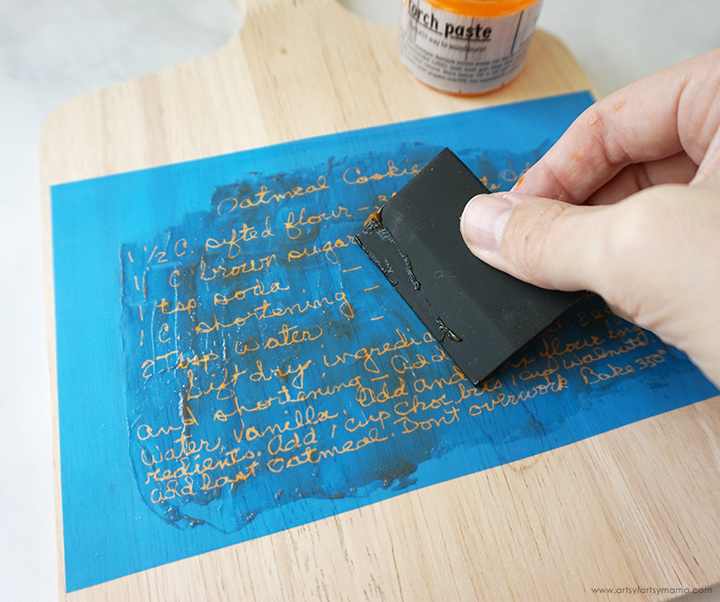
Use the squeegee to apply a thin layer of Torch Paste over the stencil. Be careful not to get any paste outside of the stencil area. If you feel like you need a little more wiggle room, place some painters tape around the edges of the stencil. Scrape off any excess paste and put it back into the jar.
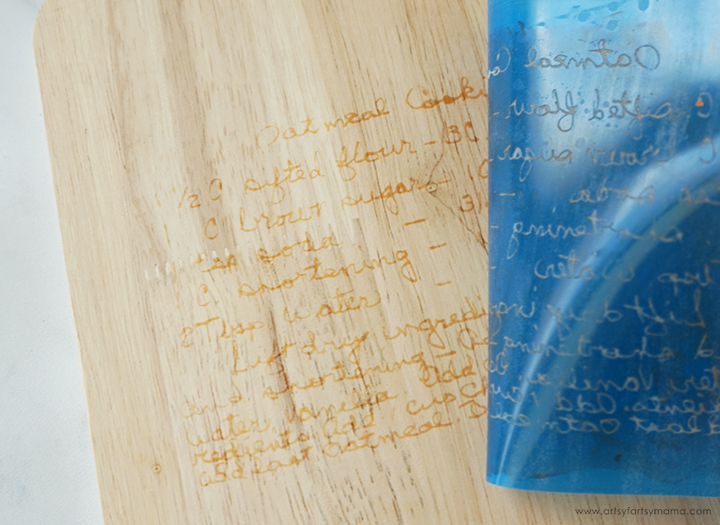
Remove the stencil and let the paste sit for 2-3 minutes. While you're waiting for the paste to set, wash the Torch Paste from the stencil. First, get the clipboard wet so your stencil doesn't stick to it. Place the stencil onto the clipboard with the textured side up, and lightly rub the stencil under cold running water to remove all the paste.
Do not rub or scrub the adhesive side of the stencil, and NEVER use anything other than water to wash the stencils. To prevent the stencil from breaking down, don't ever leave the stencils to soak.
Remove the stencil from the clipboard and lay it down with the adhesive side up. While the stencil is still wet, place the carrier sheet onto the stencil so that the word “BACK” is readable. Hang or lay the stencil flat to dry completely.
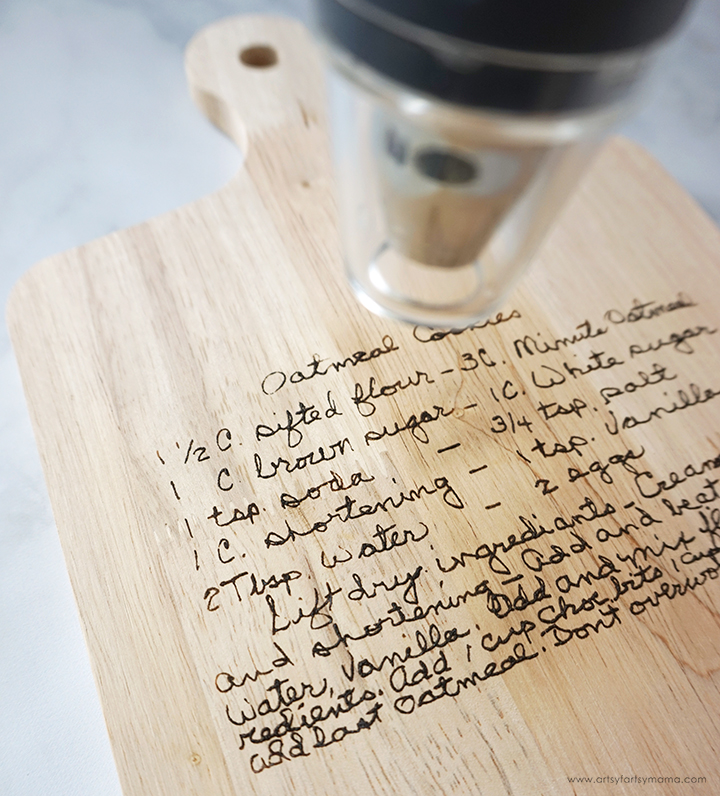
Are you ready for some Torch Paste magic?! Use a heat gun to apply heat to the design, moving the heat around continuously so that you don't burn one spot for too long. Go over the pasted areas until you get the amount of burn you want. The more you apply heat, the darker the burn effect.
Once you complete the heat process, take a minute or two to admire your work. I think this board turned out absolutely beautiful, and am blown away by the detail.
To protect the board from liquid and to keep them lasting as long as possible, cover with a coat or two of sealant. If adding multiple coats, be sure to let the previous coat dry completely before adding another.
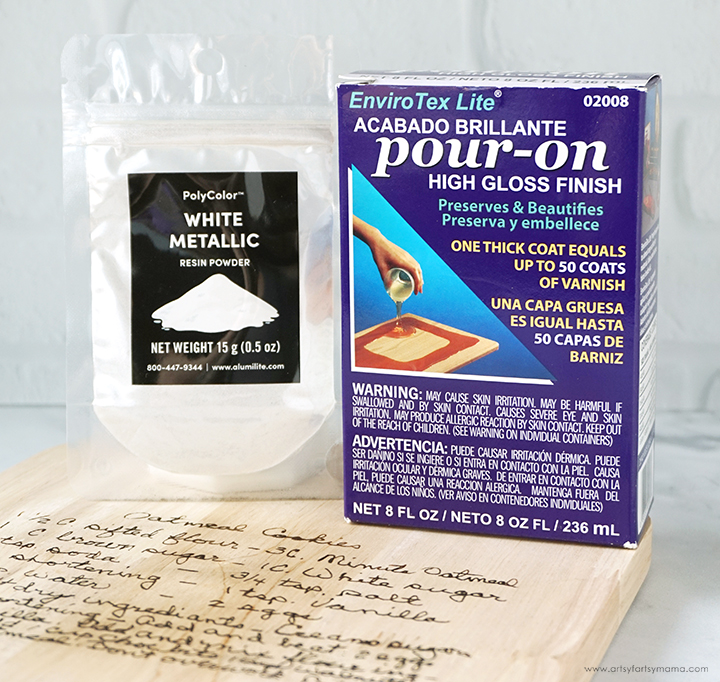
Instead of a sealant, I decided to take it a step further and cover it in a coat of resin. Working with resin can feel intimidating to beginners, but adding a topcoat is incredibly simple! Here's the supplies I used for covering my board:
*Save 10% on resin supplies when you shop ETI with code AFM
SAFETY FIRST: Before working with resin, be sure to work in a well-ventilated area, wear disposable gloves, and protect your workspace!

Prepare 2 ounces of Envirotex Lite according to package directions. Add equal parts resin and hardener to the mixing cup. Stir the resin mixture together with a stir stick for two minutes, making sure to scrape the bottom and sides of the mixing cup. After 2 minutes, pour the resin into a clean mixing cup and stir the resin again for another minute or two with a clean stir stick.
If the resin mixture is still cloudy or streaky, you will need to keep stirring until it becomes clear. To keep the bubbles down to a minimum, don’t stir too fast, and give the resin a minute or two to “rest” after mixing to let any bubbles rise to the top.
Split the resin into two smaller mixing cups. Leave one of the cups as-is (clear), and add some white mica powder to the other cup. Stir the mixture well until the powder has been combined with the resin.
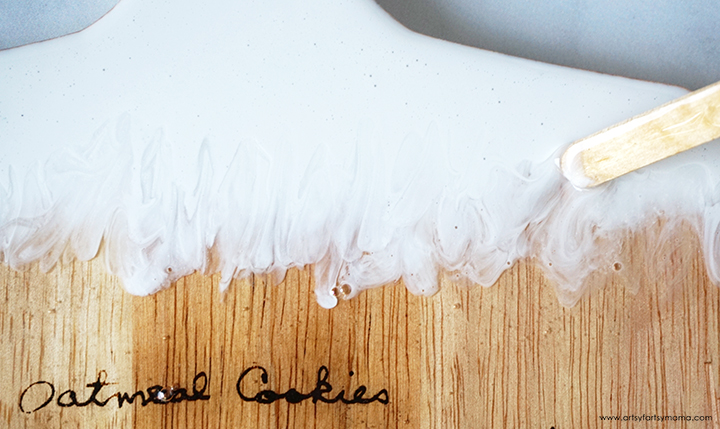
Pour the clear resin about an inch or two above the wood burned area, and down to the bottom edge. Decide how far you want the white resin to go down from the handle, and add resin to just above that area. Use a stir stick to blend the area where the resins meet. Be careful not to drag the resin down over the recipe!
If you tilt your head or angle yourself to see the light reflecting in the resin, you will be able to see any "bald spots" or areas that aren't covered in the resin top coat yet. Use the stir stick to fill in the areas.
Add enough resin to the board so that the entire top is covered, but do NOT overfill. Let the resin sit for a few minutes, then use a straw, heat gun, or spritz with 91% alcohol to remove any air bubbles that rise to the top. Leave the resin to cure for at least 12 hours, but it could be more depending on humidity.
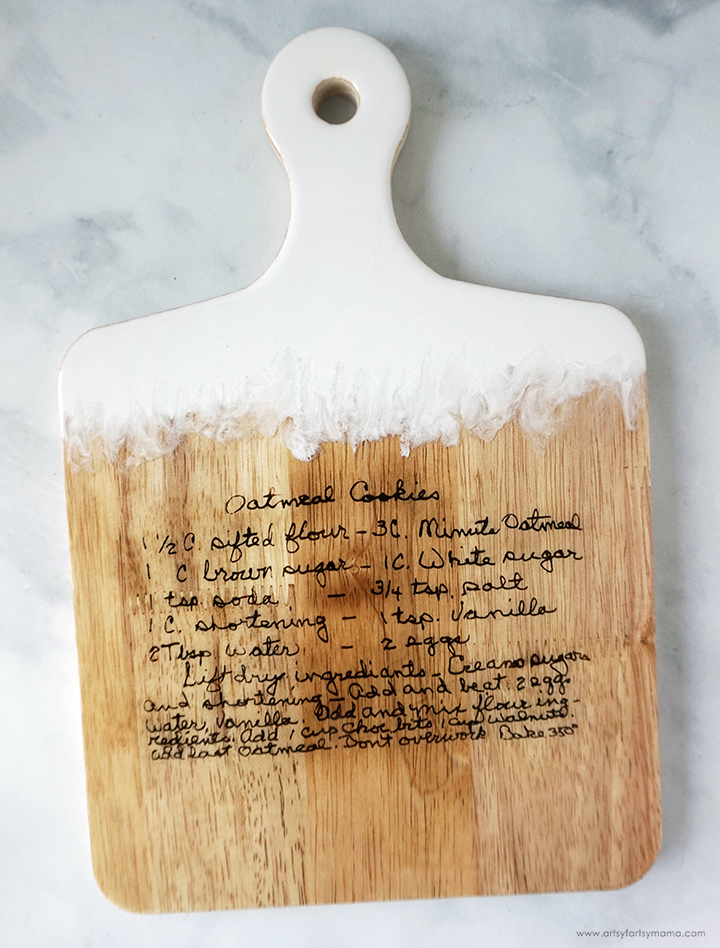
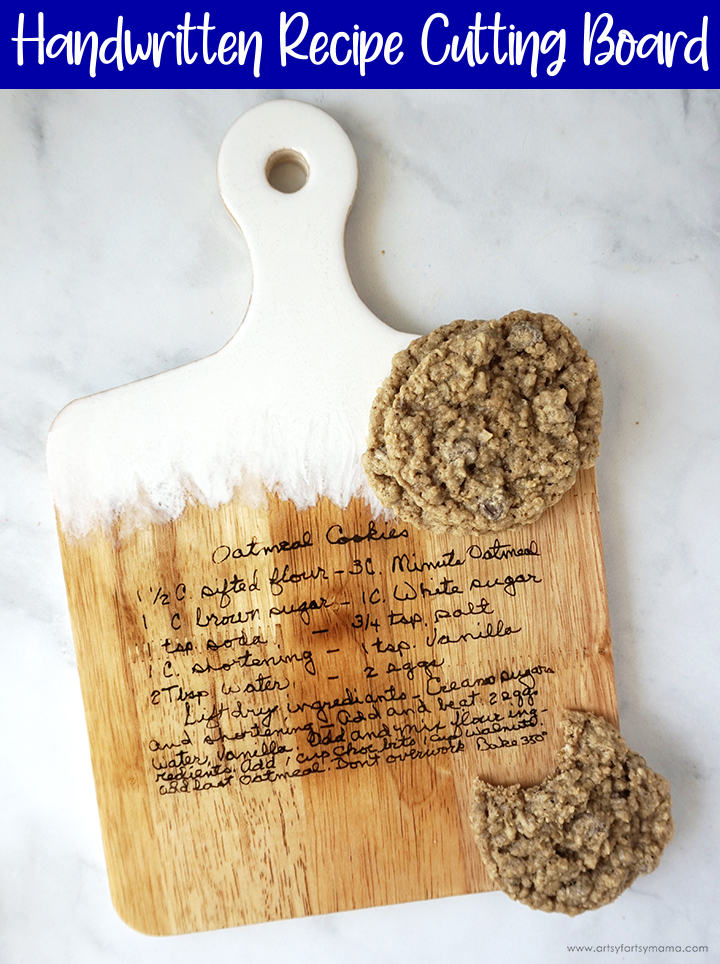
Once the resin has completely cured, the cutting board is complete! I would not recommend cutting anything on the board, but you can definitely put it on display. The resin is actually food-safe, so you could also use the tray for serving cookies or other goodies.
I had so much fun making this Handwritten Recipe Cutting Board, and am now inspired to go through more vintage recipe cards to make more stenciled projects! I'd love to hear what you think about this project, or if you are interested in trying out reusable stencils. If you've made wood burned projects, I would love to see your creations! Share yours on Instagram, Facebook, or leave a comment/photo on the project pin on Pinterest! #AFMCrafts
Don't forget to Pin, Like, and Share!


This is a fabulous project! It would make such a great gift with a family recipe!
ReplyDeleteI love this idea! Thanks for sharing at Vintage Charm!
ReplyDeleteLove this, I'm featuring you this week when the next To Grandma's house we go party starts - thanks for sharing with us!
ReplyDeleteWhat a beautiful and special gift and/or keepsake. Featuring when my link party opens tonight!
ReplyDeleteLindsay, I love this DIY and have to make it.
ReplyDeleteThank you for sharing your DIY for making handwritten recipe boards at Create, Bake, Grow & Gather this week. I'm delighted to be featuring it at the party tonight and pinning too.
Hugs,
Kerryanne
Oh goodness... to save a recipe is one thing, but to capture the original handwriting is quite something else! What a pretty outcome I'd be proud to display!
ReplyDeleteSuch a beautiful idea, this product looks and sounds amazing.
ReplyDeleteThis is amazing! I can't wait to try this with one of my mom's recipe's!
ReplyDeleteDid you seal the wood?
ReplyDelete