
Make a magical set of Hogwarts Wood Burned Coasters that's easy to make with Ikonart!

Hogwarts is a truly magical place. Oh, how I wish the world of Harry Potter were real so that I could live there! Until then, I'll keep visiting the one in Florida, and will keep this set of Hogwarts Wood Burned Coasters on my coffee table to keep the dream alive. Wood burning by hand is actually a really fun craft, but having the help of Ikonart stencils and Torch Paste is a game changer. Don't believe me? Check out the tutorial to see for yourself!

To make your own set of Hogwarts Wood Burned Coasters, you will need these supplies:
*Save 15% on Ikonart supplies when you shop with code AFM15

To make a stencil, you need to start with a printed design. Download the Hogwarts Castle Art and size it to fit your coasters. For the 4" coasters I used, I made the design 3.5". I also typed "Hogwarts is My Home" to add to the coaster holder to make it a complete set. Print the design as dark as possible on either inkjet or laser Ikonart Printer Film.
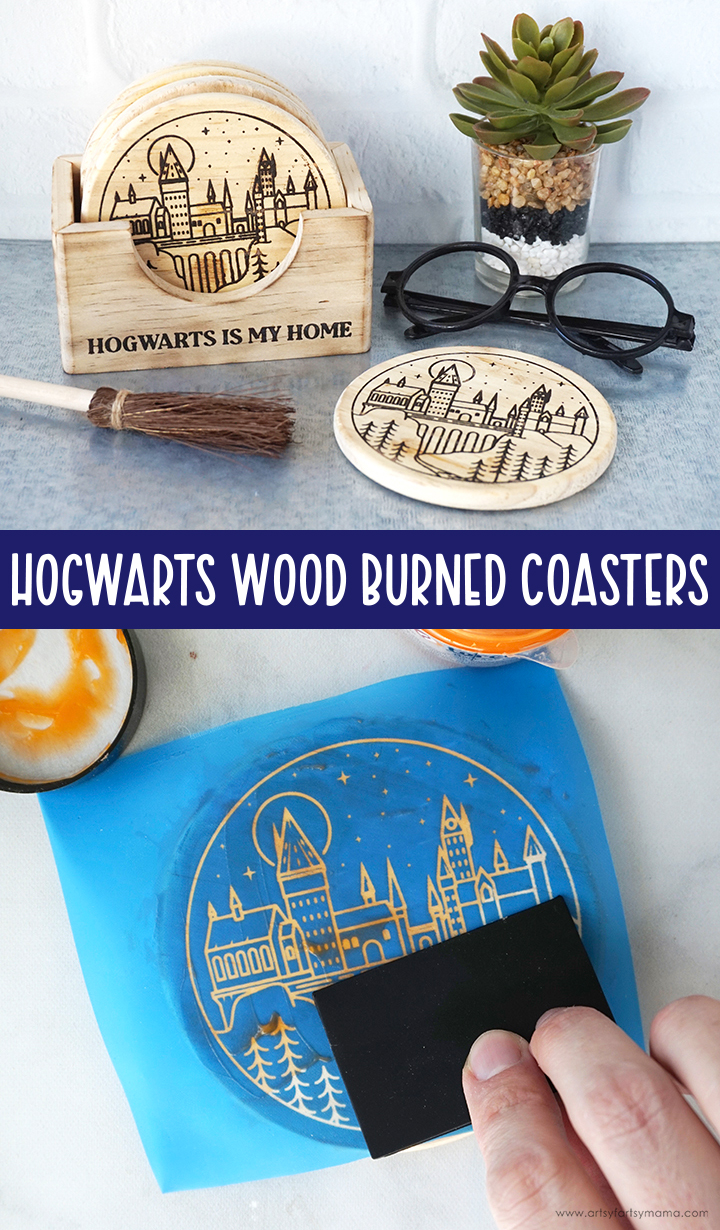
The next step in the process is exposing the stencil film. Set up the exposure stand with UV LED Light by following the directions included in the kit. Ikonart Stencil Film is light sensitive, so be careful to keep it out of sunlight and bright lights before exposure. Cut a piece of the film the same size as the design print.
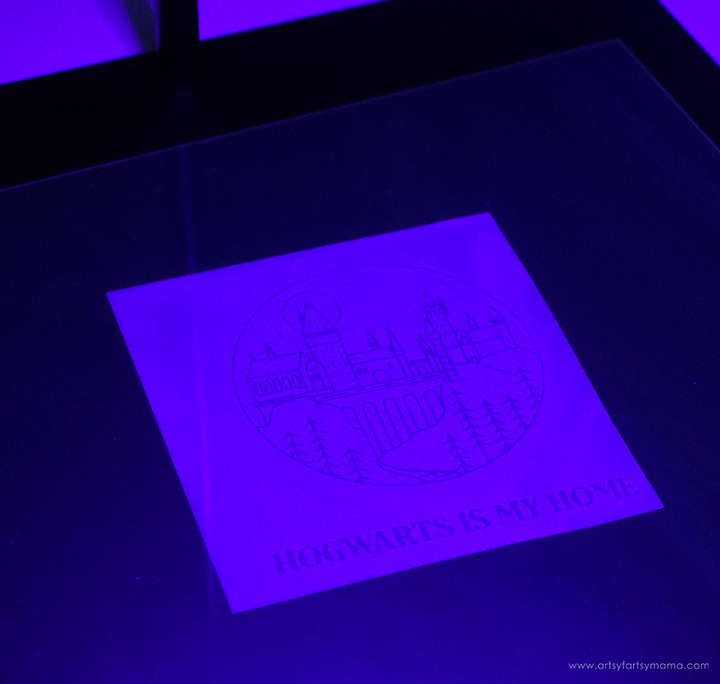
Lay the piece of film down on the base of the stand with the textured side facing up. Place the printed design on top of the stencil film, making sure it's right-side up - meaning that if there are words in your design, you should be able to read them.
Lastly, place the clear exposure sheet (found in the stencil film pack) on top and press it down well to seal the design tight against the stencil film. Turn the exposure light on and expose the film for 35 seconds.

The final step in the stencil-making process is to washout, or rinse the stencil. Clip the exposed stencil film to the Ikonart clipboard with the shiny side (carrier sheet) touching the clipboard. Use the kitchen sink sprayer to rinse the stencil film with warm water until the design shows through and becomes completely clear. The washout process shouldn't take more than 3 minutes.
Gently blot excess water off the from of the stencil, and hang or lay flat to dry for about 45 minutes. When he stencil is dry, you shouldn't see any water spots or discoloration. Once the stencil is dried, place the it back on the exposure stand and expose it again for at least 2 minutes without the clear cover sheet. This extra exposure will increase the durability of the stencil so you can get as much use out of it as possible.
Use a permanent marker and write "back" on the carrier sheet (shiny side) on the back of the stencil.

The Ikonart stencils work best on wood that is smooth. Go over all of the wood coasters and holder with 220 grit sandpaper and wipe them clean afterward with a damp cloth to remove any dust.
I decided to work on the coaster holder first, and trimmed the wording section away from the stencil. You can keep the stencils in one piece if you want, but I found it easier to separate them. Place the stencil down on the front of the holder, and use a ruler to make sure the words are straight. Once the stencil is in place, rub it down well to make sure it's stuck on well.
Wood burning by hand can be a lot of fun, but with the help of Torch Paste, you can wood burn in practically any design with a professional finish. Not only can Torch Paste be used on wood, but it can also be used on denim, cardboard, card stock and more!
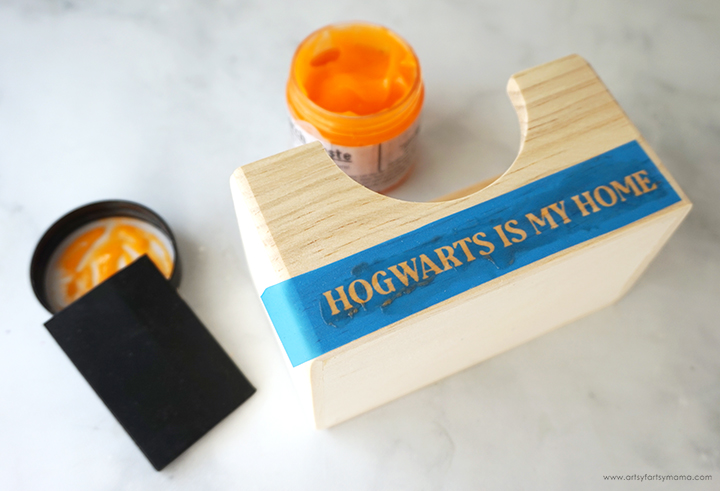
Use the squeegee to apply a thin layer of Torch Paste over the stencil. Be careful not to get any paste outside of the stencil area. If you feel like you need a little more wiggle room, place some painters tape around the edges. Scrape off any excess paste and put it back into the jar. Remove the stencil and let the paste sit for 2-3 minutes.
While you're waiting, wash the Torch Paste from the stencil. To do this, get the clipboard wet so your stencil doesn't stick to it. Place the stencil on the clipboard with the textured side up, and lightly rub the stencil under cold running water to remove all the paste.
Do not rub or scrub the adhesive side of the stencil, and NEVER use anything other than water to wash the stencils. To prevent the stencil from breaking down, don't ever leave the stencils to soak.
Remove the stencil from the clipboard and lay it down with the adhesive side up. While the stencil is still wet, place the carrier sheet onto the stencil so that the word “BACK” is readable. Hang or lay the stencil flat to dry completely.
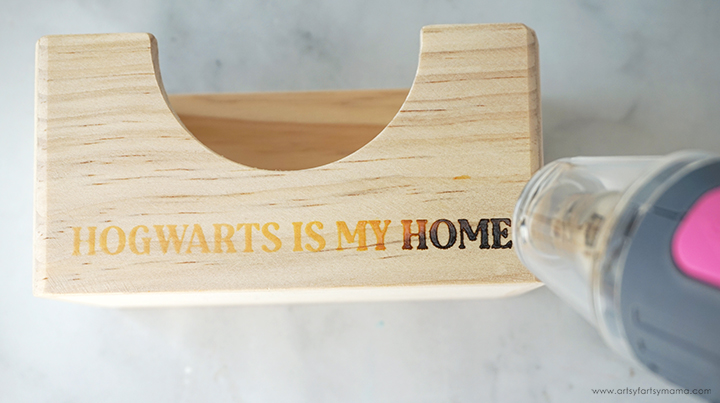
Now for the magic! Use a heat gun to apply heat to the design, moving the heat around continuously so that you don't burn one spot for too long. Go over the paste until you get the amount of burn you want, meaning the more you apply the heat, the darker the burn.

After I burned the paste in, I decided to give the holder an aged look by carefully burning the edges of the holder. I absolutely love it, and watching the paste transform under the heat is SO satisfying!!

To wood burn the coasters, you go through the same process as I did for the holder:
- Apply the stencil in the center of the coaster and press it down well.
- Use the squeegee to apply a thin layer of Torch Paste over the stencil.
- Scrape away the excess paste and return it to the jar.
- Peel the stencil away and let the paste dry for at least 2 minutes.
- Wash out the stencil and let it dry completely.
- Repeat for each coaster.
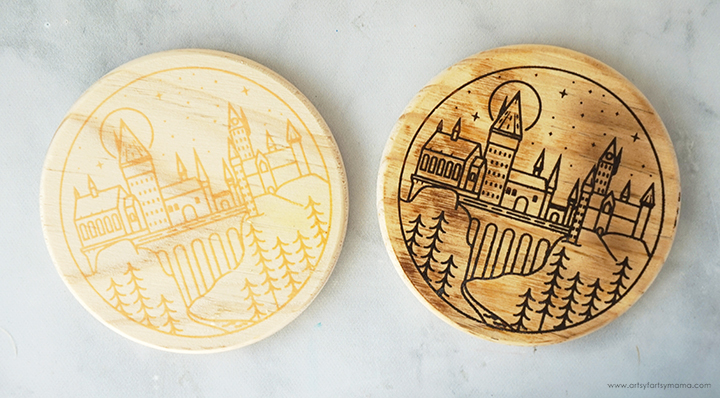
Here's a before and after image of the coasters from paste to burn. I noticed that even though the coasters are from the same set, a couple of the coasters turned pretty brown with not too much time under the heat. I don't hate it, but found it interesting and wanted to let you know that it can happen.
If you happen to have any coasters warp from the heat, don't panic. Finish burning the paste into the coaster and immediately place the coaster under something heavy while the wood is still hot. The wood will flatten out as it cools.

Once all of the coasters have been put through the heat process, take a minute or two to admire your work. I think they are absolutely beautiful, and think that it's pretty cool that each coaster turned out a little bit different in how the wood reacted to the heat.
To protect the coasters from liquid and to keep them lasting as long as possible, cover each coaster with a coat or two of sealant. If adding multiple coats, be sure to let the previous coat dry completely before adding another.

I had so much fun with this stenciling project, and am now inspired to look around the house for more project to use Torch Paste on! I'd love to hear what you think about this project, or if you are interested in trying out reusable stencils? If you've made wood burned projects, I would love to see your creations! Share yours on Instagram, Facebook, or leave a comment/photo on the project pin on Pinterest! #AFMCrafts
Don't forget to Pin, Like, and Share!


Love this DIY. Thanks for sharing at #omhgww. See you next week. Pinned and tweeted if buttons are available.
ReplyDeleteThese are adorable! Thanks for sharing at Vintage Charm!
ReplyDeleteThese are awesome! I honestly though you would be using a wood burning tool; I have never heard of torch paste before but that looks like such a cool process. Pinned.
ReplyDeleteI have never heard of this product but do like the effects it makes. Thanks for sharing. #HomeMattersParty
ReplyDeleteI've seen the paste way to get a woodburnt effect on line but not with such a thorough explanation of the process. I have an inexpensive basic pyrography tool but with this method you really can get a more intricate look than I could ever achieve! These look fabulous and will be a feature at Handmade Monday this week.
ReplyDeleteI must question your second sentence though...what do you mean you wish it were real? We both know that our Hogwarts letters just got lost in the post don't we? Those poor owls just got lost trying to deliver them right?