
Create Girl Scout Bottle Cap Hair Bows in less than 15 minutes!

Last year was my daughter's first year being a Girl Scout. She loved being a Daisy and has learned and grown so much from the program! She's also been able to make some great new friends and is really looking forward to bridging to Brownies this year! To get her ready for some new adventures, we decided to whip up some cute Girl Scout bows for her to wear to her meetings and activities.

Some of my fellow blogging friends are also sharing some creative scout craft ideas that all take 15 minutes or less to make! Click the image above to see all the Craft Lightning projects!

Creating bottle caps is really simple! You can use these bottle caps for pretty much anything: hair bows (of course), jewelry, zipper pulls, and it's even a fun Girl Scout Swap idea! The printable bottle cap images include something for everyone, including general Girl Scout images to Daisy, Brownie, and Junior logos with their Journey images!
To make these bottle caps, you will need:
- Girl Scout Bottle Cap Printable: best results if printed at a photo lab on glossy photo paper, without "auto correction."
- 1 inch circle punch
- Bottle caps
- Epoxy stickers

Punch the image(s) you want to use in the bottle cap out with the 1 inch circle punch.

Avoid touching your images before applying the epoxy sticker. Any oils or substances on the image can cause the bottle cap to appear bubbled or blemished when image is adhered to sticker. Remove epoxy sticker and hold with sticky side up. Do not touch the adhesive backing on the sticker as this will cause permanent fingerprints.
Place image face down onto adhesive side of epoxy sticker. Use the edge of credit card or fingernail to rub the back side of the image to remove any air bubbles or lines between sticker and image. Repeat until image appears clear and smooth.


Apply a small amount of super glue or E6000 on the center of the bottle cap.
Place the image into the bottle cap and press down to evenly distribute the glue. Let the glue dry according to package directions or overnight (just to be safe).
While the bottle caps are drying, you can get going on the bows! They are easy to make, and come together quickly. First, you need to prep your clips. I used alligator clips and hot glued a strip of ribbon over the top and on the underside of the top clip. Set aside.
For this style of bow, you'll need three ribbons in different sizes and colors. The largest ribbon needs to be 1.5 inches wide. The two other colors of ribbons can be any width smaller than 1.5. For this general Girl Scouts hair bow, I chose to use 3/4 inch white ribbon, and 5/8 inch ribbon in brown polka dot to go with the 1.5 inch green polka dot ribbon.
Cut TWO pieces 1.5 inch ribbon 9 inches long
Cut TWO pieces 3/4 inch ribbon 7 inches long
Cut ONE piece 5/8 inch ribbon 7 inches long
Once all the ribbons are cut, you need to seal the edges. Use a lighter and carefully run it across the cut edges and it will melt the ribbon slightly so it won't fray.
Start with the 1.5 inch ribbon. Fold it in half and use your fingernails to press the fold. When you open the ribbon up, you should be able to see the line.
Make sure the ribbon is laying face down and add a thin line of hot glue NEXT to the fold line. Fold the edge of the ribbon over to the glue and press down. Repeat with the opposite side and the second ribbon. The ribbons should look like the image above.
Turn the ribbon over so the seam is in the back. Accordion fold the ribbon and hold in the center to give that "bow" look. Grab some thread and tightly wrap it around the ribbon to hold the fold and tie it in the back. Repeat with the second ribbon. Now you'll have two bows!
To make a more boutique-style bow, we're going to combine the two bows. Bend one of the bows so that the top corners of the bow touch and leaves the bottom center kind of flat. Add a drop of hot glue to the center. Fold the other bow the same way and press the two flat edges together. You can see the glob of hot glue in the center of my bow in the image above.
To make a more boutique-style bow, we're going to combine the two bows. Bend one of the bows so that the top corners of the bow touch and leaves the bottom center kind of flat. Add a drop of hot glue to the center. Fold the other bow the same way and press the two flat edges together. You can see the glob of hot glue in the center of my bow in the image above.
I repeated the same steps with the white ribbon to create a smaller bow. Be sure to wrap another bit of thread around the entire center or each bow to keep them secure.
For the smallest piece of ribbon, I folded, glued and wrapped it with thread. Then, I added some hot glue to the front of the white bow and placed the brown bow right in the center. Hold in place until the glue is set.
Now add some glue to the front of the green bow and place the white/brown bow right in the center and hold in place. Tightly wrap some thread around the entire bow to keep it together. You can also glue the alligator clip to the back of the bow at this point.
Add one more glob of hot glue to the center of the bow (on top of the brown ribbon) and glue the bottle cap on. Hold it in place until it is completely dry.
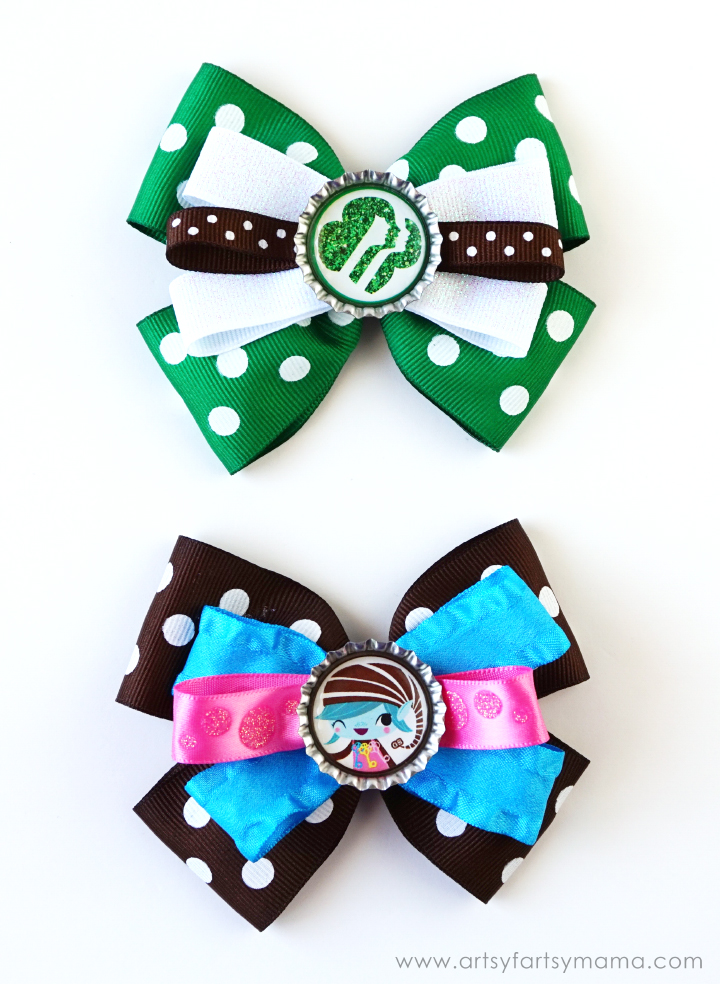
Now the Girl Scout bow is complete!!
Add one more glob of hot glue to the center of the bow (on top of the brown ribbon) and glue the bottle cap on. Hold it in place until it is completely dry.
Now the Girl Scout bow is complete!!
My daughter is excited to be a brownie this year, so we made her one to wear to her Girl Scout activities and meetings. The elf image is from the Brownie Journeys she will be working on, and I think this bow turned out so cute!
Do you have daughters or granddaughters in the Girl Scouts? Are YOU a Girl Scout? I'd love to hear what you think!


These are so cute!! Pinning for later!
ReplyDeleteThese are bomb! I LOVE THEM!!! You rocked this project and I am totally making some!!!
ReplyDelete