
Ready to see my newest Halloween decor addition?!

This turned out even better than I expected. Plus everything was incredibly inexpensive, and it only took about 30 minutes!! Sounds like the perfect craft combination, in my opinion.

Supplies:
Glue Gun
Glittery Scrapbook Alphabet Stickers
Pledge Floor Finish - After much searching, I eventually found some at a smaller Walmart (the larger ones didn't have it... weird)
4 Glass Jars
Fine Green Glitter
4 Plastic Witch Hats (found at Hobby Lobby)

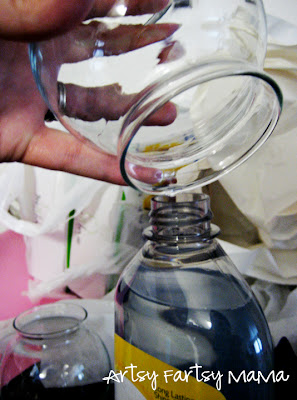
Step 1: Wash the jars out & dry thoroughly. Try not to get any lint or dust inside of it, or the floor finish may not stick. Pour a small amount of finish in the jar and slowly swirl it around the jar. Don't shake it up or it may get bubbles. Keep swirling the finish around and tilt the jar to completely coat the inside of the jar. Then pour the excess finish back into the container.

Step 2: Next, pour some glitter into the jar. A finer glitter may coat better, but regular glitter works fine, too. Swirl & tilt the jar slowly like you did with the finish to cover the inside with glitter. You can pour out the excess glitter back into the container, but DO NOT tap the jar. I did on the first one and the glitter looked a little sparse in some areas. So just don't do it, okay?

Step 3: Set the jars aside to dry. You can finish the project while they are drying, just be careful not to tap them or touch the inside. The finish shouldn't run or anything, and it dries clear.
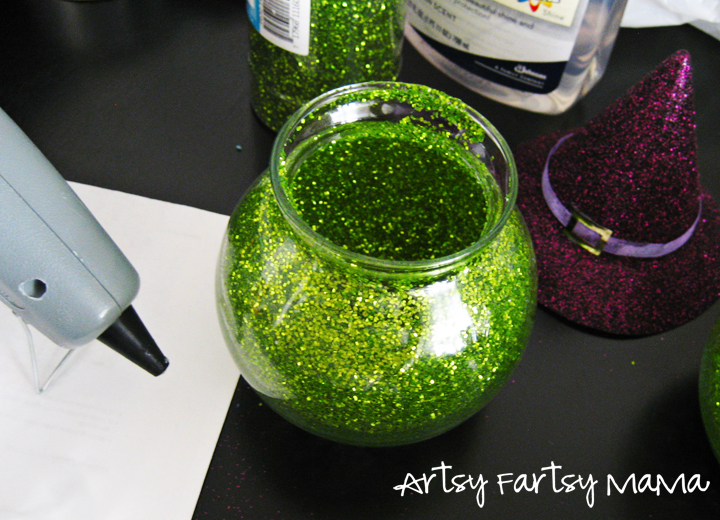
Step 4: I didn't wait that long for them to dry. Put some hot glue around the top edge of the glass and then placed the glittery witch hat on top. Easy as that! E6000 Glue would also work great.

Step 5: Next, place some glittery scrapbook stickers onto the jars. You can also use vinyl, marker or anything else that you want. You don't even have to spell something, my original idea was to draw a witch face...but in the end, I decided "EEK!" was the one for me!

And that's IT! Super easy, super inexpensive and super versatile!


These are very cute!
ReplyDeleteI love these. I already have some floor finish. I can't wait to try it.
ReplyDeleteRachel
adventuresofadiymom.blogspot.com
This comment has been removed by the author.
DeleteThese came out so... cute!! What a great idea...thanks for sharing.
ReplyDeleteAdorable! I love them!
ReplyDeleteThese are so cute Lindsay! They will look perfect for Halloween!
ReplyDeleteI absolutely LOOOOOVE this! The green glitter is just gorgeous and this looks like something I could actually make... just so cute! I love it!
ReplyDelete-Mel the Crafty Scientist
so so so cute!! Love these! did you get the witch hats from HL?
ReplyDeleteI LOVE them!! So cute -and a change from the normal orange and black halloween decor!
ReplyDeleteSuper cute idea!! I love the little witch hats. I *just* used the same glitter technique myself to make some pumpkins. Isn't it too fun?? :)
ReplyDeleteThis is the cutest idea and it is so quick and fast! I'm going to make some myself! :)
ReplyDeleteThese are adorable! I love the glitter. I have never heard of using floor finish as an adhesive.
ReplyDeleteOkay, that's just too darn cute!! Thank you so much for linking up!
ReplyDeleteThese are so stinkin cute! I love anything sparkly! I would love for you to share with Blog Stalking Thursday at http://thecraftyblogstalker.blogspot.com/2011/10/blog-stalking-thursday-12.html
ReplyDeleteI love these! They are so fun! I have already pinned them and plan to feature it this week in one of my pinterest roundup. Thanks for sharing and linking up!
ReplyDeleteI love these! They're adorable!
ReplyDeleteWay too cute! I love them! That's such a great technique that you used - I can definitely that this would be fun for Christmas decorating as well. I would love for you to share with my readers at my link party: http://www.momontimeout.com/2011/10/taking-timeout-thursday-link-party-no-1.html
ReplyDeleteStopping by from the Friday Blog Hop :)
ReplyDeleteLove the decorations, that's a super cute idea :D.
These have to be one of the cutest things ever! Well I've decided I'm making them:)
ReplyDeleteJulianna
I LOVE these! I am stopping by from the Homemaker in Heels blog hop and so glad I did! I always love your crafts and I can't wait to try using the floor finish technique-so cool! I am also hosting a link up right now and would love for you to come and link up! http://tipsfromtheheart.blogspot.com/2011/10/follow-me-friday-link-up-free.html
ReplyDelete-Robyn from http://tipsfromtheheart.blogspot.com
I love these!!! Homemade Halloween decor is the best :)
ReplyDeleteSOOO cute! Thanks for joining the Planet Weidknecht Weekend Hop!
ReplyDeleteHi, I'm with an online vintage dress boutique called Shabby Apple (www.shabbyapple.com) and I adore your blog. Shabby Apple offers affordable, stylish attire perfect for a day at work or play, or a night on the town. We would love to partner with you and offer your readers a 10% off coupon as well as the opportunity to giveaway a piece of jewelry from our collection on your blog. Please check us out at www.shabbyapple.com and let me know if you are interested.
ReplyDeleteI look forward to hearing back from you soon!
Thanks,
Chelsea Wakley
cwakely@shabbyapple.com
(this is only open to US residents, if this is not a possibility please let me know
I am in love with these, I am going to try this one this weekend. I am a new follower please follow me back at lefthandedideas.com.
ReplyDeleteNeat creations! Love the process and the colors ~ very creative! ~ thanks, namaste, Carol (A Creative Harbor) link Weidknicht Planet
ReplyDeleteI love these jars! I have never heard of using floor finish for a project like this and now my wheels are turning trying to figure out what I can use some floor finish on. Ha ha. Thank so much for linking up to Freshmen Friday. I just shared your post on my Facebook page. Love it!
ReplyDeleteThis is such a cute idea! And I've never heard of using floor finish like this before. Very clever.
ReplyDeleteI'd love for you to link this up to my Monster Mash Bash! http://afishwholikesflowers.blogspot.com/2011/10/lets-do-monster-mash.html
Hope to see you there!
This is brilliant! I used to have a zillion of these bowls from working at a pet store -- I wish I held onto them!! =) Though they're super affordable and totally worth buying more to make this for halloween! love it girl!
ReplyDeleteso happy I found your blog!
xoxo
jenn
Ok, this is awesome! I can't wait to try it! I found you at I Heart Naptime. Thanks for the inspiration!
ReplyDeletehow adorable!!!!
ReplyDeleteThese witchy jars look fabulous! I love how you glittered them!
ReplyDeleteThanks for linking to a Round Tuit!
Hope you have a great week!
Jill @ Creating my way to Success
http://www.jembellish.blogspot.com/
Oh my gosh these are ADORABLE!!!! Amazing as always :)
ReplyDeleteI am wondering if this would work with a plastic/acrylic type ball or does it have to be glass to get the floor finish to stick? Glass decorations are a hazard in our house :) Thanks!
ReplyDeleteThese are super cute! I never would've thought to use floor finish to make the glitter stick. I love the hats too.
ReplyDeleteAwesome idea! Definitely will have to try this one!
ReplyDeleteAwesome idea and so simple! These make a wonderful Halloween decoration.
ReplyDeleteThese are so cool and fun! They look great!!
ReplyDeletePlease feel free to link up to Make Yourself Monday!
Jamie
For Love of Cupcakes
Looks like a fun project! I am absolutely in love with glitter crafting. Your Halloween decoration turned out great!
ReplyDeleteThat is so cute.
ReplyDeleteSimply adorable! I want them!
ReplyDeleteThanks for linking up!
These are so cute!
ReplyDeleteReally really cute! Thanks for sharing at catch as catch can.
ReplyDeletegail
So cute! Thank you tons for linking up and sharing with us! Always a pleasure to party with you ;)
ReplyDeleteBritney
www.jandmseyecandy.blogspot.com
These are so fabulous!
ReplyDeleteI'd love for you to link up to my very first Fresh Friday Link Party!
http://www.releasemecreations.com/2011/10/fresh-fridays-link-party.html
This is so darling! I'm hosting a Fabulous Fall party over at Not So Simple Housewife and I'd love for you to link this up! We are celebrating Fall and giving me and everybody else some great inspiration. I'd love for you to add this and any other fall posts you may have!
ReplyDeleteKaitlin-The Not So SImple Housewife
http://notsosimplehousewife.blogspot.com/2011/10/fabulous-fall-link-party.html
Lindsay, your CUTE crafty projects never cease to amaze me!!! These are adorable! What a great idea! Thanks for sharing! :) Have a great weekend!
ReplyDeleteP.s.- I see you got the same offer as I did from S.A.! Yayy!!! :) Have you chosen the piece of jewelry yet?
So these are super cute! Love them, drop by & link up if you like! I am going to have to make one for sure,
ReplyDeletethanks for sharing your how to!
What a neat idea! Thanks for sharing your step by step.
ReplyDeleteThis comment has been removed by the author.
ReplyDeleteI am lovin these! I am now following you. I would love for you to come follow back and add this to my linky party!
ReplyDeletehttp://www.igottatrythat.com/p/link-party-here_24.html
Thanks,
Marcie
I think I'm going to try these with my leftover baby food jars! Wouldn't that be fun?!
ReplyDeleteI love these! They're adorable!
ReplyDeletesweepingmama.com
I love these! Thanks for linking up at the party!! https://www.facebook.com/craftscakesandcats
ReplyDeleteNice project!!
ReplyDelete