Print this Free Printable Ultimate Disney Princess Bookmark Set to save your spot with your favorite Disney Princess!
My daughter has always loved Disney Princesses, old and new. Ever since we made our Harry Potter Bookmarks, she has been begging me to make some Disney Princess versions. How could I say no? They were a lot of fun to make, and I hope that you will love them, too. We have the entire set printed out for my daughter as well as for my husband's students. Bookmarks are a fun reward and also a great way to encourage reading!
Download and print the bookmarks on cardstock. Use a paper trimmer or scissors to cut out the bookmarks. Laminate the bookmarks to help them last longer.
My daughter always loves helping me throughout the design process of creating bookmarks. She likes helping to make sure they turn out right and seeing her favorite characters come to life. There are 16 characters included in this Ultimate Disney Princess Bookmark set: Aurora/Sleeping Beauty, Cinderella, Snow White, Ariel, Belle, Jasmine, Mulan, Tiana, Rapunzel, Meg/Megara (Hercules), Merida, Moana, Anna, Elsa, Elena (of Avalor), and Pocahontas!
This shop has been compensated by Collective Bias, Inc. and its advertiser. All opinions are mine alone. #WelcomeToFamilyNight #PeterRabbit #CollectiveBias
Have a Peter Rabbit Movie Night, including Free Printable Popcorn Boxes and a Garden Popcorn recipe!
One of our favorite ways to spend time together is with family movie nights. My daughter has been begging to see Peter Rabbit, and so we surprised her with a fun movie night this last weekend. It's such a fun and family-friendly movie that everyone is sure to love. We had a wonderful time watching the movie and making some Peter Rabbit Garden Popcorn!
This post is sponsored by Baby First. As always, all opinions are my own.
Easily make diapers for your baby dolls with this Free No-Sew Baby Doll Diaper Pattern!
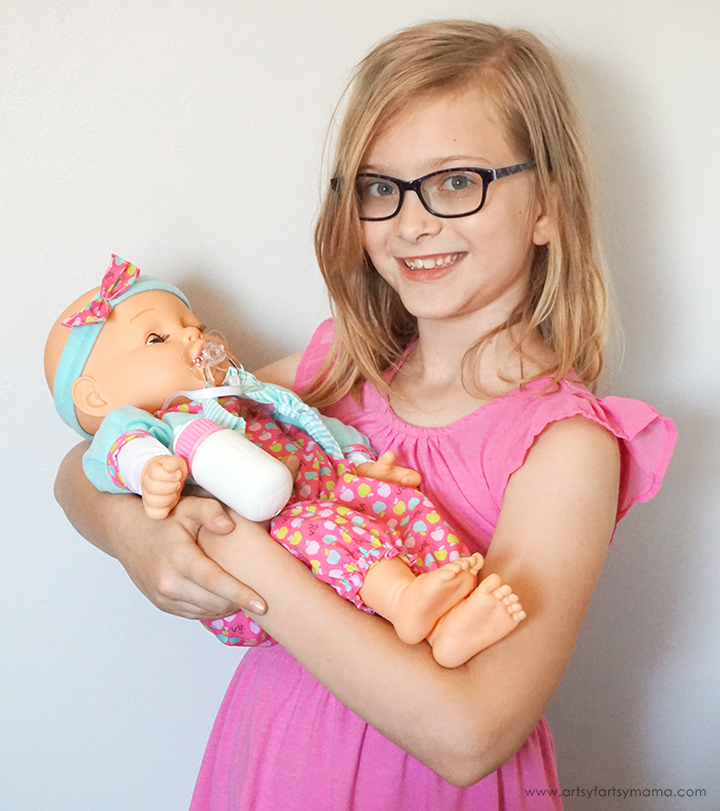
My daughter was surprised with a Baby's First Air Baby doll, and it was very nostalgic for me to watch her open it up. The smell of the new plastic, the sweet little baby clothes, and how realistic baby dolls looked and felt brought back all the memories of my own baby dolls. Check out her full review, and her "unboxing" video below:
The Air Baby is the size of a newborn, but has an adjustable air pillow tummy that makes it lighter than other baby dolls. If you're expecting a human baby into your family soon, this is the perfect doll to prepare your child for their new sibling. We aren't expecting any babies (yet), so my daughter has just been caring for her baby doll like it's a real baby.
After a few hours of playing "mom", she told me that she needed some diapers for her baby. Since our other baby dolls are a lot smaller, we didn't have any doll diapers that fit. So, I decided to put together a No-Sew Baby Doll Diaper pattern that kids can make on their own for larger baby dolls like this one!
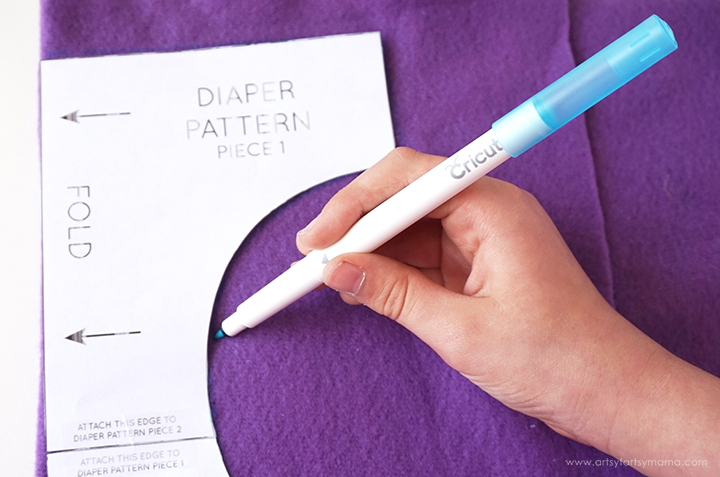
Download and print out the No-Sew Baby Doll Diaper Pattern. Cut it out, and tape the pieces together as directed. Use some fabric that won't fray (I prefer felt, fleece, or flannel), and fold it in half. Line the pattern up on the fold.
*Artsy-Fartsy Mama printables are for PERSONAL USE ONLY (home, school, libraries, etc).
*You may NOT modify, sell, redistribute, or claim the design as your own.
*Please do not remove the credits/watermarks.
*If you'd like to share this project, you may use ONE photo and credit must be given to Artsy-Fartsy Mama and linked back to this post.
Use a washable fabric pen to trace the pattern. If you'd like to make a diaper that you can sew, just add 1/4" all the way around for a seam allowance.
Grab some fabric scissors and carefully cut through both layers of fabric. Just don't cut through the fold!
Open up the diaper and lay it down with the longer edge at the top. Lay the baby down over it, and bring the bottom end up. If the tabs seem too long, you can trim them down.
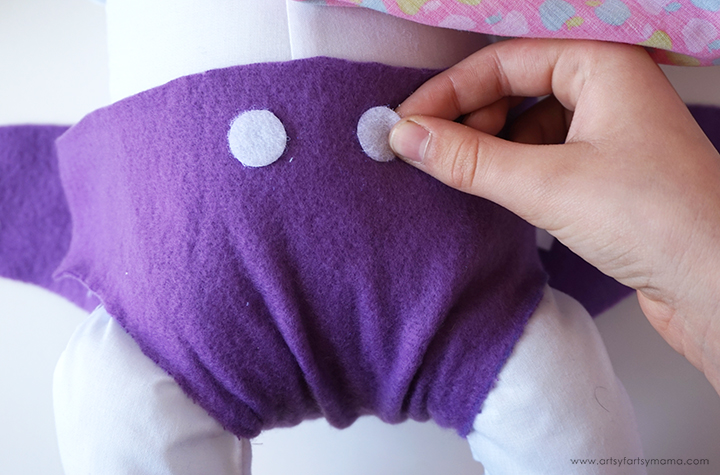
We had some adhesive-backed Velcro circles on hand, and placed the soft sides on the front of the diaper, and the hooked sides on the outer tabs. If you don't have adhesive-backed, you can use some regular and stick it on the diaper with some fabric glue.
To close the diaper, bring the back tabs around to the front and press the Velcro pieces together. You can add more dots of Velcro along the front to make it adjustable, or use a strip of Velcro across the front instead.
These diapers are so quick to make, and there are so many fun fabrics out there! Kids will love being able to make them all on their own, and I think it will definitely help them to feel more independent and self confident.
My daughter is in love with this sweet baby (that she has finally named "Alex"). It was a lot of fun teaching her to make these diapers all on her own, and seeing her take care of her baby. For more baby dolls and information, be sure to visit the Baby's First website and on Facebook!
Did you have a favorite baby doll when you were growing up?
This post is sponsored by BSM Media and contains affiliate links. As always, all opinions are my own.
Circuit Cubes are a fun way to encourage STEM with kids at home!
As a homeschooler, we are always looking for more fun ways to incorporate STEAM (Science, Technology, Engineering, Art, and Math education) activities into our curriculum. My daughter loves putting things together and figuring out how things work. You can also find her right in the middle of all of our home renovations, asking questions and how she can help.
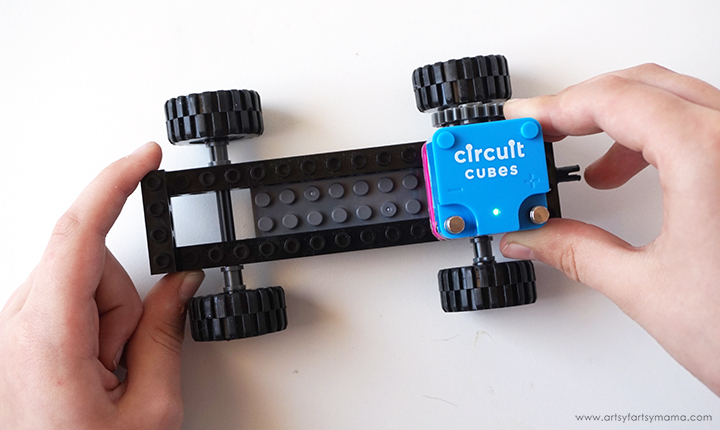
Tenka Labs designs STEM toys like Circuit Cubes for ages 8 and up with the help of STEM teachers. Circuit Cubes are electronic building blocks that are compatible with all major building block brands to encourage creative STEM play. This Whacky Wheels set comes with everything you need to build 5 cars!
The star of all of the Circuit Cubes sets are the cubes themselves. You've got the blue battery cube that is rechargeable, the motor cube, and an LED cube to light up your creations. The motor and LED cubes are semi-transparent for kids to see the technology behind the fun. By combining and mixing up the cubes, you can create all kinds of things that will move and light up to keep your kids entertained AND learning!
The set comes with everything you need, including easy-to-follow instructions, building blocks, wheels, wires, and cutout designs to transform your car into a Mars Rover, a Parade Float, a Deep Sea Explorer or a Monster Truck.
One of the first things we did was play with the cubes themselves to see just what they would do. The battery cube comes with a USB cord so you can charge it up. While it was plugged in, we figured out that a wheel fits perfectly onto one end of the motor cube.
We placed the LED cube on top of the motor cube and quickly twisted the wheel. That created a short burst of power strong enough to light up the bulb! My daughter thought it was SO cool that she could do that without the power of a battery and it lead to a good discussion about WHY it worked.
The easy-to-follow, illustrated instructions make it simple enough for kids to build the car with very minimal adult supervision. The car is built with LEGO-esque parts, which is great because my daughter LOVES building with bricks!
The next step is to connect the motor cube and gear to the frame, and attaching the wheels to the axles. By taking it one step at a time, it helped my daughter to better understand how the car is going to work in the end.
Make sure that the battery cube is charged, then connect it to the top of the motor cube. Turn the switch to "on" and test out the car! You can even add other LEGOs to the frame to create your own car design.
My daughter wanted to transform her car into a Deep Sea Explorer. Each design has easy-to-follow instructions printed on the page so kids can assemble it on their own. Smaller kids will definitely need help cutting out the designs and folding it into shape.
After assembling the Deep Sea Explorer shell, place it on top of the car. It fits perfectly and is so fun to watch it drive around with this new look! I'm sure we'll be assembling the rest of the designs here pretty soon.
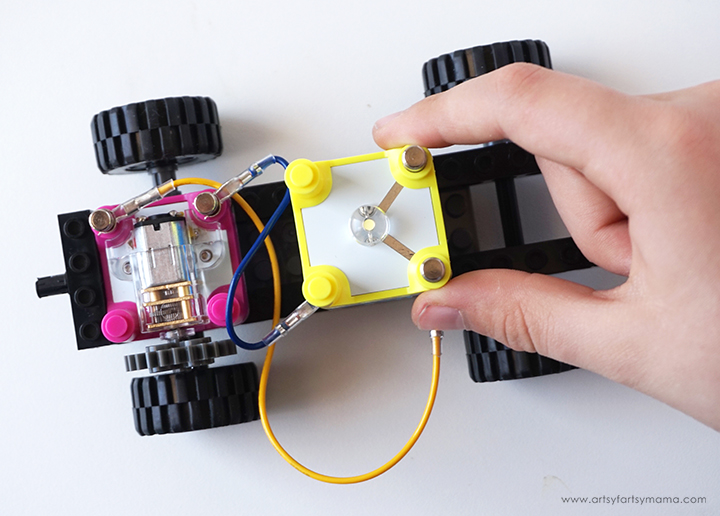
Another fun feature of the Whacky Wheels set is that it includes wires so that you can change up car designs and learn more how circuits work. We kept the motor cube in place, but moved the battery over to see how we could get the car to run with the cubes farther apart.
Next, we added the LED cube to the top of the battery cube in hopes that we could get the three to work together. It took a few tries, but we finally got it to work. This was actually helpful, because it opened the opportunity for troubleshooting and figuring out a solution.
Circuit Cubes are available in three different sets, including Whacky Wheels, Bright Lights, and Smart Art. All provide an opportunity for curiosity, critical thinking, problem-solving, and innovation through engaging and imaginative STEM play. Circuit Cubes are available nationwide by most retailers in stores and online.
Here at Artsy-Fartsy Mama, you'll find a little bit of everything: crafts (even ones for the kids), FREE printables and SVG cut files, easy recipes, educational ideas, travel tips, sewing tutorials, and so much more to add creativity to your life!
Join Our Newsletter!
Let's be friends! Get the latest DIY ideas, recipes and freebies delivered straight to your inbox!