
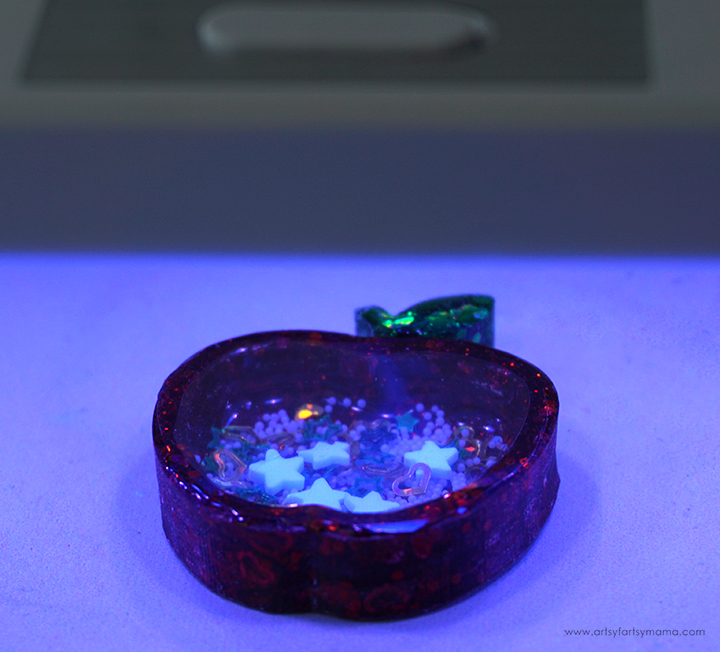
Treat your favorite teacher to a custom Apple Resin Shaker Keychain!
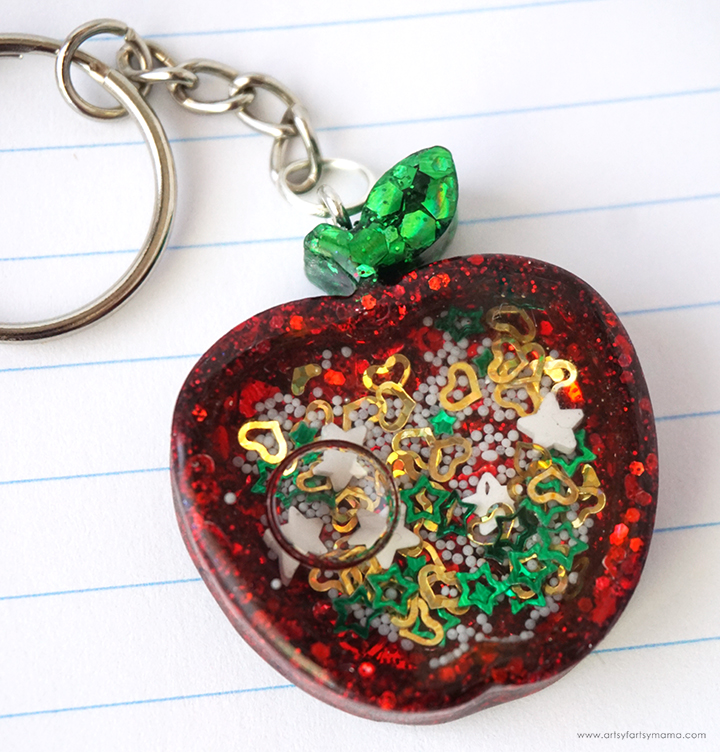
Creating with resin is one of my favorite hobbies, and I especially love making all kinds of shaker keychains! If you aren't familiar with shakers, they are a charms made of resin that are filled with small beads and shaped sequins that move around inside when "shaken". This Resin Apple Shaker Keychain was made with UV resin, which is a new medium for me. I had a lot of fun learning throughout the process and absolutely love the result. This is a great beginner project, and a fantastic gift idea for teachers to receive at back to school night or during Teacher Appreciation week!
Epoxy Resin vs UV Resin
Before I get to the project, I wanted to tell you a little bit about resin vs UV resin. Simply put, one main difference between 2-part epoxy resin and UV resin is in the curing process. Epoxy resin needs time to cure after mixing a resin and hardener together, where UV resin is a one, pre-mixed resin that is only cured via UV light. Because of this, UV resin cures a lot faster than epoxy, but needs to be poured in thin layers instead of how epoxy resin can be done in one deeper pour.
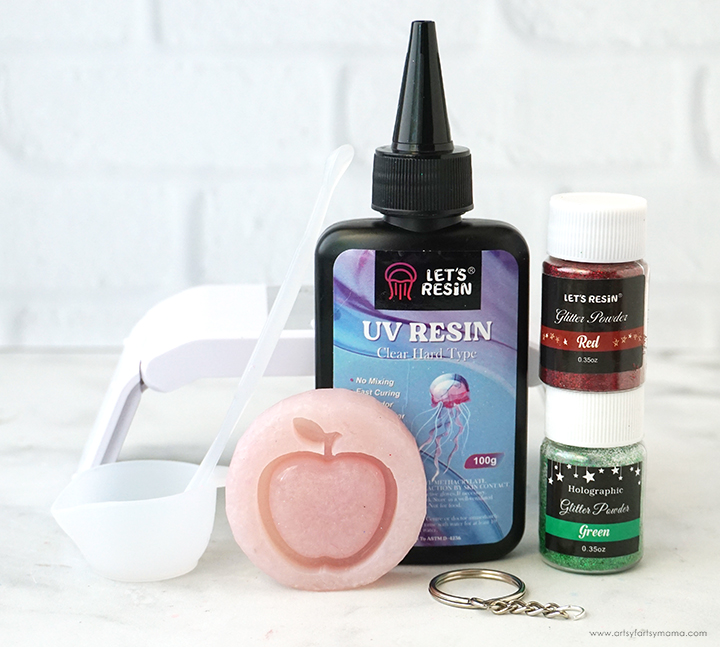
To make your own Resin Apple Shaker Keychain, you will need these supplies:
- Disposable Gloves
- Apple Shaker Mold
- Glitter - red, green
- Shaker Filler - sequins, microbeads, polymer clay slices, etc.
- Toothpick
- Transparency Film
- Permanent Marker
- Hand Drill Tool
- Unscented Baby Oil or Glycerin
- Oiler Bottle
- Jewelry Eye Screw
- Key Ring with Chain
SAFETY FIRST: Before getting started, wear disposable gloves, protect your workspace, and be sure to work in a well-ventilated area!
Like I mentioned, UV resin needs to be cured in thin layers, so this shaker was made using that process instead of pouring the resin all in at once*. The UV Resin Kit I used comes with everything you need to get started - right out of the box: 2 bottles of UV resin, silicone mat, 2 silicone mixing cups, 2 silicone stir sticks, and UV light that folds for easy storage.
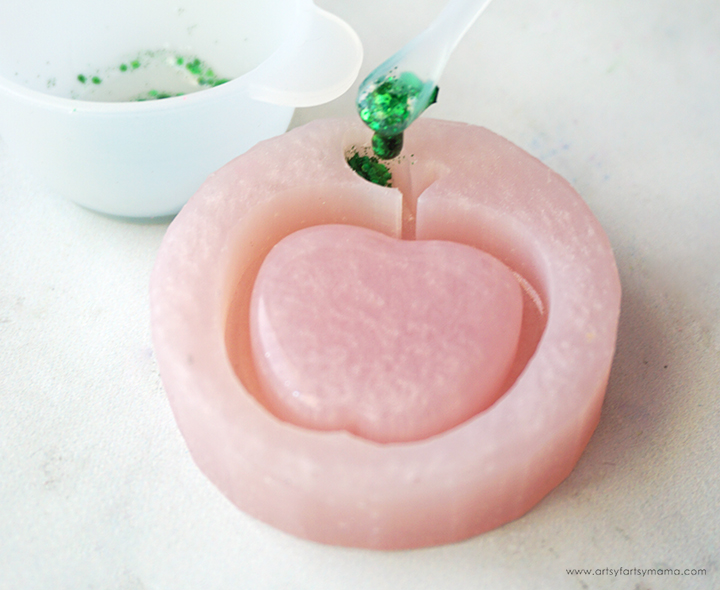
Make sure that the apple shaker mold is clean to start. Pour a little bit of UV resin into one of the included mixing cups. A little bit goes a LONG way! This mixture will be for the stem of the apple, so start with a smaller amount than you'd think. Pour in a little bit of green glitter into the cup, and mix it with the resin using the stir stick.
Spoon a little bit of the resin into the stem part of the mold, filling it no more than 1/4 full. The thinner the layer, the better! Because the resin will be cured immediately under the light, you don't have to worry about the green resin running into the "apple" area.
*Of course, this could be made with 2-part epoxy resin. Check out one of my previous shaker keychains for that tutorial.
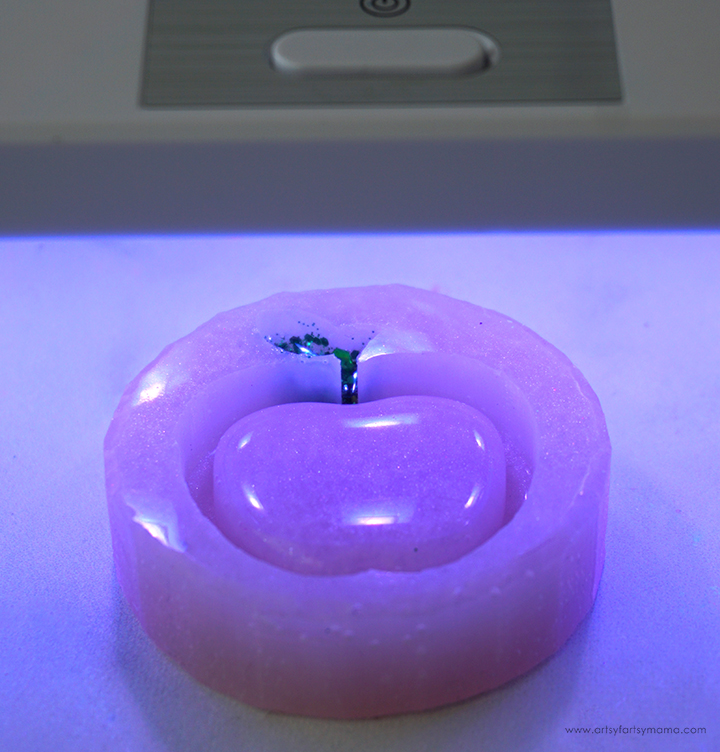
Place the mold underneath the UV light for at least 2 minutes. The resin should cure completely during this time, but DO NOT remove the resin from the mold afterward.
Be sure to keep the mixing cup with the excess resin in it away from the light to prevent it from curing.

In the other mixing cup, mix together some UV resin and red glitter. Stir until evenly combined. Spoon the resin into the bottom of the apple portion of the mold, filling it no more than 1/4 of the way. Don't worry if you spill into other areas (except the stem). Since you're working in layers, it will all be covered eventually.

Place the mold underneath the UV light for at least 2 minutes. The resin should cure completely during this time, but DO NOT remove the resin from the mold afterward.
Again, be sure to keep the excess resin in it away from the light!

Repeat the process, alternating pouring the stem and the apple portions. Cure each thin layer fully, and repeat until the mold has been filled to the top. Be careful to not to overfill.

Because the resin has cured along the way, you don't have to wait to pop the apple out of the mold! Trim away any over-poured resin around the edges with scissors or a craft knife.
If for some reason the front, or "face", of the project isn't completely cured on the first layer, don't panic. Be careful not to touch it, and put the piece under the UV light to cure the surface completely. The surface may not be completely smooth, but don't worry.
If the inside of the apple has the same issue of not being completely cured, apply a thin layer (clear or red glitter) over the area and cure it under the light for a few minutes for a smooth finish.
Things I learned:
- Clear molds are 100% better to use with UV resin than opaque. If you are using an opaque mold, put the resin under the light for longer, and use THIN layers!
- If you want to test out curing times, add one layer of resin to the mold and then remove it afterward.
- If you have any resin left over, use it on another project or cure it in the mixing cup under the UV light. If you are using a silicone mixing cup, the cured resin will pop right out for easy clean-up.
- Re-cure the "face" of your project if it isn't cured after demolding. Put the mold under the light as well to clean any uncured resin out of it. (#1 makes a little more sense now, right?)

Fillers are what make shaker charms so much fun! There are SO many options out there, like chunky glitter, microbeads, and so much more. Get creative and have fun with it! I used a mix of microbeads, sequin/confetti shapes, and polymer clay star slices.

Cut a small square of transparency film and place it on top of the charm. Carefully trace the opening with a permanent marker. Cut the transparency film along the tracing. Remove the marker lines with a little bit of alcohol and a lint-free cloth.

Use a toothpick to apply a thin line of UV resin around the top edge of the apple. Place the transparency film cutout over top and press it down well.
Place the charm under the light for a couple of minutes. Make sure that the edges of the transparency are completely sealed. If there are any gaps, the charm will leak! If you need to cover any areas to stick back down, use the toothpick to re-apply resin and then cure it again.

Lay the charm flat on its back. Carefully cover the top of the charm with UV resin and use a toothpick or a stir stick to drag the resin to the edges. Be careful to not spill any resin over the edges. This will give your charm a smooth "domed" top that also completely seals the edges of the transparency film. Use a lighter or spritz the surface with alcohol to remove any bubbles.
Place the charm under the light for a couple of minutes until the dome layer is completely cured.

You can keep the charm as-is and give it a shake, but I prefer to give the shaker charm a "waterfall" effect, which makes the fillers slowly float back down to the bottom. To do this, you need to fill the charm with baby oil or glycerin.
Since the opening of the charm has been sealed off, we need to make an opening to fill it. Turn the charm over and use a hand drill tool to carefully drill down through the back of the charm. You can actually drill the hole anywhere on the charm (I usually drill at the top), but I've found that drilling the back side is a lot easier.

Fill an oiler bottle with baby oil or glycerin. Put the needle through the opening and slowly squeeze the bottle to fill the charm with the oil. Take your time - sometimes the oil will go back up through the opening and spill out everywhere!
With the needle still in the charm, hold the charm up to see how full it is. Once full, lay the charm back down and slowly pull the needle back out. Clean up any oil residue from the back of the charm with a paper towel.

Dome the back of the charm the same way as the front. Keep the layer thin, and use a toothpick or stir stick to bring the resin to just the edges. Not only will this make the charm look professional, but it will permanently seal up the drilled hole at the same time!
Place the charm under the light for a couple of minutes until completely cured.

Use the hand drill to make a small hole in the stem of the apple charm. Remove the drill, and then twist an eye screw into the hole. For a permanent hold, put some super glue on the screw before putting it in.

I would love to hear what you think about this Apple Shaker Keychain! As always, if you make any of these projects for yourself, I'd love to see your creations! Tag me on Instagram and Facebook, or leave a comment/photo on the project pin on Pinterest #AFMCrafts!
Looking for more back to school inspiration?
Check out this collection of OVER 100 creative back to school craft ideas!!
Don't Forget to Pin, Like, and Share!


