
Looking for the perfect teacher gift? Make a customized sign that the students can autograph!

To make your own Teacher Appreciation Sign to be autographed by students, you'll need these supplies:

Open the Teacher Appreciation Sign project in Design Space. Click "Customize" to go into the canvas to customize the project for your own teacher. Here, you can make edits to paper colors, project size, and most importantly - change the teacher's name to your own teacher.
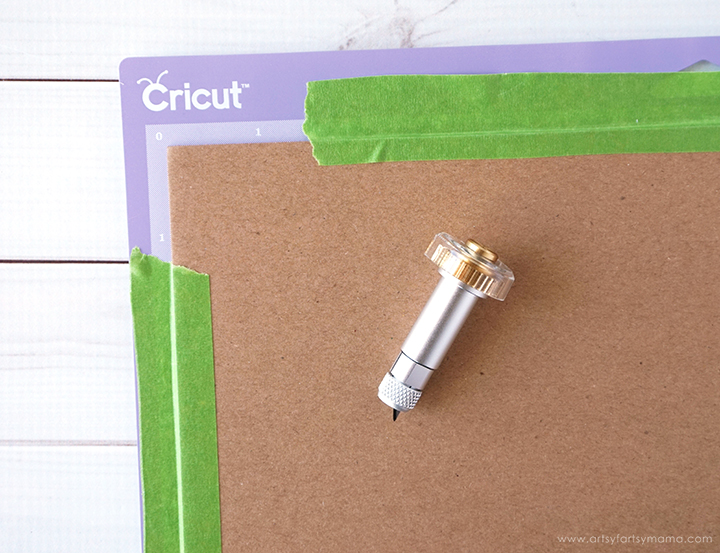
To cut chipboard, you need to use the Knife Blade. This blade is similar to a craft knife, and allows your machine to cut through thicker materials with precision.
*Learn all about the Cricut Knife Blade in this post!
You'll also need to take a few precautions before getting started to ensure you get a successful cut. First, you need the StrongGrip Mat (purple), which is the stickiest mat there is to keep heavy materials in place. Place the chipboard in the top left corner of the mat, and use a brayer to press it on well. The Knife Blade cuts in multiple passes (like you would with a craft knife), so I recommend using some masking tape around the edges of the chipboard to make sure nothing shifts during the cutting process.
Before cutting, be sure to change the material setting to "Chipboard 2mm". Install the Knife Blade into your machine by opening the Adaptive Tool System clamp B and place the blade inside, aligning the gears together. Close the clamp to secure the housing. Move the white star wheels on the roller bar all the way to the right, and then load the mat into the Maker.

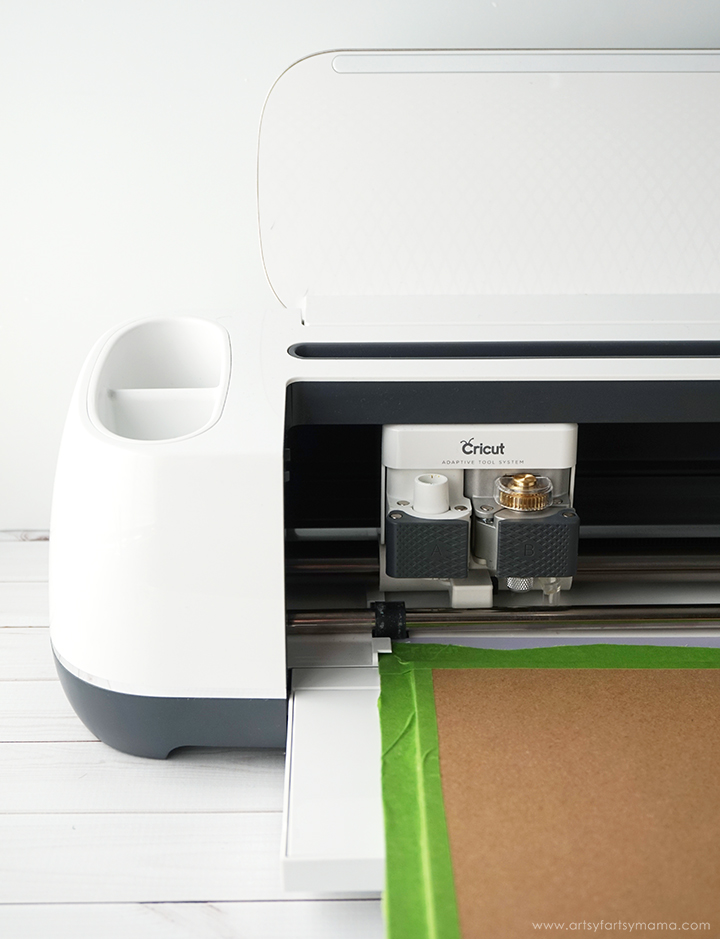
You'll need a little bit of extra time for this part of the cut because of the multiple passes. Make sure you have a strong bluetooth connection, or connect directly to your machine by cord if needed. Also make sure that your computer doesn't "sleep" during the cutting process. If you lose connection, you'll have to start over.
The machine defaults to 20 passes, but you can pause the cut (do NOT unload the mat) and check the chipboard to see if it has cut through before then. I noticed mine was finished cutting through at about 10-11 passes.


Next, change the material setting to cardstock. Move the white star wheels on the roller bar back into place and load the mat into the machine. You'll be prompted to replace the Knife Blade with the Fine Point Blade, and add the 0.4 black Pen into clamp A. Place the shimmer paper on a mat (green) and load the mat into the machine. The Maker will do all of the cutting and writing for you in one step!

Carefully remove the paper from the mat. The ink will take some time to dry, so be careful so that you don't smudge the writing. Add some lines of tape runner or a good paper glue around the front edges of the shimmer paper piece. Place the paper behind the chipboard so that the wording is centered in the apple cutout. To keep the paper in place and add some reinforcement, I also added some pieces of tape around all sides of the back of the paper.

When the Maker writes some of the fonts, it just traces an outline. That looks great on some projects, but I wanted it filled in. Use the Pen and carefully color in the lettering. Make sure you are careful not to touch the paper with your hands so that you don't smudge the ink!


Add some lines of lines of tape runner or thin amounts of paper glue around the front of the chipboard. Carefully lay the cardstock on top, lining up the apple cutouts. Press the sign down flat and make sure to remove any air bubbles. If you have any edges popping up, you can add a little more tape or glue and then lay a heavy book on top while it dries.
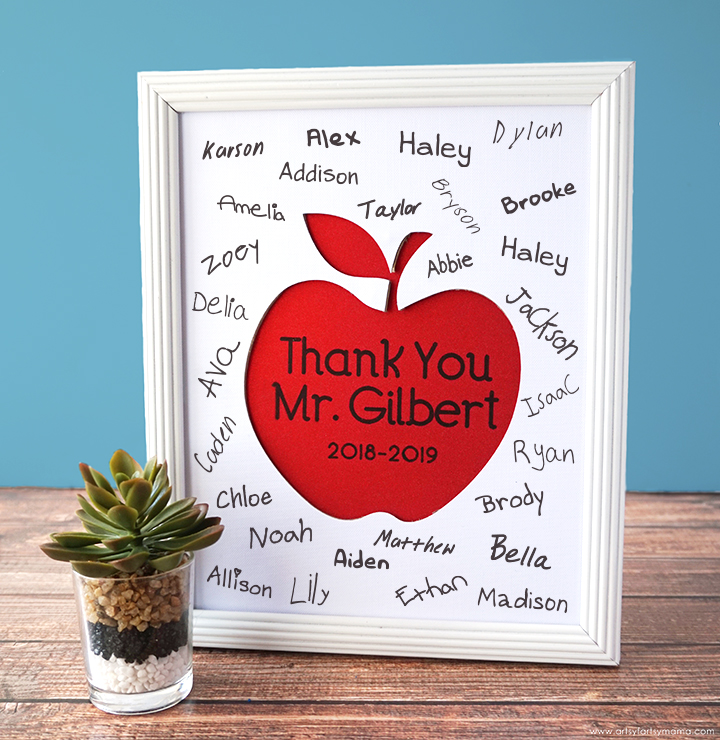
Take the sign into the classroom and have all of the students sign on the cardstock with a pen or marker. I created the sign to be 8" x 10" so that you can fit into a frame if you want. If not, you could easily place a picture hanger or command strip to the back so that the teacher can easily put it on display.
This is such a unique gift that you can make for your child's teacher (that also doesn't cost a lot of money). It will definitely be a gift that teachers can treasure for years to come and won't take up a lot of space. I love that it also incorporates the students in the class to really make it special!
Pin this project:

Who was your favorite teacher in school?


Will this work on a Cricut Air Explore? I don't have the Cricut Maker, unfortunately
ReplyDelete