
My baby is growing up too fast. While it's exciting to watch her grow and become her own little person, it makes me a little sad. We put away the crib this last week and she's been sleeping in a big girl bed for a couple months now. So, time for a big{ger} girl room! I am kind of basing the design around her rag quilt, so it's kind of a purple, pink & teal fairy theme - hence the fairy stitcheries I made a couple weeks ago. Plus she has the purple Tinkerbell bed set, so the fairy theme just kind of made sense to me.
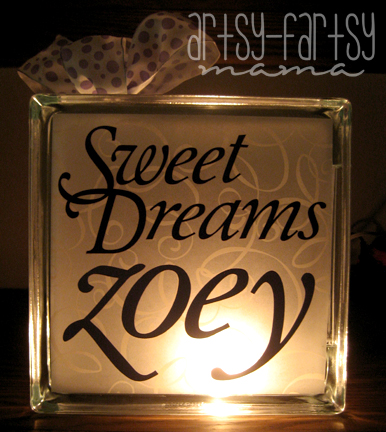
Since we moved the crib, it also left her plug-in night light in the open. It didn't last long, she unplugged it within minutes after putting her down for a nap. We needed a safer and more sensible option. I was deciding which night light from IKEA to pick for her room since they were an inexpensive AND cute option. Then it came to me... why not make my own??!! So, I did.
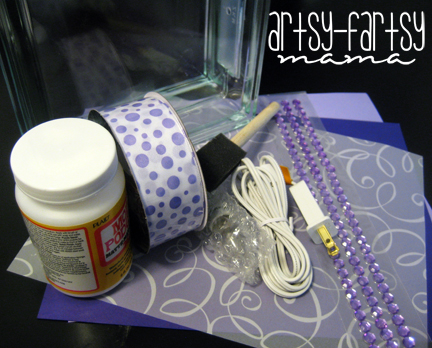
What you need:
- Glass block (I got mine at Hobby Lobby. I recommend going when glassware is 50% off. You could also use a 40% off coupon when glassware isn't on sale)
- Vellum scrapbook paper, with or without a design
- Stickers, cardstock or vinyl for words. I used my Silhouette to cut the letters out.
- Ribbon to tie around the block
- Light for inside the block (they have lights at Hobby Lobby next to the glass blocks. You can choose a string of lights or one bulb. I went for the single bulb.)
- Mod Podge
- Foam brush
We headed to Hobby Lobby that very day and bought all the supplies. This is a very affordable project. Even after buying everything I needed, I only spent about $12. I also ended up needing:
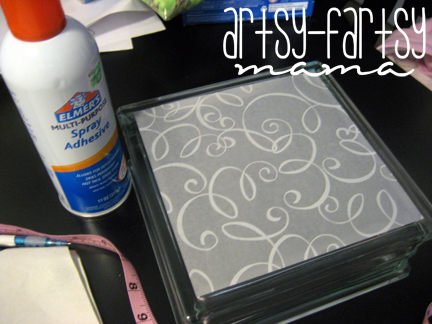
SPRAY GLUE. This was round 2 of gluing down vellum. First round, I painted the front of the glass block with Mod Podge and also the back of the vellum. Immediately the vellum curled on itself, and as soon as I laid it on the glass it bubbled. It dried before I could attempt to smooth out the bottom. I was so mad I didn't even take a picture of the mess. I washed it off and cleaned the glass. We went to the store the next day and bought spray glue and more vellum.

Spray the back of the vellum with spray glue, following the instructions on the label. I immediately & carefully placed it on the front and used my Silhouette vinyl scraper to smooth it out and get the air bubbles out. Worked great!

Next, I cut out my letters with the Silhouette and practiced arranging them on the block a couple times. Once they were how I wanted, I Mod Podged/glued them on one at a time. Vinyl would have probably been MUCH easier and faster, but I didn't want to buy two whole rolls for such a small project (yes, I am cheap like that). The cardstock worked fine, and I was proud of myself after I was done!

Personally, I thought the jewels would be a little too much, so I didn't use them. I wrapped the ribbon around the block and tied a bow on top. The side of the block has an opening with a removable piece of plastic. Pop the lid off and insert your light(s).


That is adorable!!
ReplyDeleteLindsay, I wish I had half your crafty ideas! I get so overwhelmed when in a craft store I have no idea where to begin. This is such a cute fun project, I want to make one now! Great job!
ReplyDeleteThis is so adorable, love this and plan to make some! What a great baby shower gift this would be. Thank you for sharing!
ReplyDeleteI absolutely love this idea! I hope to make one soon for my little girl and oh my goodness I totally know what you are talking about when it comes to them growing up fast! My little girl is 14 months now and it's flying by so fast. I am now following you from the House of Hepworths party! Come by and visit me at crossmyheartartdesigns.com.
ReplyDeleteYou have a ton of GREAT ideas! So glad I found your blog. I am a new follower. I cannot wait to read more! Have a great weekend!
ReplyDeleteKaren @ http://barefootinportland.blogspot.com
This is so neat! It's always been hard for me to find affordable night lights that I like- I never thought about making one myself! Great idea!
ReplyDeleteThat turned out wonderful!
ReplyDeleteHow absolutely adorable! I have never seen such a darling personalized night light before and you did a fabulous job. Thanks so much for linking this up to Inspiration Friday this week!
ReplyDeleteVanessa
I love this!! Great idea.
ReplyDeletedanielle
Just found your blog through Wildflowers and Whimsy! So happy I did :) Your night light is amazing. I want/need to make one for our long dark hallway You have so many great ideas so I am following you! Thanks so much for sharing this!
ReplyDeleteThat is a really cute idea!!
ReplyDeleteThanks so much, everyone! Your comments are so sweet. Also, thank you for your support in visiting and following my blog! Love having you here! :)
ReplyDeletethis is amazing!..... you are a sweet mom.... will follow you then.... when I will be a mom I know I will learn a lot from your blog. CHeers!
ReplyDeleteSo cute, and pretty simple! Stopping by from Tuesday timeout party! Fabulous!
ReplyDelete~Iffy~
www.stayathomenation.blogspot.com
This is such a brilliant idea...beautiful and simple enough to make...child safety proof too! I came across your post thru "Sew Can Do". Your new follower from Malaysia...PC..Do check out my blog too!
ReplyDeleteI love this... very good idea. Actually my sons nursery needs a small night light of some sort cause at night it's impossible to see. But, you don't want to turn on the overhead light because that simply wakes him up too much lol.
ReplyDeleteI'm following you from Sugar Bee Crafts linking party. Please follow me at:
www.daughterbydesign.blogspot.com
That is so cute. Your blog is really inspiring. Thanks.
ReplyDeletethis a really sweet idea. I love that it's personalized. great blog!
ReplyDeleteI'm a new follower
kathryn
thedragonsfairytail.blogspot.com
Oh my gosh, I love this!! I'm a new follower and so glad I found you from Hoo Are You! I'll be featuring this on Saturday.
ReplyDeletewww.acreativeprincess.blogspot.com
Wow! So creative! So simple! Love it! I must make one immediately! :)
ReplyDeleteThis is a terrific nightlight.
ReplyDeleteDee
Your new follower
Very cute!
ReplyDeleteThank you so much for linking up to {nifty thrifty sunday}!
I hope to see you again this week! :)
xoxo,
Vanessa @ {nifty thrifty things}
This is so sweet! I love the colors and details here. What a wonderful night light! Saw you at Blue Cricket and Hoo's got Talent - so glad you shared!
ReplyDeletebeautiful, thanks again for linking.
ReplyDeleteThis is Fabulous, I have a friend having a baby soon and a few of these blocks left over from christmas long ago as decoration. I am going to be able to reuse, you have made me a happy girl!!!
ReplyDeleteSuper cute! What font is that?
ReplyDeleteI just wanted to let you know that I love your project and I featured it today at "You Sew Rock Me Fridays" on my blog. You can see it here: http://www.sewrockin.com/2011/12/02/you-sew-rock-me-fridays-7/
ReplyDeleteAwesome job, I can't wait to see what else you come up with!
Jamie @ sewrockin.com
Oh! This is adorable!
ReplyDeleteThis is such a cute idea and I love the font you used....what is the name of it? Amazing work!!!
ReplyDeleteI love this, it would make a great gift! I'm trying to get a jump on the holidays with homemade gift ideas.
ReplyDeleteI would love it if you would share this at my new 12 Days of Christmas in July linky party. You can link up here:
http://theprudentpantryblog.blogspot.com/2012/07/twelve-days-of-christmas-in-july-linky.html
I can’t wait to get organized for a peaceful and frugal holiday season!
I really loved this cute idea. But I made it tonight, and I had a problem with the vellum. I spray glued the back of the vellum, just like you stated. Then Mod Podged the letters down. My vellum bubbled up. I don't know what I did wrong. I really think this is the cutest crafts. Any ideas to help fix it?
ReplyDeleteI tried using the spray adhesive and once I mod podged the letters on the vellum bubbled up. Any suggestions?
ReplyDeletethank you for sharing with us i have a quesion what size is the glass block? and as you put the lights in through the circle is it suposed to be towards the bottom and then the ribbon?
ReplyDeleteI'm glad I'm not the only one who tried to modge podge something vellum and it failed miserably! Thanks for sharing!
ReplyDeleteThank you so much!! I had found these pictures everywhere and either they were for sale or didn't have the instructions, but you have everything. Again Thank You for making my life a lot easier. :)
ReplyDeleteI loved this idea when I saw it several months ago. Last night my youngest three daughters made one to give to their oldest sister & her fiance who are getting married this Saturday with their names and the wedding date on it. It did bubble up in the middle even though they used spray glue. They did put modge podge around the edge of the vellum to make it stay down better. They put decorative black trim from the fabric store around the edge of the vellum to help hold it down. It looks fantastic!!!! We're hoping they set it on the gift table at the wedding. Thanks for your creativity!
ReplyDeleteIt seems like a pretty good project. The design was simple yet adorable. Nice post.
ReplyDeleteHi, I just found this on Pinterest, and I LOVE IT. I got all my supplies but wondered: do you put the vellum on the back as well?
ReplyDeleteI got a silhouette for Christmas and havent had the down time or money to spend on any of the creative projects floating around in my head. I finally pulled it out of the box and was determines to make some mother's day gifts. I loved the idea of the block night light but felt like something was missing! I found your blog pinned and new I had to try it. I saw a few comments with people saying they had trouble with the vellum, and I did at first. I used a can of loctite spray adhesive and followed the directions of spraying it about 8/10 inches from the paper. I then placed it into place starting from the top, and working my way down the side to the bottom. I also sprayed just a tiny bit on each side ON TOP of the paper and rubbed it in the corners to help keep it in place! It worked wonders for me! HOWEVER!! I bought and tried two different types of vellum. The slightly thicker solid color (I used a VERY pretty almost frosted looking piece) and a thinner more decoritve one like the one in this post. The solid one would not stick as well for me and actually torn up more (which surprised me) when I tried pushing the bubbles out with my fingers. The thin one worked amazing!! Another tip it to let it dry for maybe an hour or more before adding anything ontop of it. I was able to work out more little kinks after it dried longer. It worked out so much easier. I hope I was able to help, and thank you SO much for this post! I know the women in my life will love their gifts!!
ReplyDelete